background image

Содержание 486.242101

Страница 1: ...Source 247 Tractors CAUTION Before using this product read this manual and follow all Safety Rules and Operating Instructions TOOLS NEEDED FOR ASSEMBLY 7 16 Wrenches 2 1 2 Wrench 2 5 8 Wrench 1 1 2 Socket Wrench and Extension 1 Sears Roebuck and Co Hoffman Estates IL 60179 U S A www sears com craftsman PRINTED IN U S A FORM NO 41990 3 21 11 ...

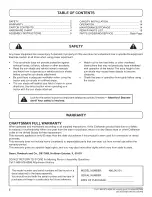
Страница 2: ...efore using the tractor Look for this symbol to point out important safety precautions It means Attention Become alert Your safety is involved 1 WARRANTY CRAFTSMAN FULL WARRANTY When operated and maintained according to all supplied instructions if this Craftsman product fails due to a defect in material or workmanship within one year from the date or purchase return it to any Sears store or other...

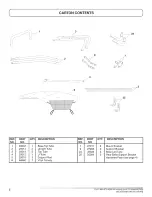
Страница 3: ... Top Tube 25014 2 Upright Tube 25013 2 Top Tube 25012 1 U Tube 25015 3 Support Rod 48660 1 Vinyl Canopy 1 2 3 4 5 6 7 27017 9 27263 24 49325 25 25304 2 2 2 2 Mount Bracket Support Bracket Base Leg Tube Rear Base Support Bracket Hardware Pack see page 4 3 Call 1 866 576 8388 for missing parts or assembly help DO NOT RETURN TO STORE ...

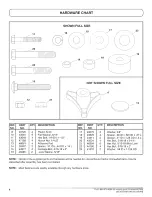
Страница 4: ...21 46584 6 Spacer 31 ID x 44 OD x 14 L 22 44180 4 Carriage Bolt 5 16 18 x 2 23 41370 2 Lock Washer 5 16 Washer 3 8 Spacer 38 ID x 62 OD x 27 L Spacer 41 ID x 1 25 OD x 5 L Hex Bolt 5 16 18 x 2 1 4 Hex Nut 5 16 18 Whiz Lock Hex Bolt 5 16 18 x 2 Washer 59 ID x 1 125 OD NOTE Not all of the supplied parts and hardware will be needed for one particular tractor Unneeded items may be discarded after asse...

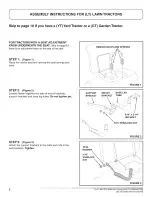
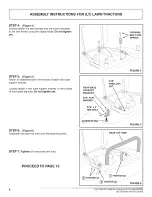
Страница 5: ...ve the seat springs and bolts STEP 2 Figure 2 Loosely fasten together two sets of mount brackets support brackets and base leg tubes Do not tighten yet STEP 3 Figure 3 Attach the support brackets to the bolts and nuts in the seat brackets Tighten REMOVE BOLTS AND SPRINGS J _ IG URE 1 SUPPORT BRACKET MOUNT BRACKET BASE LEG TUBE 5 16 x 2 1 4 HEX BOLT 5 16 WHIZLOCK NUT 59 ID WASHER 5 16 WHIZLOCK NUT ...

Страница 6: ...tach a rear base support bracket to the outside of each base leg tube Do not tighten yet STEP 6 Figure 6 Assemble the base top tube onto the base leg tubes STEP 7 Tighten all loose bolts and nuts PROCEEDTO PAGE 13 ORiGiNAL BOLT AND SPRING FIGURE 4_ REAR BASE SUPPORT BRACKET 5 16 WHIZLOCK NUT 5 16 FLAT WASHER X 5 16 x 2 HEX BOLT FIGURE 5 BASE TOP TUBE TIGHTEN 4 TIGHTEN 2 _ TIGHTEN 2 _ _ J FIGURE 6 ...

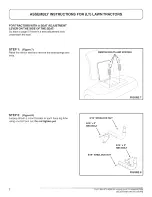
Страница 7: ...t STEP 1 Figure 7 Raise the tractor seat and remove the seat springs and bolts REMOVE BOLTS AND SPRINGS FIGURE 7 STEP 2 Figure 8 Loosely attach a mount bracket to each base leg tube using one bolt and nut Do not tighten yet 5 16 WHIZLOCK NUT 5 16 x 2 HEX BOLT 5 16 x 2 HEX BOLT 5 16 WHIZLOCK NUT FIGURE 8 7 Call 1 866 576 8388 for missing parts or assembly help DO NOT RETURN TO STORE ...

Страница 8: ... 4 HEX BOLT LEFT SIDE FIGURE 9 STEP 4 Figure 10 Attach the support brackets to the bolts and nuts in the seat brackets Tighten 14 SPACER 3 8 WASHER ORIGINAL BOLT STEP 5 Figure 11 Loosely attach the seat springs to the mount brackets and the rear fender Do not tighten yet f 5 16 2 HEX BOLT J 5 16 LOCK WASHER 18 SPACER SEAT SPRING 1g SPACER FIGURE 11 8 Call 1 866 576 8388 for missing parts or assemb...

Страница 9: ... attach a rear base support bracket to the outside of each base leg tube Push the bracket down against the fender Do not tighten yet REAR BASE SUPPORT BRACKET 5 16 WHIZLOCK NUT ADHESIVE PAD FIGURE 12 STEP 7 Figure 13 Assemble the base top tube onto the base leg tubes STEP 8 Tighten all loose bolts and nuts PROCEEDTO PAGE 13 BASE TOP TUBE 9 Call 1 866 576 8388 for missing parts or assembly help DO ...

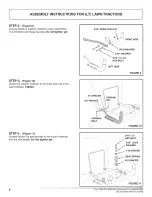
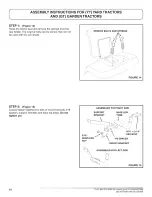
Страница 10: ...ot be used with the sun shade REMOVE BOLTS AND SPRINGS I STEP 2 Figure 15 Loosely fasten together two sets of mount brackets 18 spacers support brackets and base leg tubes Do not tighten yet ASSEMBLED FOR RIGHT SiDE SUPPORT BASE LEG BRACKET TUBE 5 16 WHIZLOCK NUT 5 16 x 2 1 4 HEX BOLT 18 SPACER MOUNT BRACKET FIGURE 15 10 Call 1 866 576 8388 for missing parts or assembly help DO NOT RETURN TO STORE...

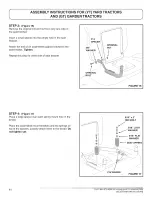
Страница 11: ...eat bracket Tighten Repeat this step for other side of seat bracket 14 SPACER 3 8 WASHER ORiGiNAL NUT FIGURE 16 STEP 4 Figure 17 Place a large spacer over each spring mount hole in the fender Place the assembled mount brackets and the springs on top of the spacers Loosely attach them to the fender Do not tighten yet 5 16 x2 HEX BOLT LOC WASHER _ __ 5 16 FLAT WASHER SEAT SPRING 19 SPACER FIGURE 17 ...

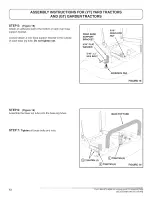
Страница 12: ...se support bracket to the outside of each base leg tube Do not tighten yet 5 16 REAR BASE WHIZLOC SUPPORT NUT BRACKET 5 16 FLAT WASHER STEP 6 Figure 19 Assemble the base top tube onto the base leg tubes STEP 7 Tighten all loose bolts and nuts BASETOP TUBE Q TIGHTEN 2 _ TIGHTEN 4 Q TIGHTEN 2 FIGURE 19 12 Call 1 866 576 8388 for missing parts or assembly help DO NOT RETURN TO STORE ...

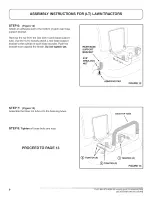
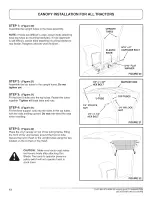
Страница 13: ...Tighten all loose bolts and nuts STEP 4 Figure 21 Fit the three support rods into the holes in the top tubes with the rods arching upward Do not over bend the rods when installing 1 4 x 1 1 2 HEX BOLT U TUBE 1 4 NYLOCK NUT 1 4 1 1 2 HEX BOLT SUPPORT ROD TOPTUBES 1 4 NUT FIGURE 21 STEP 5 Figure 22 Place the vinyl canopy on top of the tubing frame fitting the front of the vinyl canopy around the fro...

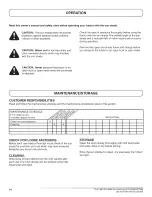
Страница 14: ...er while the sun shade is attached MAINTENANCE STORAGE CUSTOMER RESPONSiBiLiTiES Read and follow the maintenance schedule and the maintenance procedures listed in this section MAINTENANCE SCHEDULE _ _o_ Fill in dates as you __ _ ee_ _ _ complete regular service _ __ Service Dates Check for loose fasteners X Cleaning X X CHECK FOR LOOSE FASTENERS Before each use make a thorough visual check of the ...

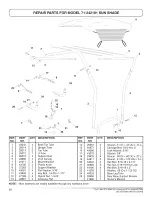
Страница 15: ... 44180 10 43081 4 Flat Washer 5 16 23 41370 11 43648 4 Hex Bolt 1 4 20 x 1 1 2 24 49325 12 47189 4 Nylock Nut 1 4 20 25 25304 13 48661 4 Adhesive Pad 41990 NOTE QTY DESCRiPTiON 2 2 2 2 4 2 4 6 4 2 2 2 1 Spacer 31 ID x 44 OD x 14 L Carriage Bolt 5 16 18 x 2 Lock Washer 5 16 Washer 3 8 Spacer 38 ID x 62 OD x 27 L Spacer 41 ID x 1 25 OD x 5 L Hex Bolt 5 16 18 x 2 1 4 Hex Nut 5 16 18 Whiz Lock Hex Bol...

Страница 16: ...ears ca Our Home For repair of carry in items like vacuums lawn equipment and electronics call anytime for the location of your nearest Sears Parts Repair Service Center 1 800 488 1222 U S A 1 800 469 4663 Canada www sears com www sears ca To purchase a protection agreement on a product serviced by Sears 1 800 827 6655 U S A Para pedir servicio de reparaci6n a domicilio y para ordenar piezas 1 888...

Отзывы: