background image

Содержание 315.117270

Страница 1: ...l for future reference A WARNING To reduce the risk of injury the user must read and understand the operator s manual before using this product Customer Help Line 1 800 932 3188 Sears Roebuck and Co 3333 Beverly Rd Hoffman Estates IL 60179 USA Visit the Craftsman Web page www sears com craftsman 983000 261 9 03 ...

Страница 2: ... sander has many features for making the use of this tool more pleasant and enjoyable Safety performance and dependability have been given top priority in the design of this belt sander making it easy to maintain and operate A WARNING Do not attempt to use this product until you read thoroughly and understand completely the operator s manual Pay close attention to the safety rules including Danger...

Страница 3: ...with your finger on the switch or plugging in tools that have the switch on invites accidents Remove adjusting keys or wrenches before turning the tool on A wrench or a key that is left attached to a rotating part of the tool may result in personal injury Do not overreach Keep proper footing and balance at all times Proper footing and balance enables better control of the tool in unexpected situat...

Страница 4: ...other conditions that may affect its operation A guard or other part that is damaged should be properly repaired or replaced by an authorized service center Following this rule will reduce the risk of shock fire or serious injury Do not abuse cord Never carry the tool by the cord or yank it to disconnect it from the recep tacle Keep cord away from heat oil and sharp edges Following this rule will ...

Страница 5: ...s The purpose of safety symbols is to attract your attention to possible dangers The safety symbols and the explanations with them deserve your careful attention and understanding The safety warnings do not by themselves eliminate any danger The instructions or warnings they give are not substitutes for proper accident prevention measures SYMBOL MEANING A DANGER Indicates an imminently hazardous s...

Страница 6: ...a precision built electric motor It should be connected to a power supply that is 120 volts 60 Hz AC only normal household current Do not operate this tool on direct current DC A substantial voltage drop will cause a loss of power and the motor will overheat If your tool does not operate when plugged into an outlet double check the power supply EXTENSION CORDS The use of any extension cord will ca...

Страница 7: ...ials Smoothing rough boards chamfering rounding edges etc Removing rust paint varnishes and stains FEATURES Before using the belt sander familiarize yourself with all operating features and safety requirements However do not let familiarity with the tool make you careless A WARNING Exercise caution when using the belt sander Careless actions for even a fraction of a second can result in serious pe...

Страница 8: ...FEATURES DUST COLLECTION BAG FRONT HANDLE SANDING BELT TRACKING KNOB Fig 1 8 ...

Страница 9: ...s uniform USING SANDING BELTS TO INSTALUCHANGE SANDING BELTS See Figures 2 3 and 4 Follow these steps to install or change sanding belts Unplug the sander AWARNING Failure to unplug the tool could result in serious injury due to accidental starting Position the sander on its side with the cord on t he left AWARNING Keep hands and fingers clear of both rollers and spring mechanism at all times Fail...

Страница 10: ...aking belt tracking adjustments ACAUTION If the sanding belt wears excessively on the inner edge it is probably adjusted too far inward and is rubbing against internal parts If this is the case readjust the tracking knob Start the sander and fine adjust the tracking knob until the belt stabilizes AWARNING Keep hands and fingers away from a moving sanding belt Any part of the body coming in contact...

Страница 11: ...while sanding and never store or leave a sander without totally emptying its dust bag Also follow the recommendations of the coatings manufacturers Follow these steps to empty the dust collection bag Unplug the sander A WARNING Failure to unplug the tool could result in serious injury due to accidental starting Remove the dust collection bag from the sander Unzip the dust bag Shake out the dust Zi...

Страница 12: ...esult in an uneven surface A WARNING Keep a firm grip on the sander with both hands at all times Failure to do so could result in loss of control leading to possible serious injury We designed the sander to provide the proper weight on the sanding belt Excessive pressure will result in the following Uneven work Clogged sanding belts Premature sanding belt wear Possible motor burnout Irregular sand...

Страница 13: ...nding belt for heavy sanding not heavy pressure The weight of the tool is sufficient to provide adequate pressure at the correct location The front roller of the sander is not designed for con tour sanding Sanding on the front roller could cause irregularity in the sanding belt tracking SETTING THE BELT SANDER SPEED Refer to the chart below for belt sander speed selections SPEED BELT GRIT MATERIAL...

Страница 14: ... not at any time let brake fluids gasoline petroleum based products penetrating oils etc come in contact with plastic parts They contain chemicals that can damage weaken or destroy plastic Electric tools used on fiberglass material wallboard spackling compounds or plaster are subject to accelerated wear and possible premature failure because the fiberglass chips and grindings are highly abrasive t...

Страница 15: ...NOTES 15 ...

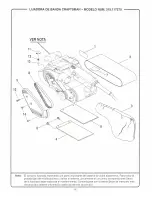
Страница 16: ...te The assembly shown represents an important part of the double insulated system To avoid the possibility of alteration or damage to the system service should be performed by your nearest Sears repair center Contact your nearest Sears retail store for service center information 16 ...

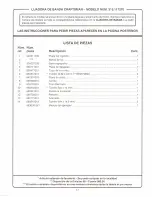
Страница 17: ...1 5 590477001 6 660312001 7 940301005 8 590560001 9 900720001 10 660272001 11 590481001 12 690725001 13 680771001 14 660212013 983000 261 Description Qty Logo Plate 1 Sanding Belt 1 Dust Collection Bag 1 Wear Plate 1 Belt Cover 1 Screw 8 32 x 3 8 in STD510803 2 Data Plate 1 Belt 1 Backing Pad 1 Screw M4 x 14 mm 1 Tracking Knob 1 Spring 1 Washer 1 Screw M4 x 14 5 mm 2 Operator s Manual 1 Standard H...

Страница 18: ... lawn equipment and electronics call or go on line for the location of your nearest Sears Parts Repair Center 1 800 488 1222 Call anytime day or night U S A only www sears com To purchase a protection agreement U S A or maintenance agreement Canada on a product serviced by Sears 1 800 827 6655 U S A 1 800 361 6665 Canada Para pedir servicio de reparaci6n a domicilio y para ordenar piezas 1 888 SU ...

Страница 19: ...turas consultas A ADVERTENCIA Para reducir el riesgo de lesiones el usuario debe leer y comprender el manual del operador antes de usar este producto Teletono de ayuda al consumidor 1 800 932 3188 Sears Roebuck and Co 3333 Beverly Rd Hoffman Estates IL 60179 EUA Visite la paqina web de Craftsman www sears com craftsman C us 983000 261 Y 9 03 ...

Страница 20: ...ra de banda ofrece numerosas caracteristicas que hacen el uso de la misma mas placentero y agradable En el disefio de esta lijadora de banda se ha conferido prioridad a la seguridad el desempefio y la fiabilidad por lo cual se facilita su manejo y su mantenimiento A ADVERTENCIA No intente utilizar este producto sin haber leido y comprendido totalmente el manual del operador Preste cuidadosa atenci...

Страница 21: ...entas con el dedo en el interrupter o conectarlas con el interrupter puesto es causa cornun de accidentes Retire toda llave o herramienta de ajuste antes de encender la herramienta electrica Toda llave o herramienta de ajuste dejada en una pieza giratoria de la herramienta electrica puede causar lesiones corporales No estire el cuerpo para alcanzar mayor distancia Mantenga una postura firme y buen...

Страница 22: ...quier otra condlclon que pudiera afectar su funcionamiento Toda protecclon o pieza que este daiiada debe repararse apropiadamente o reemplazarse en un centro de servicio autorizado Con el cumplimiento de esta regla se reduce el riesgo de una descarga electrica incendio o lesion grave No maltrate el cordon electrico Nunca porte la herramienta sujetandola por el cordon electrico ni tire del mismo pa...

Страница 23: ...exponga la unidad a la lluvia ni la use en lugares hurnedos El prop6sito de los simbolos de seguridad es llamar la atenci6n sabre posibles peligros Los sfmbolos de seguridad con sus respectivas explicaciones deben observarse cuidadosamente y comprenderse Los avisos de advertencia de seguridad no eliminan por sf mismos nlnqun peligro Las instrucciones y advertencias que otrecen no sustituyen ningun...

Страница 24: ...o fabricado con precision Se debe conectar micamente a una lfnea de voltaje de 120 voltios 60 Hz de corriente alterna corriente normal para uso domesttco No utilice esta herramienta con corriente continua c c Una cafda considerable de voltaje causa la perdida de potencia y el recalentamiento del motor Si la herramienta no funciona al conectarla en una toma de corriente vuelva a verificar el sumini...

Страница 25: ...ales Alisado de tablas asperas achaflanado redondeado de bordes etc Remoci6n de herrumbre pintura barniz y manchas CARACTERISTICAS Antes de usar la lijadora de banda familiarfcese con todas las caracterfsticas de funcionamiento y requisitos de seguridad No obstante no permita que su familiarizaci6n con la herramienta lo vuelva descuidado A ADVERTENCIA Tenga precauci6n al usar la lijadora de banda ...

Страница 26: ...CARACTERISTICAS SACO CAPTAPOLVO MANGO DELANTERO BOTON DEL SEGURO DE ENCENDIDO EL ORIFICIO DE ESCAPE Fig 1 8 ...

Страница 27: ... DE LAS BANDAS DE LIJA PARA INSTALAR Y CAMBIAR BANDAS DE LIJA Vea las figuras 2 3 y 4 Para instalar o cambiar la banda de lija siga estos pasos Desconecte la lijadora A ADVERTENCIA Si no se desconecta la herramienta y se pone en marcha accidentalmente se corre el riesgo de sufrir lesiones Coloque la lijadora sobre el costado de la misma con el cordon hacia la izquierda PALANCA DE AFLOJE DE TENSION...

Страница 28: ...ci6n hasta asegurarse de que este segura la banda de lija en otras palabras que no se salga de la lijadora ni toque las partes internas de esta A PRECAUCION Sise gasta excesivamente el borde interior de la banda de lija probablemente esta qued6 ajustada demasiado hacia adentro y esta rozando las partes internas de la unidad Si tal es el caso reajuste la banda con la perilla de alineaci6n Encienda ...

Страница 29: ...guarde ni deje la lijadora sin haber vaciado completamente el saco Tarnbien siga las recomendaciones de los fabricantes de acabados Para vaciar el saco captapolvo siga estos pasos Desconecte la lijadora A ADVERTENCIA Si no se desconecta la herramienta y se pone en marcha accidentalmente se corre el riesgo de sufrir lesiones Retire de la lijadora el saco captapolvo Abra el saco Sacuda el saco para ...

Страница 30: ... con el delantero Nota Si se permite que la lijadora permanezca en un lugar se produce una superficie desigual A ADVERTENCIA Sujete firmemente la lijadora con ambas manos todo el tiempo La inobservancia de esta advertencia puede causar la perdida del control y por consiguiente posibles lesiones serias La lijadora esta disefiada para aplicar un peso adecuado en la banda de lija Si se aplica una pre...

Страница 31: ...S PROVECHOSAS Si la correa que enarena se desliza o no sigue mientras que enarena usted puede aplicar demasiada presion Cuando ocurre esto quite la lijadora del objeto Si usted ajusta correctamente suguir de correa la correa que enarena volvera a su posicion normal y correcta respecto al rodillo impulsor y al rodillo delantero Utilice una correa que enarena mas gruesa para heav que enareana presio...

Страница 32: ...nos gasolina productos a base de petr61eo aceites penetrantes etc lleguen a tocar las piezas de plastico Dichos productos contienen compuestos qufmicos que pueden dafiar debilitar o destruir el plastico Las herramientas electricas que se utilizan en materiales de fibra de vidrio paneles de yeso para paredes compuestos de resanar o yeso estan sujetas a desgaste acelerado y posible fallo prematuro p...

Страница 33: ...NOTAS 15 ...

Страница 34: ... parte importante del sistema de doble aislamiento Para evitar la probabilidad de modificaciones o dafios al sistema unicarnente en un centro de reparaciones Sears de la localidad debe realizarse el mantenimiento Comunfquese con la tienda Sears de menudeo mas cercana para obtener informaci6n sobre los centros de servicio 16 ...

Страница 35: ...60312001 7 940301005 8 590560001 9 900720001 10 660272001 11 590481001 12 690725001 13 680771001 14 660212013 983000 261 Descripci6n Cant Placa del logotipo 1 Banda de lija 1 Saco captapolvo 1 Piaca de desgaste 1 Tapa de la correa 1 Tornillo 8 32 x 3 8 in STD510803 2 Piaca de datos 1 Correa 1 Cojin Del Forro 1 Tomillo M4 x 14 mm 1 Perilla de alineaci6n 1 Resorte 1 Arandela 1 Tornillo M4 x 14 5 mm ...

Страница 36: ... lawn equipment and electronics call or go on line for the location of your nearest Sears Parts Repair Center 1 800 488 1222 Call anytime day or night U S A only www sears com To purchase a protection agreement U S A or maintenance agreement Canada on a product serviced by Sears 1 800 827 6655 U S A 1 800 361 6665 Canada Para pedir servicio de reparaci6n a domicilio y para ordenar piezas 1 888 SU ...

Отзывы: