Craftsman 2915 Скачать руководство пользователя страница 8

coNteNiDo De la caJa De cartÓN

ferreterÍa

eNsamblaJe

ferreteria iNcluiDas:

herramieNtas Necesarias:

Llave inglesa de 3/8”

Llave inglesa de 5/16”

Llave inglesa de 1/2”

Tijeras

Paquete de manija (Cant.: 1)

Paquete de ruedas

Rollo de forro para gaveta (Cant.: 1)

divisores de gaveta (Cant.: 6) (Para los gabinetes de 46” (116,8

cm) puede encontrar divisores de gabinete en la gaveta superior

de largo total.)

bolsa de accesorios

Material impreso

2

proceso:

• Fije (1) remate terminal de manija utilizando (2) tornillos.

• Apriete con una llave.

•  Alinee la manija con las muescas en el remate terminal, sostén-

gala en posición.

•  Alinee las muescas en el remate terminal de la segunda manija 

y fije utilizando (2) tornillos. Apriete con una llave.

• Para quitarlo, deshaga los pasos anteriores.

iNstalaciÓN De la maNiJa lateral

elementos necesarios:

Tornillo Hexagonal de 1/4-20 X 1 1/2 (Cant.: 4)
Manija (Cant.: 1)
Llave inglesa de 3/8”

2

El hardware y otros contenido incluidos pueden ser encontrados 

en el ajuar (a menos que se indique lo contrario).

Paquete de ruedas

Paquete de manija

Rollo de forro para gaveta

divisor de gavetas

proceso:

•  Recueste la unidad rodante sobre su parte posterior. (Utilice el 

material de empaque para proteger el acabado de la pintura.)

•  Monte ambas ruedas giratorias en el mismo lado de la unidad 

rodante utilizando (4) tornillos en cada rueda.

• Apriete todos los tornillos con una llave.

•  Monte ruedas rígidas en el lado opuesto de la unidad rodante 

de la misma forma.

• Vuelva a colocar la unidad en su posición vertical.

elementos necesarios: (si fuese necesario)

Tornillo hexagonal de 5/16-18 x 1 (Cant.: 16)

Paquete de ruedas

Llave inglesa de 1/2”

colocaciÓN De las rueDas 

(si fuese Necesario)

Tornillo Hexagonal de 10-24 

x 5/16 (Cant: 24)

Tornillo Hexagonal de 1/4 - 20 x 1-1/2 (Cant: 4) 

(incluido con el paquete de la minija.)

Tornillo Hexagonal de 5/16 - 18 x 1 (Cant: 16) 

(Sólo incluido con el gabinete de 36" (91,4 cm).)
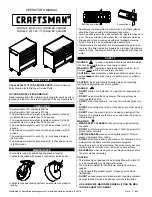
Figura 2

Tornillo

Manija

Figura 1

Содержание 2915

Страница 1: ...port this product empty Properly secure when transporting DO NOT exceed maximum product weight including contents See Operations Sections Capacities for more information Use adequate manpower when lifting or mov ing the chest or cabinet warning WEAR SAFETY GLASSES when removing or repositioning the slides DO NOT pull this product when moving it Push the product to prevent personal injury USE THE B...

Страница 2: ...nit to its upright position CASTER INSTALLATION if required Items Needed 5 16 18 x 1 Hex Screw Qty 16 Caster Pack 1 2 Wrench Hardware and other included contents can be found in the bottom drawer unless otherwise noted Handle Pack Drawer Liner Roll Drawer Divider side handle INSTALLATION Items Needed 1 4 20 x 1 1 2 Hex Screw Qty 4 Handle Qty 1 3 8 in Wrench Process Attach 1 handle endcap using 2 s...

Страница 3: ...chest 5 16 Wrench Process Remove the wooden top from the cart Remove the top two drawers of the cart refer to the drawer removal instructions Lift the chest onto the cart Line up the holes in the bot tom of the chest with the holes in the top of the cart Attach the chest using 4 screws inserted from the underside of the top of the cart See Figure 8 Wrench tighten all screws Replace the drawer refe...

Страница 4: ...tend slides in cabinet Hold the slide on the cabinet while aligning it with the slide on drawer Push the drawer into the unit until the drawer fully engages slides Open drawer and reclose to ensure proper operation If stop does not engage slide lightly deflect the stop with screwdriver removing and installing drawers BALL BEARING SLIDES Lever Style Lift or lower depending on the slide the release ...

Страница 5: ...troubleshooting Problem Cause Solution The unit unlocks but the drawers still will not open One or more of the drawers are holding the lockbars from releasing Completely close all the drawers and the lockbars will release to open the drawers The cover on the chest is holding the lockbars from releasing Apply a downward pressure to the top of the cover to let the lockbars release The release cables...

Страница 6: ......

Страница 7: ...el contenido Re fiérase a las Capacidades para más información Utilice el personal adecuado para levantar o mover el baúl o el gabinete ADVERTENCIA USE GAFAS DE SEGURIDAD al quitar o volver a poner las corred eras NO hale la unidad empújela cuando la mueva UTILICE LOS FRENOS cuando el producto no esté en movimiento Esto impedirá que se deslice NO altere la unidad en modo alguno Por ejemplo no suel...

Страница 8: ...anija Cant 1 Llave Inglesa de 3 8 2 El hardware y otros contenido incluidos pueden ser encontrados en el ajuar a menos que se indique lo contrario Paquete de ruedas Paquete de manija Rollo de forro para gaveta Divisor de gavetas Proceso Recueste la unidad rodante sobre su parte posterior Utilice el material de empaque para proteger el acabado de la pintura Monte ambas ruedas giratorias en el mismo...

Страница 9: ...ior de madera de la unidad rodante Retire las dos gavetas superiores de la unidad rodante re fiérase a las instrucciones para remoción de gavetas Levante el baúl y colóquelo en la unidad rodante Alinee los agujeros en la parte inferior del baúl con los de la parte supe rior de la unidad rodante Fije el baúl utilizando 4 tornillos insertados desde abajo de la parte superior de la unidad rodante Ref...

Страница 10: ...nga la corredera en el gabinete mientras lo alinea con la corredera de la gaveta Empuje la gave ta en la unidad hasta que la gaveta se enganche completamente en las correderas Abra la gaveta y vuelva a cerrarla para asegu rarse de que funcione correctamente Si el tope no se engancha en la corredera dóblelo ligeramente con un destornillador COJINETES DE BOLAS Estilo palanca Levante o baje dependien...

Страница 11: ...ación de la corredera Coloque la corredera en la posición adecuada en la unidad y hale hacia el frente de la misma hasta que el retenedor de resorte encaje en su posición y asegure la corredera Para un funcionamiento suave cerciórese de que las gavetas correspondan con sus correderas originales soluciÓn de problemas DEL SISTEMA DE CIERRE Problema Causa Solución La unidad puede desbloquearse pero l...

Страница 12: ......

Отзывы: