background image

11

SERVICE AND MAINTENANCE

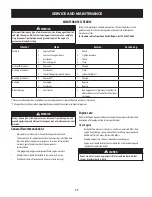
MAINTENANCE SCHEDULE

 WARNING

Before performing any type of maintenance/service, disengage all controls 
and stop the engine. Wait until all moving parts have come to a complete 
stop. Disconnect spark plug wire and ground it against the engine to 
prevent unintended starting.      

Follow the maintenance schedule given below. This chart describes service 
guidelines only. Use the Service Log column to keep track of completed 
maintenance tasks.  

To schedule service from Sears Parts & Repair, call 1-888-331-4569.

Interval

Item

Service

Service Log

Each Use

1. 

Engine oil level

2. 

Loose or missing hardware

3. 

Air cleaner

4. 

Unit and engine

1. 

Check

2. 

Tighten or replace

3. 

Check

4. 

Clean

1st Month or 5 hours

1. 

Engine oil

1. 

Change

Annually or 25 hours

1. 

Air cleaner †

2. 

Control linkages/pivots and wheels

1. 

Clean

2. 

Lube with light oil

Annually or 50 hours

1. 

Engine oil ††

1. 

Change

Annually

1. 

Spark plug

2. 

Air Cleaner

1. 

Replace

2. 

Replace

Before Storage

1. 

Fuel system

1. 

Run engine until it stops from lack of fuel, or 
add stabilizer to a full tank of fresh fuel prior 
to storage. 

† Clean more often under dusty conditions or when airborne debris is present. Replace air cleaner if very dirty.
†† Change oil every 25 hours when operating the engine under heavy load or in high temperatures.

 WARNING

Always stop engine, allow engine to cool, disconnect spark plug wire, and 
ground against engine before performing any type of maintenance on your 
machine. 

General Recommendations

• 

Always observe safety rules when performing any maintenance.

• 

The warranty on this edger/trencher does not cover items that have been 
subjected to operator abuse or negligence. To receive full value from 
warranty, operator must maintain the equipment as  
instructed here.

• 

Changing of engine-governed speed will void engine warranty.

• 

All adjustments should be checked at least once each season.

• 

Periodically check all fasteners and make sure these are tight.

Engine Care

Refer to the Engine Operator’s Manual packed with your mower for a detailed 
description of all engine-related service specifications.

Clean Engine

• 

Daily or before every use, clean grass, chaff or accumulated debris from 
engine. Keep linkage, spring, and controls clean. Keep area around and 
behind muffler free of any combustible debris.

• 

Keeping engine clean allows air movement around engine.

• 

Engine parts should be kept clean to reduce the risk of overheating and 
ignition of accumulated debris.

 CAUTION

Do not use water to clean engine parts. Water could contaminate fuel 
system. Use a brush or dry cloth.

Содержание 247.762660

Страница 1: ...our website www craftsman com CAUTION Before using this product read this manual and follow all safety rules and operating instructions Operator s Manual SAFETY ASSEMBLY OPERATION MAINTENANCE ESPAÑOL p 18 EDGER TRENCHER Model No 247 762660 Form No 769 09515C November 23 2015 ...

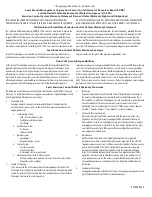
Страница 2: ...nclude Expendable items which can wear out from normal use within the warranty period such as the belt s filter s spark plug s or edging blade s Product damage resulting from user attempts at product modification or repair or caused by product accessories Repairs necessary because of accident or failure to operate or maintain the product according to all supplied instructions Preventative maintena...

Страница 3: ...ield and blade control handle in place and working Never operate with damaged safety devices Failure to do so can result in personal injury Never run an engine indoors or in a poorly ventilated area Engine exhaust contains carbon monoxide an odorless and deadly gas Do not operate machine while under the influence of alcohol or drugs Muffler and engine become hot and can cause a burn Do not touch N...

Страница 4: ...he area Never remove gas cap or add fuel while engine is hot or running Allow engine to cool at least two minutes before refueling Never over fill fuel tank To allow for expansion of the fuel do not fill above the bottom of the fuel tank neck Replace gasoline cap and tighten securely If gasoline is spilled wipe it off the engine and equipment Move machine to another area Wait 5 minutes before star...

Страница 5: ... covered land unless the engine s exhaust system is equipped with a spark arrestor meeting applicable local or state laws if any If a spark arrestor is used it should be maintained in effective working order by the operator In the State of California the above is required by law Section 4442 of the California Public Resources Code Other states may have similar laws Federal laws apply on federal la...

Страница 6: ...knobs which are located on both the left and right sides of the handle Control Cable Z Fitting Unwrap the control cable from around the engine and route it up the left side of the handle 1 Hook the Z end of the brake cable into the control from the outside to inside See Figure 2 Z Fitting Blade Control Upper Handle Figure 2 Securing Control Cable WARNING The cable must be routed properly to avoid ...

Страница 7: ... guide to the right side of the upper handle as shown in Figure 5 2 Stand behind the edger and hold the blade control against the upper handle 3 Gently pull the starter rope out of the engine WARNING The edger blade WILL rotate when the starter rope is pulled NOTE The starter rope will not pull out of the engine unless the blade control refer to Figure 5 is depressed against the upper handle 4 Sli...

Страница 8: ... height adjustment lever is found on the rear portion of the edger When placed in an applicable notch it aids in stabilizing the edger while edging grass along a curb Blade Depth Control Lever The blade depth control lever is located on the right side of the upper handle It is used to control the depth of the cut The further forward the blade depth control lever is moved the deeper into the soil t...

Страница 9: ...n the cord at all times to prevent rapid starter cord retraction kickback Rapid retraction can pull arm and hand toward the engine faster than you can let go and result in broken bones fractures bruises or sprains To Stop Engine 1 Release blade control to stop the engine and blade Edging WARNING Rotating cutting blade may throw objects causing personal injury Keep area clear of bystanders and do n...

Страница 10: ...tional trenching feature in order to create a wider cutting path for such things as laying wire for landscape lighting WARNING Disconnect the spark plug wire and ground against the engine before performing the following steps WARNING The edger blade is sharp Wear leather work gloves to protect your hands when working around the edger blade 1 Use two wrenches one wrench to prevent hex bolt head fro...

Страница 11: ...cleaner if very dirty Change oil every 25 hours when operating the engine under heavy load or in high temperatures WARNING Always stop engine allow engine to cool disconnect spark plug wire and ground against engine before performing any type of maintenance on your machine General Recommendations Always observe safety rules when performing any maintenance The warranty on this edger trencher does n...

Страница 12: ...he edger blade Periodically inspect the blade for cracks especially if you strike a foreign object Replace when necessary Follow the steps below for blade service 1 Disconnect spark plug boot from spark plug 2 Use two wrenches one wrench to prevent the hex bolt head from spinning and the other to remove the flange nut to remove the edger blade Refer to Figure 14 3 Remove and discard the edger blad...

Страница 13: ...ain making sure to note the orientation of the belt Discard the belt See Figure 16 5 Working from the front of the edger place the belt onto the spindle sheaves route it back onto the top and bottom idler pulleys and then place it onto the engine flywheel pulley NOTE Make certain that the V side of the belt is seated into the top pulley and the flat side of the belt is seated into the bottom pulle...

Страница 14: ...eas where fuel fumes may reach an open flame spark or pilot light as on a furnace water heater clothes dryer or gas appliance Preparing The Edger Clean and lubricate edger thoroughly as described in the lubrication instructions Do not use a pressure washer or garden hose to clean your unit Coat edger blade with chassis grease to prevent rusting Refer to Preparing the Engine for correct engine stor...

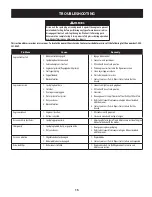
Страница 15: ...ContactyourSearsParts RepairCentertohavefuelline cleaned Enginerunserratic 1 Sparkplugbootloose 2 Stalefuel 3 Ventingascapplugged 4 Waterordirtinfuelsystem 5 Dirtyaircleaner 6 Blockedfuelline 1 Connectandtightensparkplugboot 2 Filltankwithclean freshgasoline 3 Clearvent 4 Runengineuntilitstopsfromlackoffuel Refillwithfreshfuel 5 RefertoAirCleanerMaintenanceinEngineManualincluded withthemower 6 Con...

Страница 16: ...ative at 1 800 469 4663 The emission warranty is a defects warranty Defects are judged on normal engine performance The warranty is not related to an in use emission test Sears Emission Control Defects Warranty Provisions The following are specific provisions relative to your Emission Control Defects Warranty Coverage It is in addition to the Sears engine warranty for non regulated engines found i...

Страница 17: ...esolution phone support from a Sears representative Think of us as a talking owner s manual Once you purchase the Repair Protection Agreement a simple phone call is all that it takes for you to schedule service You can call anytime day or night or schedule a service appointment online The Repair Protection Agreement is a risk free purchase If you cancel for any reason during the product warranty p...

Страница 18: ...s fungibles que pueden desgastarse con el uso normal en el período de garantía como la s cuchilla s diente s o cinturón es Daños en el producto resultante de los intentos del usuario de modificación del producto o la reparación o causados por accesorios de productos Las reparaciones necesarias debido a un accidente o falla para operar o mantener el producto según las instrucciones suministradas Ma...

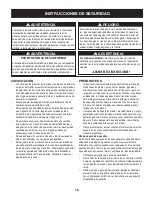
Страница 19: ... zapatos resbalosos o livianos por ej de lona Nunca intente realizar ajustes mientras el motor está en marcha excepto en los casos específicamente recomendados en el manual del operador Manejo seguro de la gasolina Para evitar lesiones personales o daños materiales sea sumamente cuidadoso al manipular la gasolina La gasolina es sumamente inflamable y sus vapores pueden causar explosiones Si se der...

Страница 20: ...á dañada Regrese la máquina al servicio técnico de su distribuidor autorizado más cercano para que la examine y la repare No haga funcionar la máquina si la cuchilla de corte está dañada o excesivamente desgastada Nunca intente sacar material del protector de la cuchilla si el motor está en funcionamiento Apague el motor desconecte el cable de la bujía y póngalo de manera que haga masa contra el m...

Страница 21: ... piezas que no cumplen con las especificaciones del equipo original podría tener como resultado un rendimiento incorrecto y además poner en riesgo la seguridad No cambie la configuración del regulador del motor ni acelere demasiado el mismo El regulador del motor controla la velocidad máxima segura de funcionamiento del motor Mantenga o reemplace las etiquetas de seguridad e instrucciones según se...

Страница 22: ...siga todas instrucciones en el manual manuales antes procurar para reunir y operar ADVERTENCIA CUCHILLAS ROTATIVAS Mantegna manos y pies lejos de girar hoja ESPECTADORES Mantenga a espectadores los animales favoritos y los niños por lo menos 75 pies de la máquina mientras está en la operación Pare máquina si cualquiera entra el área ADVERTENCIA SUPERFICIES CALIENTES No toque el silenciador o zonas...

Страница 23: ...io Z de Cable de Control Desenrolle el cable del motor por debajo de la manija inferior 1 Enganche el extremo Z del cable de frenado en la manija desde el exterior hacia el interior Vea Figura 2 Accesorio Z Control de la Cuchilla Manija superior Figura 2 Colocación del cable de Control ADVERTENCIA El cable debe colocarse apropiadamente para evitar contacto con todos los bordes afilados y las super...

Страница 24: ...o pero no apriete la guía de la cuerda para el lado derecho de la manija superior como se muestra en la Figura 5 2 Párese detrás de la unidad y sostenga el control de la cuchilla contra la barra superior 3 Jale suavemente de la cuerda de arranque fuera del motor ADVERTENCIA La cuchilla de la bordeadora girará cuando la cuerda de arranque NOTA La cuerda de arranque no se separa del motor a menos qu...

Страница 25: ...juste de altura del bordillo se encuentra en la parte posterior de la bordeadora Cuando se la coloca en la muesca indicada ayuda a estabilizar la bordeadora mientras recorta pasto a lo largo de un bordillo Palanca de Control de la Cuchilla La palanca de control de profundidad de la cuchilla se encuentra del lado derecho de la barra superior Se usa para controlar la profundidad del corte Cuanto más...

Страница 26: ...odría resultar Para Detener el Motor 1 Suelte la manija de control de la cuchilla para detener el motor y la cuchilla Bordeado ADVERTENCIA La cuchilla de corte giratoria puede lanzar objetos y causar lesiones personales Mantenga el área libre de observadores y no opere sin tener todos los protectores ADVERTENCIA No baje la cuchilla si la cuchilla se encuentra sobre concreto asfalto rocas o similar...

Страница 27: ...rte más ancho para cosas tales como tendido de cables para la iluminación paisajista ADVERTENCIA Desconecte el cable de la bujía de encendido y haga masa contra el motor antes de realizar los siguientes pasos ADVERTENCIA El borde de la bordeadora es filoso Póngase guantes de trabajo de cuero para protegerse las manos cuando trabaja cerca de la cuchilla de la bordeadora 1 Use dos llaves una para im...

Страница 28: ...esentes Sustituya el filtro de aire de ser muy sucio Cambie el petróleo cada 25 horas whem funcionamiento del motor bajo la carga pesada o en temperaturas altas ADVERTENCIA Detenga siempre el motor deje que el motor se enfríe desconecte el cable de la bujía y haga masa contra el motor antes de realizar cualquier tarea de mantenimiento a su máquina Recomendaciones Generales Respete siempre las regl...

Страница 29: ...iódicamente la cuchilla en busca de rajaduras especialmente cuando golpee un objeto extraño Realice los reemplazos que resulten necesarios Siga los pasos que aparecen debajo para realizar el mantenimiento de la cuchilla 1 Desconecte el capuchón del cable de la bujía 2 Use dos llaves una para impedir que la cabeza del perno hexagonal gire loca y la otra para desenroscar la tuerca de brida para extr...

Страница 30: ...a orientación de la correa Descarte la correa Vea la Figura 16 5 Trabajando delante de la bordeadora coloque la correa en las poleas del husillo oriéntela nuevamente hacia las dos poleas locas y luego colóquela en la polea del volante del motor NOTA Asegúrese de que el lado V de la correa está asentado sobre la polea superior y que el lado plano de la correa está asentado sobre la polea inferior V...

Страница 31: ...le puedan alcanzar el fuego chispas o una luz piloto como la que tienen algunos hornos calentadores de agua secadores de ropa o algún otro dispositivo a gas Preparación de la Bordeadora Limpie y lubrique la bordeadora como se describe en las instrucciones de lubricación No utilice una lavadora a presión ni una manguera de jardín para limpiar su unidad Cubra la cuchilla de la bordeadora con grasa p...

Страница 32: ...mbustibleestávacíooelcombustible sehaechadoaperder 4 Elmotornoestácebado Silotiene 5 Labujíanofuncionacorrectamente 6 Elmotorsedesbordó 7 Líneadecombustiblebloqueada 1 Engraneelcontroldelacuchilla 2 Conecteelcablealcapuchóndelabujía 3 Lleneeltanquecongasolinalimpiaynueva 4 Cebeelmotortalcomoseexplicaenlasecciónde Funcionamiento 5 Limpie ajustelaseparación ocambielabujía 6 Esperarunosminutospararea...

Страница 33: ...oel manualdelmotor Elmotorfuncionamalenmarcha lenta 1 Bujíaatorada averiadaoexcesodeseparación 2 Elfiltrodeaireestásucio 1 Limpie reemplaceoreajustelaseparación 2 ConsultelasecciónMantenimientoelmanualdelmotor Demasiadavibración 1 Lacuchilladelabordeadoraestádobladaodañada 2 Elhusillodelabordeadoraestádobladoodañado 1 Reemplacelacuchilladelabordeadora 2 ContacteconsucentrodepartesyreparacionesSear...

Страница 34: ...l 1 800 469 4663 La garantía de emisiones es una garantía por defectos Los defectos se juzgan de acuerdo con el funcionamiento normal de un motor La garantía no está relacionada con una prueba de emisiones en uso Disposiciones de la garantía Sears para defectos en el control de emisiones Las siguientes son disposiciones específicas relacionadas con la cobertura de la garantía para defectos en el c...

Страница 35: ...s Resolución Rápida el apoyo telefónico de un Chamusca al representante Piense en nosotros como el manual de un dueño hablador Una vez adquirido el Acuerdo puede programar el servicio con tan sólo realizar una llamada telefónica Puede llamar en cualquier momento del día o de la noche o programar un servicio en línea El Acuerdo de Protección de Reparación es una compra sin riesgo Si usted anula por...

Страница 36: ...stas a preguntas o problemas y ordenar piezas o pedir servicio para la reparación de su equipo To help us help you register your product at www craftsman com registration Para poderte ayudar mejor registra tu producto en www craftsman com registration Join the Craftsman Club today Receive exclusive member benefits including special pricing and offers project sharing expert advice and SHOP YOUR WAY...

Отзывы: