background image

Содержание 247.24035

Страница 1: ...pment read this manual and follow all safety rules and operating instructions For answers to your questions about this product Call 1 800 659 5917 CraftsmanTractorHelp Line 7 am 7 pm CT Mort Sun Sears Brands Management Corporation Hoffman Estates IL 60179 U S A Visit our website www craftsman com FormNo 769 07689 January 2 2012 ...

Страница 2: ...ment visit theweb site www craftsman com Thiswarrantydoesnot coverbags whichareexpendablepartsthatcanwear outfromnormalusewithinthe warrantyperiod Thiswarrantyis void if thisproductis everusedwhile providingcommercialservicesor if rentedto anotherperson Thiswarrantygivesyou specificlegalrights andyou mayalso haveotherrightswhichvaryfromstateto state Sears Brands Management Corporation Idoffman Est...

Страница 3: ...chineif anyoneentersthe area Thoroughlyinspectthe areawherethe equipmentis to beused Remove allstones sticks wire bones toys and otherforeignobjectswhich couldbepickedupand thrownby the blade s Thrownobjects can causeseriouspersonalinjury Alwayswearsafetyglassesor safetygogglesduringoperationand while performinganadjustmentor repairto protectyoureyes Thrownobjects whichricochetcancauseseriousinjur...

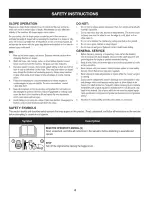
Страница 4: ...n slopesunlessnecessary then turn slowlyand gradually downhill ifpossible 2 Do notmowneardrop offs ditchesor embankments The mowercould suddenlyturn over if a wheelis overthe edgeof a cliff ditch or if an edge cavesin 3 Do nottry to stabilizethe machineby puttingyourfooton theground 4 Do notusea grasscatcheronsteepslopes 5 Do notmowonwet grass Reducedtractioncouldcausesliding GENERAL SERVICE 1 Bef...

Страница 5: ...4 Adjustgaugeup or down until the left cornertouchesthe slope SeeFigure1 andFigure2 5 10odashedline If there is a gapbelowthe gauge the slope is too steepfor safeoperation SeeFigure2 above Figure2 Slopes are a majorfactor relatedto tip over and roll over accidents which can result in severe injury or death Do not operate machineon slopes in excess of 10degrees All slopes requireextra caution if yo...

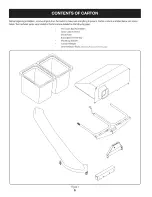
Страница 6: ...ent Cartoncontentsarelistedbelowand shown below Twohardwarepacksareincludedin thiskit andaredetailedonthe followingpage Two Grass Bag Assemblies Grass Catcher Hood Chute Tube Bag Support Assembly Mounting Bracket CounterWeight One Hardware Packs Detoited Picturedonthe nextpoge Figure1 6 ...

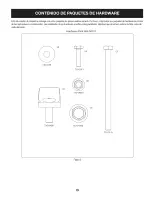
Страница 7: ...closed Pleasecheckyourhardwarepacksagainstthe illustrationsbelow The quantitiesfor eachitemis listedinparenthesiswhilethe part numberis listedneareach item Hardware Pack 689 00210 4 _ 4 736 0159 LJ 720 04061 1 710 3015 2 712 04063 2 712 04150 710 3195 2 Figure2 7 ...

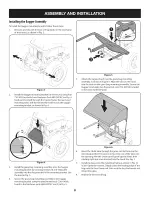
Страница 8: ...n the bagger mounting bracket as shown in Fig 4 Figure 4 3 Install the grass bag mounting assembly onto the bagger mounting bracket by lowering it down 1 and fitting the assembly into the slot provided in the mounting bracket See the Inset in Fig 5 4 Secure the grass bag mounting assembly to the bagger mounting bracket using the attachment knob 720 04061 found in the hardware pack 689 00210 See 2 ...

Страница 9: ...ing it Installing the WeightBar 1 Remove the bumper by unthreading the two hex bolts that secure it 2 Turn the wheels of the tractor all the way to the right hand side from the operator s position as shown in Fig 9 Figure 9 3 Slide the weight bar across the front of the unit s frame until the mounting holes align Turn the wheels back straight once you slide the weight bar on the unit and towards t...

Страница 10: ...ingit upwards Itis not necessaryto removethe discharge chuteinordertoemptythe grassbags See Fig 11 3 Emptythe grassclippingsat a properdisposalsite Holdingthe bagfirmly turn upsidedown and emptythecontents 4 Replacegrassbags closelid flipdown seat restartyourtractor and resumecuttingyourgrass i Figure11 2 Removethe grassbagsby liftingtheseup 1in Fig 12 and movingthebagsawayfromthe bagsupportassemb...

Страница 11: ...This page intentionally left blank Use this page to make any notes regarding your tractor 11 ...

Страница 12: ...CRAFTSMAN TWO BIN REAR BAGGER Model No 247 24035 To purchase replacement parts call 800 469 4663 12 ...

Страница 13: ... 07379 Description Grass Bag Front Hood Assembly Frame Rear Hood Assembly Frame Bagger Support Assembly Mounting Bracket Hex Lock Screw 1 4 15 0 75 Tap Screw 1 4 20 0 500 Hex Head Screw 1 4 20 75 Hex Head Screw 5 16 18 4 50 Flange Lock Nut 5 16 18 Flange Lock Nut 1 2 13 Knob 3 8 16 875 Push Cap 3 8 ROD Chute Tube Chute Mount Bracket Plug End Flat Washer 349 x 879 x 063 Shoulder Screw 1 4 15 750 Gr...

Страница 14: ...cto defectuososer reemplazado deformagratuita Forwarrantycoveragedetailsto obtainfree replacement visit theweb site www craftsman com Thiswarrantydoesnot coverbags whichareexpendablepartsthatcanwear outfromnormalusewithinthe warrantyperiod Thiswarrantyis void if thisproductis everusedwhile providingcommercialservicesor if rentedto anotherperson Thiswarrantygivesyou specificlegalrights andyou mayal...

Страница 15: ...las cuchillas Los objetos arrojados por la m quina pueden causar lesiones graves 4 Para protegerse los ojos utilice siempre galas o lentes de seguridad mientras opera la m quina o mientras la ajusta o repara Los objetos arrojados que rebotan pueden causar lesiones oculares graves 5 Nunca opere la cortadora de c_sped sin tenet bien colocada la cubierta de descarga o el colector de c_sped Si falta o...

Страница 16: ...segurarse de que el equipo est_ en condiciones seguras de operaci6n 3 Nunca intente violar el sistema de bloqueo de seguridad u otros mecanismos de seguridad de la cortadora Controle peri6dicamente que funcionan correctamente 4 No intente nunca hacer ajustes o reparaciones a la cortadora mientras el motor est_ en marcha 5 Los componentes del colector de c6sped y la cubierta de descarga est_n sujet...

Страница 17: ...ltarFigura1 andFigura2 Ajusteel pendiente decalibrearribao haciaabajohastalos toquesesquinaizquierdael pendiente consultarFigura1andFigura2 Sihayun espaciopordebajodela pendiente decalibre el pendiente es demasiado escarpaporoperaciOn segura consultarFigura2 above Las pendientesson un factor importante relacionadocon un vuelco y renovaci6nde los accidentesque pueden provocar lesionesgraves o la mu...

Страница 18: ...numerana continuaci6ny se muestraa continuaci6n Dospaquetesde hardwarese incluyenenestekity se detallanen lasiguientep_ gina o o o o o o Dos Asambleas hierba Bolsa Hierba Hood Catcher Chute Tubo Bolsa de la Asamblea de Apoyo montaje en un tubo contrapeso Un Pack de hardware ylafotodetatladaen lapbginasiguiente Figura1 18 ...

Страница 19: ...pruebesuspaquetesde hardwareen contra de las ilustraciones a continuaci6n Lascantidadesde cadaarticuloseindicaentre par_ntesis mientrasqueel nQmero est enla listacercade cada eiemento Hardware Pack 689 00210 4 _ 4 736 0159 720 04061 1 710 3015 2 712 04063 2 712 04150 710 3195 2 Figura2 19 ...

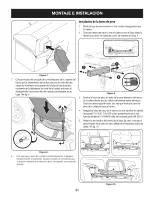
Страница 20: ...embolsadoradehierba montajede las bolsas comose muestraen la Figura6 Alineelas leng0etasde lacubiertaen las ranurasdela asambleade base montajede las bolsas Lacampanaembolsadora con dos tuercasde la brida 712 04150 incluidoenel paquetedehardwaremismo Figure 4 Instaleel conjuntodebasede rnontajeen la bolsadela embol sadorade montajebajandohaciaabajo 1 y el accesoriode montajeen la ranuradelsoported...

Страница 21: ...fig 9 Figura 9 3 Deslicelabarradepesoa travesde la partedelanteradelmarco de launidadhastaquelosorificiosde montajeest_nalineados Girarlas ruedasespaldarecta unavezquedeslicelabarrade pesode launidady haciaelcentro 4 Asegurela barrade pesoenel tractorcon dos tornillosdecabeza hexagonal710 3195 712 0159 cuatroarandelasplanasy dos tuercasde fijaci6n712 04063 bridade hardwarepack689 00210 5 Retirelos...

Страница 22: ... es necesarioquitarel tubode descargacon elfin de vaciarla grassbags Verfig 11 r 3 Vaciarlos recortesdec_speden unlugardedesechoadecuado Celebraci6nde labolsacon firmeza asu vezal reves y vaciarel contenido 4 Vuelvaa colocarbolsasde hierba cierrelatapa tapa haciaabajo del asiento reinicieel tractory volvera cortarel cesped 2 Figura 11 Sacarlas bolsasdela hierbamedianteel levantamiento de estos m_ ...

Страница 23: ...Esta pagina se dej6 intencionalmente en blanco Utilice esta pagina para tomar notas acerca de su tractor 23 ...

Страница 24: ...carry in items like vacuums lawn equipment and electronics call anytime for the location of your nearest Sears Parts Repair Service Center 1 800 488 1222 U S A 1 800 469 4663 Canada www sears com www sears ca To purchase a protection agreement on a product serviced by Sears 1 800 827 6655 U S A 1 800 361 6665 Canada Para pedir servicio de reparaci6n a domicilio y para ordenar piezas 1 888 SU HOGAR...

Отзывы: