background image

16 ― English

       WARNING  

■ Do not use other battery chargers. The 

   battery charger supplied is specifically 

   designed for the lithium-ion battery used    

   in this tool.

■ Check the main power supply! The voltage 

   of the power supply must correspond with 

   the data on the nameplate of the battery 

   charger. Battery chargers operate on 120V.

■ Charge the battery pack in a location where 

   the temperature is between 40°F (4°C) and 

100°F (38°C). If the battery pack is hot, 

allow it to cool down before recharging.

NOTE: 

The battery is supplied partially 

charged. To ensure full capacity of the 

battery, charge the battery in the battery 

charger before using the product for the first 

time. The lithium-ion battery can be charged 

at any time without reducing its service life. 

Interrupting the charging procedure does not 

affect the battery.

CHARGER INDICATORS

■ Preparation: The charging process starts 

   as soon as the battery charger is plugged 

   into a power supply socket and the battery 

   is inserted into the charger.

■ If the battery is not inserted, a continuous 

   green light indicates that the charger is 

   plugged into a power supply socket and is 

   now ready to begin charging.

OPERATION FOR  BATTERY PACK & CHARGER

BECOME FAMILIAR WITH THE 

CHARGER

See Figures 23 & 24, page vi 

Before attempting to use this charger, 

become familiar with all of its operating 

features and safety requirements.

CHARGING THE BATTERY PACK

See Figure 25, page vi

       WARNING 

■ If any part of the charger is missing or 

   damaged, do not operate it! Replace the 

   charger with a new one. Failure to heed 

   this warning could result in possible serious 

   injury.

■ Use an electrical testing device to check 

   the voltage! The voltage must comply with 

   the information on the rating label.

BATTERY CHARGING PROCEDURE

■ Align the battery pack to the slots on the 

   charger and slide it in until it locks in place.

■ Connect the charger to the power supply.

■ Allow sufficient charging time (see Product 

   Specifications), and then disconnect the 

   charger from the power supply.

■ Press the release button on the battery 

   pack and remove it from the charger.

NOTE:

 It is normal for the battery pack 

and charger to become warm (but not hot) 

during charging process. If the battery does 

not charge properly, check to make sure the 

electrical outlet is "live".

Always charge the battery before storage!

other type of bit.

NOTE:

 If the driver bit is not inserted deep 

enough into the sleeve, the sleeve will not 

return to its original position and the driver 

bit will not be secured. In this case, try re-

inserting the bit according to the instructions 

above.

NOTE: 

After inserting the driver bit, make 

sure that it is firmly secured. If it comes out, 

do not use it.

NOTE:

 Insert a socket adaptor into the 

sleeve to use a socket with the impact driver.

Belt Hook (Available Separately)

See Figure 12, page iii

A belt hook is available for separate 

purchase. The hook enables you to 

conveniently hang the tool from your belt 
when tool is not in use.
Install the hook on either side of the tool. 

Insert the tab of the hook into the slot in the 

tool base. Secure the hook by tightening the 

screw through the hole in the hook into the 

hole in the base.
To purchase the hook, see Replacement 

Parts on page 22 of this manual. 

OPERATION FOR IMPACT DRIVER

Содержание 125.21417

Страница 1: ...ve this manual for future reference ADVERTENCIA Para reducir el riesgo de lesiones el usuario debe leer y comprender el manual antes de utilizar este producto WARNING To reduce the risk of injury the user must read and understand the Operator s Manual before using this product 20V MAX LITHIUM ION CORDLESS DRILL DRIVER AND IMPACT DRIVER KIT ENSEMBLE DE COMBINACIÓN DES TALADRO DESTORNILLADOR Y DESTO...

Страница 2: ...de solo 90 días si el producto se usa para proporcionar servicios comerciales o si se le arrienda a otra persona Esta garantía le entrega derechos legales específicos que pueden variar según su estado podría tener otros derechos adicionales Sears Brands Management Corporation Hoffman Estates IL 60179 INTRODUCTION INTRODUCCIÓN TABLE OF CONTENTS TABLA DE CONTENIDOS These tools have many features for...

Страница 3: ...use reduces the risk of electric shock If operating a power tool in a damp location SAFETY INSTRUCTIONS is unavoidable use a ground fault circuit interrupter GFCI protected supply Use of a GFCI reduces the risk of electric shock PERSONAL SAFETY Stay alert watch what you are doing and use common sense when operating a power tool Do not use tool while tired or under the influence of drugs alcohol or...

Страница 4: ...ing this rule will reduce the risk of electric shock fire or serious injury Always wear eye protection with side shields marked to comply with ANSI Z87 1 when assembling parts operating the tool or performing maintenance Following this rule will reduce the risk of serious personal injury Protect your lungs Wear a face or dust mask if the operation is dusty Following this rule will reduce the risk ...

Страница 5: ...k of injury charge only the specified lithium ion rechargeable batteries This charger is compatible with only Craftsman 20V Max powered by SAFETY INSTRUCTIONS DieHard slide type lithium ion battery packs Other types of batteries may burst causing personal injury of damage Do not charge battery in a damp or wet location Following this rule will reduce the risk of electric shock Keep cord and charge...

Страница 6: ...utions that involve your safety No Hands Symbol Failure to keep your hands away from the blade will result in serious personal injury Hot Surface To reduce the risk of injury or damage avoid contact with any hot surface SYMBOL NAME DESIGNATION EXPLANATION No load Speed Eye protection Keep Away From Water Do not dispose of battery packs in rivers or immerse in water Keep Away From Fire Do not dispo...

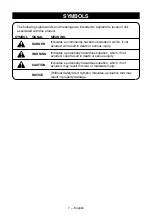
Страница 7: ...ous situation which if not avoided could result in death or serious injury CAUTION Indicates a potentially hazardous situation which if not avoided may result in minor or moderate injury NOTICE Without Safety Alert Symbol Indicates a situation that may result in property damage The following signal words and meanings are intended to explain the levels of risk associated with this product ...

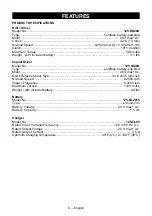
Страница 8: ...D20A Type Cordless battery powered Motor 20 V max d c Quick Release Chuck Size 1 4 in 6 35 mm hex No load Speed 0 2500 rpm Impact Frequency 0 3100 ipm Maximum Torque 1100 in lbs Weight with included battery 2 8 lbs Battery Model No 125 BL2015 Type Lithium lon Battery Voltage 20 V max d c Battery Capacity 1 5 Ah Charger Model No 125 CL05 Rated Input Voltage Frequency 120 V 60 Hz a c Rated Output Vo...

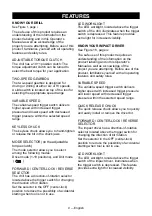
Страница 9: ...tion of bit rotation Set the selector in the OFF center lock position to reduce the possibility of accidental starting when tool is not in use FEATURES LED WORKLIGHT The LED worklight located above the trigger switch of the drill illuminates when the trigger switch is depressed This feature provides extra light for increased visibility KNOW YOUR IMPACT DRIVER See Figure 16 page iv The safe use of ...

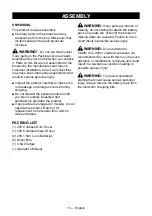
Страница 10: ...ries from the box Make sure that all items listed in the packing list are included WARNING Do not use this product if any parts on the Packing List are already assembled to your product when you unpack it Parts on this list are not assembled to the product by the manufacturer and require customer installation Use of a product that may have been improperly assembled could result in serious personal...

Страница 11: ...trigger switch delivers higher speed with increased trigger pressure and lower speed with decreased trigger pressure DIRECTION OF ROTATION SELECTOR FORWARD CENTER LOCK REVERSE See Figure 4 page ii The direction of bit rotation is reversible and is controlled by a selector located above the trigger switch With the tool held in normal operating position as shown in Figure 4 1 Position the direction ...

Страница 12: ...different types of screws nuts holes into different materials To use the torque setting rotate the mode selector to the driver mode 1 19 positions or drill mode The proper setting depends on the type of material and the application ADJUSTABLE TORQUE CLUTCH See Figure 8 page ii The higher the torque setting the more force the drill produces to turn an object in either LO or HI rotation speed When u...

Страница 13: ...the work 8 When drilling or driving into hard smooth surfaces use a center punch to mark the desired location of the hole This will prevent the bit from slipping off center as the hole is started 9 If the bit jams when drilling into the workpiece or if the tool stalls stop the tool immediately Remove the bit from the workpiece and determine the reason for jamming NOTICE This tool is equipped with ...

Страница 14: ...ration is dusty also wear a dust mask Belt Hook Available Separately See Figure 12 page iii A belt hook is available for separate purchase The hook enables you to conveniently hang the tool from your belt when tool is not in use Install the hook on either side of the tool Insert the tab of the hook into the slot in the tool base Secure the hook by tightening the screw through the hole in the hook ...

Страница 15: ...F ROTATION SELECTOR FORWARD CENTER LOCK REVERSE See Figure 19 page v The direction of bit rotation is reversible and is controlled by a selector located above the trigger switch With the impact driver held in normal operating position as shown in Fig 18 1 Position the direction of rotation selector to the left of the tool for forward rotation 2 Position the direction of rotation selector to the ri...

Страница 16: ...one Failure to heed this warning could result in possible serious injury Use an electrical testing device to check the voltage The voltage must comply with the information on the rating label BATTERY CHARGING PROCEDURE Align the battery pack to the slots on the charger and slide it in until it locks in place Connect the charger to the power supply Allow sufficient charging time see Product Specifi...

Страница 17: ...e a damp cloth or detergent on the battery or battery charger Always remove the battery pack before cleaning inspecting or performing any maintenance on the product The charger ensures maximum battery life because it measures the existing charge level of the battery and then charges with the required current and voltage Charge battery fully before storage Preparing to Charge a blinking red LED lig...

Страница 18: ...cement parts as listed in this manual Use of any other parts may create a hazard or cause product damage WARNING To avoid serious personal injury always remove the battery pack from the tool when cleaning or performing any maintenance GENERAL MAINTENANCE Avoid using solvents when cleaning plastic parts Most plastics are susceptible to damage from various types of commercial solvents and may be dam...

Страница 19: ...ry pack that is already fully charged Overcharging shortens battery life Once the battery pack is fully charged remove the battery from the charger and disconnect the charger from the outlet Do not store the battery pack on the tool or in the charger Charge the battery pack in a location where the temperature is between 40 F 4 C y 100 F 38 C If the battery pack is hot allow it to cool down before ...

Страница 20: ...echarge it and do not use Dispose of it and replace with a new battery pack DO NOT ATTEMPT TO REPAIR IT To avoid injury and risk of fire explosion or electric shock and to avoid damage to the environment Cover the battery terminals with heavy duty adhesive tape DO NOT attempt to remove or destroy any of the battery pack components DO NOT attempt to open the battery pack If a leak develops the rele...

Страница 21: ...r Release the sleeve Bit does not fit into the quick change chuck Impact Driver Use appropriately sized 1 4 in hexagonal quick change bit Motor overheats Cooling vents are clogged with saw dust or debris or are being covered by hand during operation Clear vents with compressed air Do not cover vents with hand during operation Two speed gearbox will not properly seat into the HI or LO position The ...

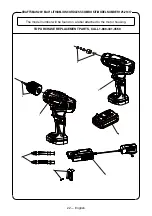
Страница 22: ...h TO PURCHASE REPLACEMENT PARTS CALL 1 888 331 4569 The model number will be found on a label attached to the motor housing 8 5 3 4 2 1 7 6 CRAFTSMAN 20V MAX LITHIUM ION CORDLESS COMBO KIT MODEL NUMBER 125 21417 ...

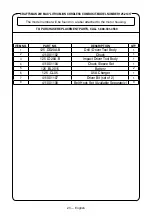
Страница 23: ...r will be found on a label attached to the motor housing ITEM NO PART NO DESCRIPTION QTY 1 125 DD20A B Drill Driver Tool Body 1 2 411001102 Chuck 1 3 125 ID20A B Impact Driver Tool Body 1 4 411001104 Chuck Sleeve Set 1 5 125 BL2015 Battery 2 6 125 CL05 0 5A Charger 1 7 411001107 Driver Bit set of 2 1 8 411001108 Belt Hook Set Available Separately 0 ...

Страница 24: ...orque Adjustable Ring Aro de ajuste de torque B Two Speed Gearbox Switch Selector de dos velocidades C Variable Speed Trigger Switch Gatillo de velocidad variable D Keyless Chuck Mandril sin llave E Direction of Rotation Selector Selector de la dirección de giro F LED Worklight Luz de trabajo LED G Battery Pack Batería H Handgrip Empuñadura Fig 1 i G B F C H D A E ...

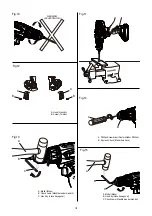
Страница 25: ... Decrease Torque Reducir el torque To Increase Torque Aumentar el torque A A Torque adjustable Ring Aro de ajuste de torque B Keyless Chuck Mandril sin llave C Chuck Jaws Mandíbulas del mandril A Chuck Jaws Mandíbulas del mandril B Keyless Chuck Mandril sin llave C Bit Punta B C RELEASE LIBERAR GRIP ASEGURAR C A B Fig 2 Fig 6 Fig 7 Fig 9 Fig 8 Fig 4 Fig 3 A A Direction Of Rotation Selector Selecto...

Страница 26: ...B Chuck Jaws Mandíbulas del mandril C Hex Key Llave hexagonal A Phillips Screwdriver Destornillador Phillips B Keyless Chuck Mandril sin llave A Hook Gancho B Screw Tornillo A Mallet Mazo B Hex Key Llave hexagonal C Chuck Jaws Mandíbulas del mandril iii A A B B A B A B C A B C ...

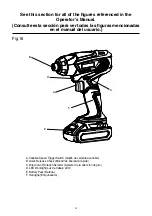
Страница 27: ...uras mencionadas en el manual del usuario A Variable Speed Trigger Switch Gatillo de velocidad variable B Quick Release Chuck Mandril de liberación rápida C Direction of Rotation Selector Selector de la dirección de giro D LED Worklight Luz de trabajo LED E Battery Pack Batería F Handgrip Empuñadura Fig 16 iv B D A F E C ...

Страница 28: ... liberación rápida A LED Worklight Luz de trabajo LED A A Direction Of Rotation Selector Selector de la dirección de giro Fig 17 Fig 19 Fig 18 Fig 20 Fig 21 v A Fig 22 A Belt Hook Gancho para cinturón B Screw Tornillo B A B A 12 mm 15 32 9 mm 3 8 A A Variable Speed Trigger Switch Gatillo de velocidad variable ...

Страница 29: ...ección para ver todas las figuras mencionadas en el manual del usuario B A C Fig 23 Fig 24 Fig 25 vi A Battery Batería B Battery Latch Pestillo de la batería C Release Button Botón de liberación B A A Indicator Light Luces indicadora B Power Cord Cable A B A Battery Batería B Charger Cargador ...

Страница 30: ...esgo de que se produzcan INSTRUCCIONES DE SEGURIDAD descargas eléctricas No maltrate el cable Nunca utilice el cable para transportar la herramienta jalar de ella o desenchufarla Mantenga el cable alejado del calor de aceites bordes afilados o partes móviles Los cables dañados o enredados incrementan el riesgo de sacudidas eléctricas Cuando maneje una herramienta eléctrica en espacios exteriores u...

Страница 31: ...gadas fuera del alcance de los niños y no permita que personas que no conozcan la herramienta eléctrica o estas instrucciones utilicen la herramienta eléctrica Las herramientas eléctricas son peligrosas cuando se encuentran en manos de usuarios que no han sido instruidos en su uso Mantenimiento de las herramientas eléctricas Revise la máquina por si hubiera señales de desalineación ligaduras entre...

Страница 32: ...se utiliza con otro paquete de batería diferente No cargue la batería en condiciones INSTRUCCIONES DE SEGURIDAD húmedas o en un lugar mojado Siga esta regla y reducirá el riesgo de descargas eléctricas No coloque herramientas a batería ni sus baterías cerca del fuego o calor Esto reducirá el riesgo de explosión y posibles lesiones No abra ni desarme la batería Los electrolitos liberados son corros...

Страница 33: ...o en la sección Especificaciones del producto de este manual No utilice un cargador que se haya caído o recibido un golpe duro No desarme el cargador Llévelo a un centro de servicio calificado para que lo inspeccionen o cambien Un procedimiento de reensamblaje incorrecto puede provocar descargas eléctricas o incendios No maltrate el cable del cargador Jamás utilice el cable para transportar el car...

Страница 34: ...a No elimine las baterías lanzándolas a ríos ni las sumerja en agua Alerta de calor No exponga las baterías a un calor superior a 60 C Símbolo sin manos No mantener sus manos alejadas de la cuchilla provocará graves lesiones personales Superficie caliente Para reducir el riesgo de daños o lesiones evite el contacto con cualquier superficie caliente Reciclaje de la batería de iones de litio Indica ...

Страница 35: ...ncial la cual de no evitarse podría causar una muerte o lesiones graves CUIDADO Indica una situación peligrosa potencial la cual de no evitarse podría causar una lesión menor o moderada AVISO Sin símbolo de alerta de seguridad Indica una situación que podría causar daños a la propiedad Las siguientes palabras y significados están diseñados para explicar los niveles de riesgo asociados a este produ...

Страница 36: ...nalámbrico con batería Motor 20 V máx d c Tamaño del mandril de liberación rápida 6 35 mm 1 4 in hexagonal Sin velocidad de carga 0 2500 rpm Frecuencia de impacto 0 3100 ipm Torque máximo 1100 in lbs Peso con la batería incluida 1 22 Kg 2 8 lbs Batería N de modelo 125 BL2015 Tipo Iones de litio Voltaje de la batería 20 V máx d c Capacidad de la batería 1 5 Ah Cargador N de modelo 125 CL05 Voltaje ...

Страница 37: ... de la broca Mueva el selector hacia la posición OFF bloqueo al centro para reducir la posibilidad CARACTERÍSTICAS de un encendido accidental de la herramienta cuando no esté en uso LUZ DE TRABAJO LED La luz de trabajo LED ubicada debajo del gatillo del taladro se enciende al presionar el gatillo Esta característica ofrece una mayor visibilidad al trabajar CONOZCA SU DESTORNILLADOR DE IMPACTO Cons...

Страница 38: ...en la lista de componentes del empaque estén incluidos ADVERTENCIA No utilice este producto si alguna de las piezas mencionadas en la lista de componentes del empaque ya está ensamblada en el producto al desempacarlo Las piezas mencionadas en esta lista no vienen ensambladas al producto y requiere que el cliente las instale Usar un producto que podría haberse ensamblado de manera errónea podría ca...

Страница 39: ... herramienta presione el gatillo Para apagar la herramienta suelte el gatillo El interruptor de velocidad variable ofrece una mayor velocidad a una mayor presión sobre el gatillo y una menor velocidad a una menor presión sobre el gatillo SELECTOR DE LA DIRECCIÓN DE GIRO HACIA ADELANTE BLOQUEO CENTRAL REVERSA La dirección de giro de la punta se puede revertir y ésta se controla mediante un selector...

Страница 40: ... está andando El taladro posee un mandril sin llave que permite apretar o soltar brocas de manera rápida Las flechas del mandril indican la dirección de giro hacia donde se debe mover para ASEGURAR o LIBERAR la broca del mandril ADVERTENCIA No sostenga el mandril con una mano y use la fuerza de la herramienta para apretar la broca en el mandril El mandril podría resbalarse de su mano o bien su man...

Страница 41: ...oca del material de trabajo y determine la razón del atasco AVISO Esta herramienta posee un freno eléctrico Cuando el freno funciona correctamente USO DEL TALADRO DESTORNILLADOR ADVERTENCIA Asegúrese de insertar la broca de manera recta hacia el mandril No inserte la broca en el mandril en un ángulo y luego la apriete como se indica en la figura 10 Esto podría provocar que la broca salga disparada...

Страница 42: ...l punto inicial 4 Mantenga una velocidad y presión que permita perforar sin sobrecalentar la broca Aplicar demasiada presión Sobrecalentará la broca Gastará los cojinetes Doblará o quemará la broca Producirá orificios de forma irregular o alejados de la zona de perforación deseada 5 Al perforar agujeros grandes en metal comience con una broca pequeña y luego finalice con una más grande ADVERTENCIA...

Страница 43: ...D VARIABLE Consulte la Figura 18 página v Para encender el destornillador de impacto presione el gatillo Para apagar la herramienta USO DEL DESTORNILLADOR DE IMPACTO suelte el gatillo El interruptor de velocidad variable ofrece una mayor velocidad a una mayor presión sobre el gatillo y una menor velocidad a una menor presión sobre el gatillo SELECTOR DE LA DIRECCIÓN DE GIRO HACIA ADELANTE BLOQUEO ...

Страница 44: ...con firmeza No use otro tipo de puntas NOTA Si la punta de destornillador no está insertada lo suficiente en la manga ésta no volverá a su posición original y la punta no quedará asegurada En tal caso intente reinsertar la punta siguiendo las instrucciones anteriores NOTA Tras insertar la punta de destornillador asegúrese de que esté asegurada con firmeza Si se sale no la use NOTA Inserte un adapt...

Страница 45: ...nectado a una toma de corriente pero que no está listo para comenzar el proceso de carga Cargando un LED rojo continuo en el cargador indica que la batería está cargando normalmente Cargada un indicador LED verde continuo en el cargador indica que la batería está lista para usarse Las luces del cargador indican su estado de carga El cargador garantiza el máximo de vida útil de la batería ya que mi...

Страница 46: ...eo aceites penetrantes etc entren en contacto con las piezas móviles Los químicos pueden dañar debilitar o destruir el plástico lo cual podría causar graves lesiones personales ADVERTENCIA Al realizar reparaciones utilice solo piezas de repuesto idénticas a las indicadas en este manual El uso de otras piezas podría generar un peligro o dañar al producto Para garantizar la seguridad y confiabilidad...

Страница 47: ...roteja del polvo CUIDADO Y MANTENIMIENTO TRANSPORTE Coloque el selector de la dirección de giro en la posición OFF y extraiga la batería antes de transportar el producto Normalmente transporte siempre la herramienta tomándola desde su empuñadura Si la herramienta tiene instalado un gancho para cinturones puede transportarla colgando desde su cinturón Proteja la herramienta contra golpes duros o vi...

Страница 48: ...alguno de los componentes de la batería NO intente abrir la batería Si ocurre una fuga los electrolitos liberados son corrosivos y tóxicos NO deje que la solución entre en contacto con sus ojos o piel ni tampoco la trague NO coloque estas baterías junto con su basura doméstica regular NO incinerar NO deje las baterías en un lugar donde se recojan para ser llevadas a algún relleno sanitario o siste...

Страница 49: ... La punta no calza en el mandril de cambio rápido destornillador de impacto Use una punta de cambio rápido hexagonal de 1 4 in adecuada El motor se caliente en exceso Las rejillas de ventilación están tapadas con polvo o sedimentos o bien están cubiertas con la mano durante el uso Limpie las rejillas usando aire comprimido No cubra las rejillas con la mano durante el uso La caja de dos velocidades...

Страница 50: ...ZAS DE REPUESTO LLAME AL 1 888 331 4569 El número de modelo se encuentra en la etiqueta adjunta a la carcasa del motor KIT COMBINADO INALÁMBRICO CRAFTSMAN DE 20 V MAX CON BATERÍA DE LITIO NÚMERO DE MODELO 125 21417 8 5 3 4 2 1 7 6 ...

Страница 51: ...rnillador de impacto 1 4 411001104 Juego de manga del mandril 1 5 125 BL2015 Batería 2 6 125 CL05 Cargador de 0 5 A 1 7 411001107 Punta de destornillador juego de 2 1 8 411001108 Juego del gancho para cinturones disponible por separado 0 El número de modelo se encuentra en la etiqueta adjunta a la carcasa del motor KIT COMBINADO INALÁMBRICO CRAFTSMAN DE 20 V MAX CON BATERÍA DE LITIO NÚMERO DE MODE...

Страница 52: ...25 Español To order replacement parts or schedule repair service Para ordenar piezas o pedir servicio de reparación 1 888 331 4569 ...

Отзывы: