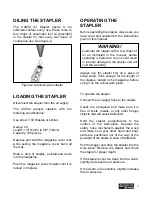
Craftex CX902 Скачать руководство пользователя страница 7


7

OILING THE STAPLER 


The CX902 Air Stapler needs to be 
lubricated before every use. Place three to 
four drops of pneumatic tool oil (provided) 
in the stapler air inlet every two hours of 
continuous use. See figure-2. 

Figure-2 Lubricating the stapler 


LOADING THE STAPLER 


Disconnect the stapler form the air supply. 
 
The CX902 accepts staplers with the 
following specifications: 
 
Use arrow T-50 Staples or similar. 
 
Gauge: 20 
Length: 1/4" (6mm) to 5/8" (16mm) 
Capacity: 100 pieces 
 
Depress and hold the magazine cover lock 
while pulling the magazine cover back all 
the way. 
 
Slide a strip of staples, pointed-end down 
into the magazine. 
 
Push the magazine cover forward until it is 
locked in its place. 


OPERATING THE 
STAPLER 


Before operating the stapler, make sure you 
have read and understood the instructions 
given in this manual. 

 
Always use the stapler first on a piece of 
scrap wood; thick enough for the length of 
the staples, loaded in the magazine, before 
using it on the actual work-piece. 
 
 
To operate the stapler: 
 
Connect the air supply hose to the stapler. 
 
Check the work-piece and make sure it is 
free of knots, metals, or any other foreign 
objects that will cause deflection.  
 
Hold the stapler perpendicular to the 
surface of the work-piece. Depress the 
safety nose mechanism against the wood 
and make sure your other hand and body 
parts are positioned out of the way of the 
potential of the staple in case of deflection. 
 
Pull the trigger and drive the stapler into the 
work-piece. Remove the stapler and check 
the staple for proper depth. 
 
If the staple is shot too deep into the wood, 
slightly decrease the air pressure. 
 
If the depth is too shallow, slightly increase 
the air pressure. 
 

WARNING! 

Lubricate the stapler with a few drops of 
oil as instructed in the manual, before 
operating it. Failure to do so could result 
in internal damage to the stapler and will 
void the warranty. 

Содержание CX902

Страница 1: ...CX902 T 50 AIR STAPLER User Manual ...

Страница 2: ...ic Tools 3 CX902 Specific Safety Instructions 4 CX902 Features 5 Unpacking 6 Inventory 6 Safety Nose Mechanism 6 Oiling the Stapler 7 Loading the Stapler 7 Operating the Stapler 7 Removing the Jammed Nails 8 Cleaning 8 Parts Diagram 9 Parts List 10 Warranty 12 ...

Страница 3: ...king other adjustments or repairs Never leave a tool unattended while it is in operation Do not force the tool It will do a better and safer job at the rate for which it is designed Always use the right tool Do not attach any part to the tool for which it is not designed Always check the hose for any damage before using the pneumatic tool Disconnect the tool before servicing changing accessories o...

Страница 4: ... fitting that allows air to remain in the tool If used the tool can remain charged with air after disconnecting and this will be able to drive a fastener even after the air hose is disconnected possibly causing injury Do not connect the stapler to pressurized oxygen or other combustible gases as a power source Only use regulated compressed air Do not use gasoline or any other flammable liquids to ...

Страница 5: ...sfaction The CX902 is a professional tool and like all pneumatic tools proper care and safety procedures should be adhered to TOOL AIR FITTING This tool uses a 1 4 NPT male plug OPERATING PRESSURE 60 to 100 PSI MAX 120 PSI AIR CONSUMPTION 0 98 SCFM 90 PSI STAPLER DIMENSIONS 9 5 24cm x 6 5 17cm x 2 5 6cm FASTENER SIZE Uses Arrow T 50 Staples and Similar Gauge 20 Length 1 4 6mm x 5 8 16mm Capacity 1...

Страница 6: ...safe use To check the safety nose mechanism Make sure the stapler is disconnected from the air supply Make sure the magazine is empty Make sure the trigger and the safety nose mechanism move up and down without sticking Connect the stapler to the air supply Without pressing the trigger depress the safety nose mechanism against a scrap piece of wood that is clean and free of any knots nails staples...

Страница 7: ...pler first on a piece of scrap wood thick enough for the length of the staples loaded in the magazine before using it on the actual work piece To operate the stapler Connect the air supply hose to the stapler Check the work piece and make sure it is free of knots metals or any other foreign objects that will cause deflection Hold the stapler perpendicular to the surface of the work piece Depress t...

Страница 8: ...bly Now the jammed staple should be visible Remove it with a pair of needle nose pliers Re install the driver guide cover and load a new staples stick Check the safety nose mechanism before using the stapler again CLEANING Always keep the stapler clean from dust chips sand and etc in the air connectors or into the body Use a good solvent to clean the nose assembly of the stapler and make sure the ...

Страница 9: ...9 ...

Страница 10: ...10 ...

Страница 11: ...11 ...

Страница 12: ...er handy All returned merchandise will be subject to a minimum charge of 15 for re stocking and handling with the following qualifications Returns must be pre authorized by us in writing We do not accept collect shipments Items returned for warranty purposes must be insured and shipped pre paid to the nearest warehouse Returns must be accompanied with a copy of your original invoice as proof of pu...

Отзывы: