background image


3

GENERAL SAFETY INSTRUCTIONS


Extreme caution should be used when operating all power tools. Know your power 
tool, be familiar with its operation, read through the owner’s manual and practice 
safe usage procedures at all times. 


CONNECT

 your machine only to the 

matched and specific power source. 


ALWAYS

 wear safety glasses 

respirators, hearing protection and 
safety shoes, when operating your 
machine. 


DO NOT

 wear loose clothing or 

jewelry when operating your machine. 


GROUND ALL TOOLS

 if tool is 

equipped with three-prong plug, it 
should be plugged into a three-hole 
electrical receptacle. If an adapter is 
used to accommodate a two-prong 
receptacle, the adapter plug must be 
attached to a known ground. Never 
remove the third prong. 


A SAFE ENVIRONMENT


is   

important. Keep the area free of dust, 
dirt and other debris in the immediate 
vicinity of your machine. 


KEEP CHILDREN AND VISITORS 
AWAY

. All children and visitors should 

be kept a safe distance from work 
area. 


NEVER

 leave a tool unattended while 

the machine is in operation. 


DON’T OVERREACH

. Keep proper 

footing and balance at all times. 


DISCONNECT

 the machine from the 

power source when changing drill bits, 
hollow chisels, router bits, shaper 
heads, blades, knives, or making other 
adjustments or repairs. 


SECURE WORK

. Use clamps or a vise 

to hold work when practical. It’s safer 
than using your hand and frees both 
hands to operate tool. 


BE ALERT!  DO NOT

 use prescription 

or other drugs that may affect your 
ability or judgment to safely use your 
machine. 


MAINTAIN TOOLS IN TOP 
CONDITION

. Always keep the blades 

sharp and aligned. Follow instructions 
given in the user manual for lubricating 
and changing accessories. 


DISCONNECT TOOLS

 before servicing 

and when changing accessories such as 
blades, bits, cutters, etc. 


ALWAYS

 keep all safety guards in 

place and ensure their proper function. 


 The dust generated by certain woods 

and wood products can be injurious to 
your health. 

ALWAYS

 operate 

machinery in well ventilated areas use 
wood dust collection systems whenever 
possible. 

Содержание CX405

Страница 1: ...CX405 2 HP DUST COLLECTOR User Manual ...

Страница 2: ...05 Specific Safety Instructions 4 Features 5 Physical Features 6 Unpacking 7 Setup 7 Proper Grounding 8 Assembly 9 Test Run 11 Operation 12 Maintenance 12 Bag Cleaning 12 Cleaning the Canister 12 Lubrication 12 Parts Breakdown 13 Parts List 14 Warranty 15 ...

Страница 3: ...tors should be kept a safe distance from work area NEVER leave a tool unattended while the machine is in operation DON T OVERREACH Keep proper footing and balance at all times DISCONNECT the machine from the power source when changing drill bits hollow chisels router bits shaper heads blades knives or making other adjustments or repairs SECURE WORK Use clamps or a vise to hold work when practical ...

Страница 4: ...and safety glasses when emptying dust from the collection bags NEVER operate the dust collector with all blast gates closed ALWAYS disconnect the dust collector from its power source when changing or emptying the bags ALWAYS be sure that the collection and filter bags are securely fastened to collector body DO NOT place your hand or tools nears the open inlet while operation Serious personal injur...

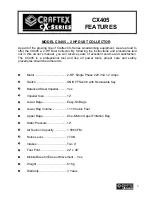
Страница 5: ... a professional tool and like all power tools proper care and safety procedures should be adhered to Motor 2 HP Single Phase 220 Volt 12 Amps Switch ON OFF Switch with Removable Key Balanced Steel Impeller Yes Impeller Size 12 Lower Bags Easy On Bags Lower Bag Volume 11 10 Cubic Feet Upper Bags One Micron Upper Filtration Bag Static Pressure 12 Air Suction Capacity 1 596 CFM Noise Level 77 dB Inta...

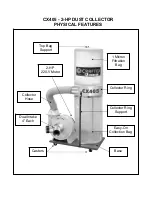
Страница 6: ...05 2 HP DUST COLLECTOR PHYSICAL FEATURES 1 Micron Filtration Bag Collector Hose 2 HP 220 V Motor Collector Ring Support Casters Base Easy On Collection Bag Collector Ring Dual Intake 4 Each Top Bag Support ...

Страница 7: ...On Bottom Bags 5 E Base Unit 1 F Dual Intake 4 Each 1 G Hose 1 H Outlet Connector 1 I Casters 4 J Hardware Bag 1 K Gasket 1 L Collector Ring Supports 2 M Top Bag Supports 1 N Hose Clamps 2 SETUP Before setting up your machine you need to read and understand this user manual completely The CX405 features four casters installed to its base unit for easy mobility If you want to use the CX405 as a sta...

Страница 8: ... a 3 prong grounded receptacle as shown in figure 2 Do not remove the grounding prong to fit it into a 2 pronged outlet Figure 2 220 Volts outlet for CX405 It is strongly recommended not to use extension cords with your CX405 Always try to position your machine close to the power source so that you do not need to use extension cords In case if you really find it necessary to use an extension cord ...

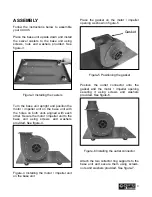
Страница 9: ...Secure the motor impeller unit to the base unit using screws and washers provided See figure 4 Figure 4 Installing the motor impeller unit on the base unit Place the gasket on the motor impeller opening as shown in figure 5 Figure 5 Positioning the gasket Position the outlet connector onto the gasket and the motor impeller opening securing it using screws and washers provided See figure 6 Figure 6...

Страница 10: ...g screws nuts and washers provided Figure 8 Installing the collector ring and the upper bag support Take the hose provided and attach it with its one to the outlet connector and the other end to the collector ring See figure 9 Use the hose clamps provided to secure the hose on both ends Figure 9 Connecting the hose from the outlet connector to the collector ring Hang the top bag from the support a...

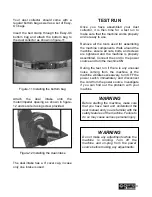
Страница 11: ... tools used for assembling the machine components Walk around the machine ensure all nuts bolts and screws are tightened and the machine is properly assembled Connect the cord to the power source and turn the machine ON During the test run if there is any unusual noise coming from the machine or the machine vibrates excessively turn OFF the power switch immediately and disconnect the cord from the...

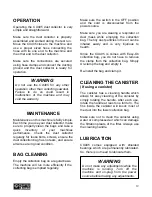
Страница 12: ...e wearing a respirator or dust mask while emptying the collection bag The tiny dust particles in the air can be inhaled easily and is very injurious to health Since the CX405 is comes with Easy On collection bag you do not have to remove the clamp from the collection bag Simply Un clamp the bag and empty it Re install the bag and clamp it CLEANING THE CANISTER If using a canister The canister has ...

Страница 13: ...13 CX405 DUST COLLECTOR PARTS BREAKDOWN ...

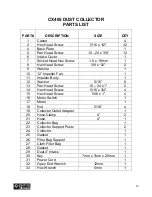
Страница 14: ... 8 13 Pan Head Screw 10 24 x 1 2 14 Hex Head Screw 5 16 x 3 4 4 15 Hex Head Screw 5 16 x 1 4 16 Motor Switch 1 17 Motor 1 18 Nut 5 16 4 19 Collector Outlet Adapter 1 20 Hose Clamp 4 2 21 Hose 4 1 22 Collector Bag 1 23 Collector Support Posts 2 24 Collector 1 25 Gasket 1 26 Filter Bag Support 1 27 Cloth Filter Bag 1 28 Gasket 1 29 Dual 4 Intake 1 30 Key 7mm x 7mm x 29mm 1 31 Power Cord 1 32 Open En...

Страница 15: ...er handy All returned merchandise will be subject to a minimum charge of 15 for re stocking and handling with the following qualifications Returns must be pre authorized by us in writing We do not accept collect shipments Items returned for warranty purposes must be insured and shipped pre paid to the nearest warehouse Returns must be accompanied with a copy of your original invoice as proof of pu...

Отзывы: