background image

Single Phase 

Refer to the wire drawing inside the electrical box and 
above for proper motor and transformer connections, 
lead selection and wiring connections from the motor 
to the power source for the voltage you are using. 
Important: Immediately after wiring the machine, 
remove the drive belt, turn on the power and make 
sure the motor is running in the right direction 
(counter-clockwise when looking at the motor shaft.)   


Three Phase 

Refer to the wire drawing inside the electrical box and 
above for proper motor and transformer connections, 
lead selection and wiring connections from the motor 
to the power source for the voltage you are using. 
Important: Immediately after wiring the machine, 
remove the drive belt, turn on the power and make 
sure the motor is running in the right direction 
(counter-clockwise when looking at the motor shaft.) If 
it is not, disconnect the machine from the power 
source and interchange any two lead lines. 


General Operating Instructions 

Removing and Installing the Blade 

When your machine was shipped, a blade was 
supplied and assembled to the saw. When selecting a 
new blade refer to the selection of sawblades. The 
machine requires a blade 1”

×

0.032”

×

119

1

/

2

”. 

(27MM

×

0.9MM

×

3035MM) 

1.  Disconnect the machine from the power source. 

2.  Raise the saw frame about 6” and close the feed 

control valve by turning it clockwise as far as it will 
go. (Do Not Overtighten.) 

3.  Open both wheel covers and clean the chips out 

of the machine. 

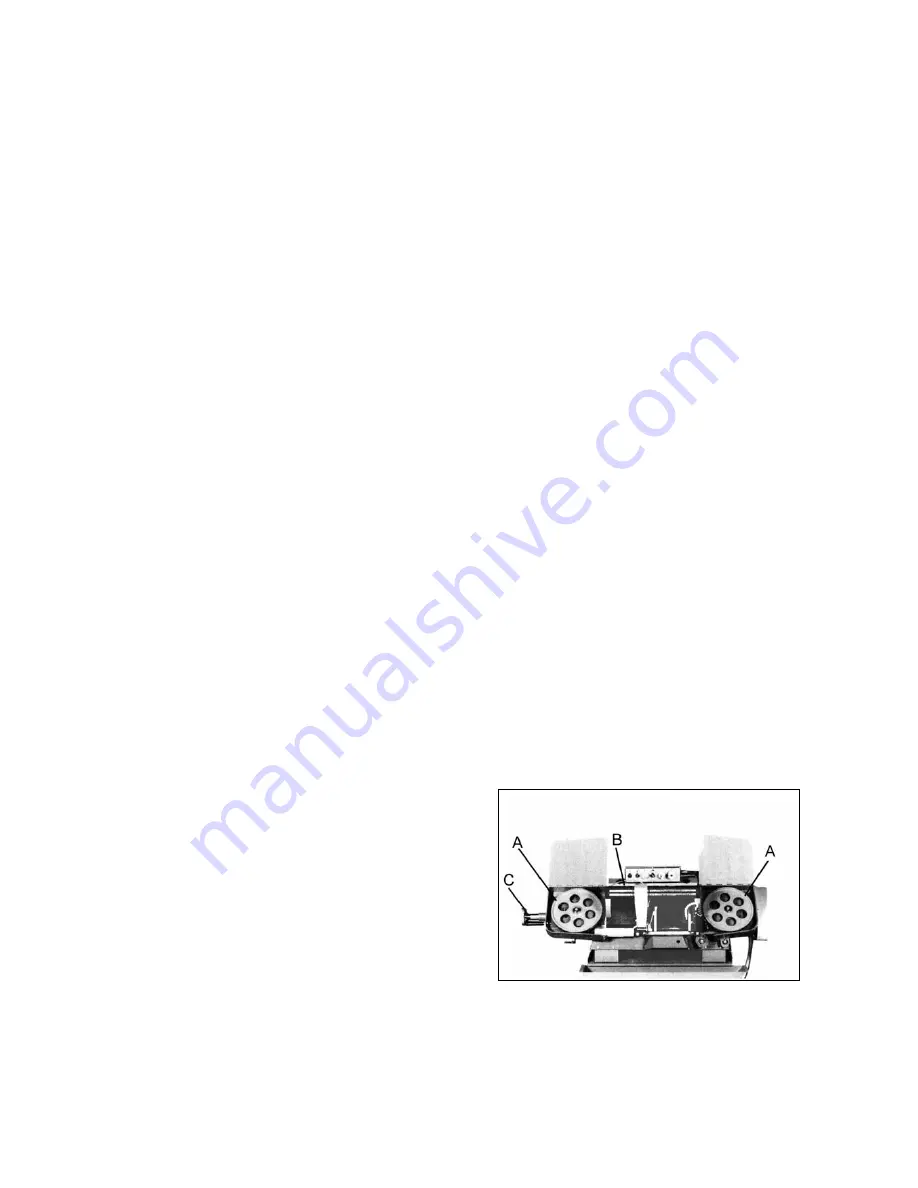
4.  Release blade tension by turning the blade 

tension handwheel (C) Fig.1 counter-clockwise. 

5.  Slide left blade guide arm to the right as far as 

possible. 

6.  Remove the blade from both wheels and out of 

each blade guide. 

7.  Make sure the teeth of the new blade are pointing 

in the direction of travel. If necessary, turn the 
blade inside out. 


Fig. 1 


Содержание B2060V

Страница 1: ......

Страница 2: ......

Страница 3: ...ETY GLASSES Also use face or dust mask if cutting operation is dusty Everyday eyeglasses only have impact resistant lenses they are NOT safety glasses 12 SECURE WORK Use clamps or a vise to hold work when practical It s safer than using your hand and it frees both hands to operate tool 13 DON T OVERREACH Keep proper footing and balance at all times 14 MAINTAIN TOOLS WITH CARE Keep tools sharp and ...

Страница 4: ...A Never use a blade so coarse that less than 3 teeth are engaged in the workpiece at any time Too few teeth will cause teeth to strip out B Never use a blade finer than required to obtain a satisfactory surface finish or satisfactory flatness Too many teeth engaged in the workpiece will prevent attainment of a satisfactory sawing rate frequently cause premature blade wear frequently produce dished...

Страница 5: ...2 ...

Страница 6: ...3 ...

Страница 7: ...n counter clockwise when looking at the motor shaft If it is not disconnect the machine from the power source and interchange any two lead lines General Operating Instructions Removing and Installing the Blade When your machine was shipped a blade was supplied and assembled to the saw When selecting a new blade refer to the selection of sawblades The machine requires a blade 1 0 032 1191 2 27MM 0 ...

Страница 8: ...nst the wheel flanges of both wheels and properly inserted into the guides finish putting tension on the blade Proper tension is achieved when the pointer is on the left mark of the blade tension scale behind the driven wheel 12 Jog the power on and off to be sure the blade is in place and tracking properly If blade is not tracking properly refer to the section tracking the blade Starting and Stop...

Страница 9: ...lade wheels and blade 7 Tighten locking bolts A once properly tracking is completed 8 Connect machine to the power source Adjusting Feed Rate When the oil regulating micro switch A Fig 6 is turned clockwise as far as it will go the saw frame will not move down By turning the feed control valve counter clockwise you regulate the flow of oil from the cylinder and determine the speed at which the saw...

Страница 10: ...the workpiece has been completely cut move the micro switch mounting plate up Thrust Roller Adjustment 1 Disconnect machine from the power source 2 Loosen two hex socket cap screws A Fig 8 3 Move guide seat B Fig 8 up or down until a clearance of 0 003 to 0 005 between back of blade and thrust roller is obtained 4 Tighten two hex socket cap screws A Fig 8 5 Repeat for other blade guide assembly 6 ...

Страница 11: ...justing to parallel and tightening bolt Setting Up the Machine for Operation 1 Select the proper speed and blade for the type of material you are going to cut 2 Make sure blade tension is adjusted properly 3 Lift the saw frame up and turn off the oil regulating micro switch 4 Place the stock between the vise jaws set the stock for the desired width of cut and tighten the vise 5 Make sure the left ...

Страница 12: ... belt tension is obtained and tighten tension lock knob 5 Close belt and pulley guard For 916V Your machine is provided with variable speed equipment the ranges are 67 212FPM for 50HZ and 82 259 for 60HZ 1 While your machine is running speed can be adjusted 2 Turn handle knob A Fig 13 clockwise to increase the speed 3 Turn hand knob counter clockwise to decrease the speed Gear Case After the first...

Страница 13: ...e 1 43 Hex Cap Bolt M8 20 2 9 1 Hex Cap Bolt M10 30 2 44 Hex Cap Bolt M6 12 4 10 Chip Tray 1 45 Limit Switch 1 11 Bed 1 47 Cylinder Pin 1 11 1 Nut M10 1 48 C Ring S 20 1 11 2 Hex Cap Bolt M10 30 1 49 C Ring S 25 2 12 Hex Cap Bolt M8 30 8 50 Hex Cap Bolt M12 40 1 13 Washer M8 8 51 Hydraulic Cylinder Assembly 1 14 Lock Washer M8 8 52 Cylinder Pin Top 1 15 Nut M8 8 52 1 Pin 1 16 Work Stop Bracket 1 5...

Страница 14: ...Blade Wheel Cover Left 1 118 1 Lock Washer M8 2 80 Blade Wheel Cover Right 1 119 Hex Cap Bolt M12 35 2 81 Hex Socket Cap Screw M6 8 6 120 Washer M12 2 82 Bushing 1 121 Ball Bearing 6205Z 3 83 Washer 1 122 Idler Wheel 1 84 Drive Wheel 1 123 Blade Guard 1 85 Blade 3035MM 1 123 1 Hex Cap Bolt M8 16 1 86 Hex Cap Bolt M12 20 2 123 2 Washer M8 2 87 Round Head Screw M5 10 2 124 Guide Bracket Left 1 88 Fi...

Страница 15: ...5 Nut M12 1 192 Hex Socket Cap Screw M8 20 4 155 1 Hex Cap Bolt M12 30 4 193 Hex Socket Cap Screw M12 20 1 155 2 Lock Washer M12 4 193 1 Washer 1 155 3 Washer M12 4 194 Gib 2 156 Stand Bolt M12 50 1 195 Hex Cap Bolt M16 30 3 157 Blade Guard 1 196 Hex Cap Bolt M10 60 3 157 1 Blade Guard Down 1 197 Lock Washer M10 3 158 Lock Knob 1 4 10 2 V96 Pulley Cover 1 159 Hose 8 700MM 1 V96 1 Pulley Cover Plat...

Страница 16: ...13 ...

Страница 17: ...14 ...

Страница 18: ......

Отзывы: