TM
s
teP
3
c
i
nStallinG
the
S
uPPort
a
rm
i
nStallinG
the
S
uPPort
a
rm
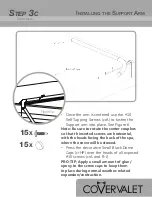
• Once the arm is centered use the #10
Self Tapping Screws (crA) to fasten the
Support arm into place. See Figure 6.
Note: Be sure to rotate the center couplers
so that th inserted screws are horizontal,
with the heads facing the back of the spa,
where the cover will be stowed.
• Press the decorative Small Black Dome
Caps (crHP) over the heads of all exposed
#10 screws (crA and R-J).
PRO-TIP; Apply a small amount of glue/
epoxy to the screw caps to keep them
in place during normal weather-related
expansion/contraction.
15
x
15
x
C
ontinued
...
Figure 6a


