Cotech GTC350B Скачать руководство пользователя страница 2

2

EN

GL

IS

H

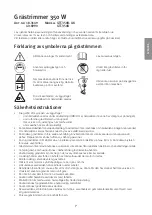
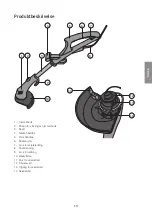
Grass Trimmer, 350 W

Art.no 18-3149 

Model  GTC350B-UK


40-6990  

GTC350B

Please read the entire instruction manual before using the product and save it for future reference.
We reserve the right for any errors in text or images and any necessary changes made to technical data.
If you have any questions regarding technical problems please contact Customer Services.

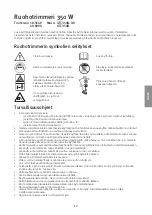
Grass trimmer symbol explanation


WARNING! Grass trimmers can 
be dangerous.


Wear eye and ear protection.


There is a risk of objects being 
thrown from the machine during use. 
Keep all bystanders at distance of 
15 metres.


Unplug the mains lead immediately if 
it is damaged.


Read the instruction manual.


Do not expose the grass trimmer to 
rain or moisture.


Keep all persons or animals at a safe 
distance from the machine.

Safety instructions

•   

Pull out the plug from the wall socket: 


-


if the mains lead is damged during use. (

Note:

 Do not touch the lead until you have turned off the power)


-


if you leave the trimmer unattended


-


before servicing or adjusting the trimmer head


-


if the machine starts to vibrate heavily

•   

Check the mains lead before each use. The grass trimmer must not be used if it is damaged in any way. 

•   

If the mains lead is damaged it must only be replaced by a qualified tradesman.

•   

Check the grass trimmer before each use. Do not use it if it is damaged. Repair it if necessary. 

Repairs should only be carried out by a qualified tradesman.

•   

Connect the grass trimmer to the mains via an RCD with a tripping current of max 30 mA. 

Check the RCD before each use.

•   

The grass trimmer must only be used by persons familiar with its functions and applications.

•   

Never allow children or pets close to the trimmer when it is used.

•   

Never use the trimmer if any of its safety devices is damaged or missing.

•   

Never have your hands or feet close to the trimmer head when starting the motor.

•   

Never attach metal cutting blades to this grass trimmer.

•   

Keep the motor’s air vents free from grass and leaves.

•   

Keep the extension lead away from the trimmer line during use.

•   

The trimmer line will continue to rotate after the motor has been turned off. 

Wait until the line has completely stopped before servicing.

•   

Avoid cutting wet grass.

•   

Keep your hands and feet away from the rotating trimmer line.

•   

Always wear non-slip safety footwear with reinforced toe caps.

•   

Always set the trimmer head to the normal position following any adjustments or changes of line.

•   

Use only original trimmer line, never use metal trimmer line.

•   

Use only approved extension leads.

•   

The socket of the extension lead must be shielded from water splashes, be made of rubber or have 

a splashproof cover.

• 

 Store the grass trimmer out of children’s reach.

Содержание GTC350B

Страница 1: ...ye og forsikre deg om at du forst r dem f r du tar produktet i bruk Ta vare p anvisningene for seinere bruk T rke tietoa Lue n m ohjeet huolellisesti ja varmista ett olet ymm rt nyt ne ennen kuin ala...

Страница 2: ...by a qualified tradesman Check the grass trimmer before each use Do not use it if it is damaged Repair it if necessary Repairs should only be carried out by a qualified tradesman Connect the grass tri...

Страница 3: ...3 Shaft 4 Lower handle 5 Upper handle 6 Power switch 7 Extension lead hook 8 Mains lead 9 Hook for lead storage 10 Guard 11 Trimmer line cutter 12 Trimmer line cassette 13 Line feed hole 14 Trimmer li...

Страница 4: ...a click Replace the screw Use Starting the trimmer 1 Make sure that the trimmer line is long enough If it too short push in the centre of the cassette whilst simultaneously pulling out the ends of th...

Страница 5: ...tart the trimmer and let it reach operational speed before you start to cut any grass Do not cut wet or damp grass Always clean the trimmer guard before putting the trimmer away Replacing the trimmer...

Страница 6: ...uct please contact your municipality Specifications Power supply 230 V AC 50 Hz Power 350 W Speed no load 10 000 rpm Trimmer line 1 2 mm Cutting diameter 25 cm Weight 2 2 kg Vibration 5 m s Uncertaint...

Страница 7: ...ficerad personal Kontrollera gr strimmern f re varje anv ndning Anv nd den inte om den r skadad utan reparera vid behov Reparation f r endast utf ras av beh rig personal Anslut gr strimmern till eln t...

Страница 8: ...rhuvud 3 Skaft 4 Nedre handtag 5 vre handtag 6 Str mbrytare 7 Krok f r skarvsladd 8 N tsladd 9 Krok f r sladdf rvaring 10 Skydd 11 Kniv f r sk rtr d 12 Tr dkassett 13 Utg ng f r sk rtr d 14 Sk rtr d 1...

Страница 9: ...p tills du h r ett klickljud Skruva fast skruven igen Anv ndning Att starta trimmern 1 Kontrollera att sk rlinan har tillr cklig l ngd Om den r f r kort tryck in centrum p spolen och drag samtidigt i...

Страница 10: ...rn s att den har kommit upp i varv innan du kommer i kontakt med gr set du ska sl Klipp inte fuktigt gr s F re f rvaring g r rent skyddet Byte av sk rtr d 1 St ng av apparaten och dra stickproppen ur...

Страница 11: ...os ker p hur du ska g tillv ga kontakta din kommun Specifikationer Str mf rs rjning 230 V AC 50 Hz Effekt 350 W Hastighet obelastad 10 000 varv min Sk rtr d 1 2 mm Klippdiameter 25 cm Vikt 2 2 kg Vibr...

Страница 12: ...cepersonale Kontroller gresstrimmeren f r hver gang den skal benyttes Ikke bruk den dersom den er skadet Reparer den ved behov Reparasjoner m kun utf res av kvalifiserte personer Gresstrimmeren kobles...

Страница 13: ...3 Skaft 4 Nedre h ndtak 5 vre h ndtak 6 Str mbryter 7 Krok for skj teledning 8 Str mledning 9 Krok for ledning 10 Beskyttelse 11 Kniv for skj retr d 12 Tr dkassett 13 Utgang for skj retr d 14 Skj retr...

Страница 14: ...h rer et klikk Fest skruen igjen Bruk starte trimmeren 1 Kontroller at skj retr den er tilstrekkelig lang Hvis den ikke er lang nok trykk inn sentrum av spolen og dra samtidig i enden p tr den Under...

Страница 15: ...g s rg for at den har kommet opp i turtall f r den f res bort til gresset du skal sl Klipp ikke fuktig gress Rengj r dekselet etter bruk Skifte av tr d 1 Skru av trimmeren og trekk ut st pselet 2 Tryk...

Страница 16: ...kkerhet ta kontakt med lokale myndigheter Spesifikasjoner Str mforsyning 230 V AC 50 Hz Effekt 350 W Hastighet ubelastet 10 000 o min Skj retr d 1 2 mm Klippediameter 25 cm Vekt 2 2 kg Vibrasjon 5 m s...

Страница 17: ...asta ruohotrimmerin kunto ennen jokaista k ytt kertaa l k yt viallista ruohotrimmeri vaan korjauta se tarvittaessa Laitteen saa korjata ainoastaan valtuutettu henkil Liit ruohotrimmeri s hk verkkoon v...

Страница 18: ...tamispainike 3 Varsi 4 Alakahva 5 Yl kahva 6 Virtakytkin 7 Jatkojohdon koukku 8 Virtajohto 9 Johdon s ilytyskoukku 10 Suoja 11 Siiman leikkuri 12 Siimakotelo 13 Leikkuusiiman aukko 14 Leikkuusiima 10...

Страница 19: ...Laita ruuvi takaisin paikoilleen K ytt Trimmerin k ynnist minen 1 Varmista ett siima on riitt v n pitk Mik li siima on liian lyhyt paina kelan keskiosaa sis n ja ved siiman kumpaakin p t samanaikaises...

Страница 20: ...anna sen kiihty t ysille kierroksille ennen kuin alat leikata ruohoa l leikkaa m rk ruohoa Puhdista suoja ennen kuin laitat ruohotrimmerin s ilytykseen Leikkuusiiman vaihto 1 Sammuta laite ja irrota p...

Страница 21: ...a kuntasi j teneuvonnasta Tekniset tiedot Virtal hde 230 V AC 50 Hz Teho 350 W Nopeus kuormittamaton 10 000 kierr min Leikkuusiima 1 2 mm Leikkuuala 25 cm Paino 2 2 kg T rin 5 m s Mittausep tarkkuus K...

Страница 22: ...Ein besch digtes Netzkabel darf nur von qualifiziertem Fachpersonal ausgewechselt werden Der Rasentrimmer ist vor jedem Gebrauch zu kontrollieren Den Rasentrimmer nicht verwenden wenn er besch digt is...

Страница 23: ...eichweite von Kindern aufbewahren Produktbeschreibung 1 Trimmerkopf 2 Knopf f r den Trimmerkopfwinkel 3 Schaft 4 Griffunterteil 5 Griffoberteil 6 Ein Ausschalter 7 Haken f r das Kabel 8 Netzkabel 9 Ha...

Страница 24: ...e Schraube wieder hineinschrauben Verwendung So wird der Trimmer gestartet 1 Sicherstellen dass der Schneidfaden ausreichend lang ist Wenn er zu kurz ist auf die Mitte der Spule dr cken und gleichzeit...

Страница 25: ...mit dem Rasen der gek rzt werden soll in Kontakt gebracht wird Keinen feuchten Rasen schneiden Die Abdeckung vor dem Lagern reinigen Austausch des Schneidfadens 1 Das Ger t abschalten und den Netzstec...

Страница 26: ...n kommunalen Entsorgungsbetrieben erh ltlich Technische Daten Stromversorgung 230 V AC 50 Hz Leistungsaufnahme 350 W Drehzahl unbelastet 10 000 U min Schneidfaden 1 2 mm Schnittdurchmesser 25 cm Gewic...

Страница 27: ...EC MACHINERY 2006 95 EC LOW VOLTAGE DIRECTIVE 2004 108 EC EMC Complies with the provisions of the following hamonized standards EN 50366 2003 A1 06 EN 60335 1 2002 A11 A1 04 A12 A2 06 EN 60335 2 91 2...

Страница 28: ...ks 485 Sentrum 0105 OSLO SUOMI ASIAKASPALVELU Puh 020 111 2222 S hk posti asiakaspalvelu clasohlson fi Internet www clasohlson fi OSOITE Clas Ohlson Oy Maistraatinportti 4 A 00240 Helsinki UNITED KING...

Отзывы: