background image

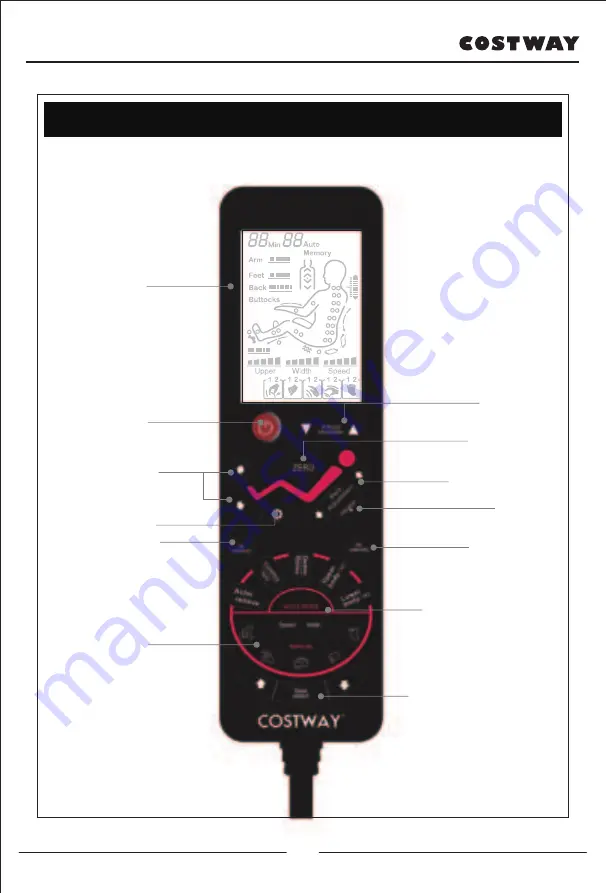
Method of usage  

Note: The specific display is subject to the actual product!

LCD screen
All massage function diagrams 
are displayed.

Power switch
Turn on/off all massage 
functions.

Air pressure  
Turn on/off the pressure 
massage function

Manual massage

Foot roller massage

Manually adjust the position of the shoulders 
and massage the acupressure points.

Adjust shoulder

There are three automatic lying modes, which 
can be switched according to your needs.

Auto lying

Adjust the backrest frame to rise or fall.

Backrest adjustment 

Turn on/off the heating massage function.

Heater 

Adjust the pressure intensity.

Air intensity

Auto massage

Back stretch

Adjust leg 
Adjust the leg to go up or 
down.

13

Содержание JL10009

Страница 1: ...READ AND KEEP FOR FUTURE REFERENCE Follow Costway Please give us a chance to make it right and do better Contact our friendly customer service department for help first Replacements for missing or da...

Страница 2: ...e and count all parts and hardware Read through each step carefully and follow the proper order We recommend that where possible all items are assembled near to the area in which they will be placed i...

Страница 3: ...roperly for future use Note Our Company reserves the right to revise the design and description of this product without any further notice Please refer to the actual color of this product CONTENTS Saf...

Страница 4: ...t listed herein 20 minutes of usage each time is recommended Do not use this product if the leather is broken or damaged Do not use this product if the cover or leather is broken or damaged Do not use...

Страница 5: ...cians to have rest or who feel unwell People whose bodies are wet are forbidden to use this product This product has a hot surface Persons insensitive to heat must pay attention when using this produc...

Страница 6: ...order to avoid hazards 5 Product Service and Maintenance This product should be maintained by the service center designated by the manufacturer only No user should disassemble or maintain it without p...

Страница 7: ...ion of this product this is the normal operation sound If the controller cannot work normally check whether the plug and the power socket are connected reliably and whether the power switch is turned...

Страница 8: ...g forward to damage the product or cause personal injuries Use safety warning Warning Before sitting on the massage chair Please make sure the massage hand cannot place in the seat position so as to a...

Страница 9: ...ou unplug the controller cable and power cord and put away after you use the chair Warning When turning on the zero gravity lying function be sure to notice whether there are children or pets under th...

Страница 10: ...oller 5 Hand controller storage bag 6 Quick armrest 7 USB charging interface 8 Arm bag assembly 9 Seat cushion 10 Leg rest 11 Footrest 12 Back cushion 13 Armrest 14 Side cover 15 Backrest cover 16 Dri...

Страница 11: ...ing synchronously The speed of each massage method can be adjusted in three levels as a whole In the fixed point and partial body state the mechanical hand can adjust the position of the upper and low...

Страница 12: ...an be connected through the Bluetooth function of a smart device such as a mobile phone or tablet for music playback The left and right upper arms are equipped with negative ion generators On the righ...

Страница 13: ...sage Foot roller massage Manually adjust the position of the shoulders and massage the acupressure points Adjust shoulder There are three automatic lying modes which can be switched according to your...

Страница 14: ...n up and down to the suitable position There are a total of 10 shoulder positions If there is no shoulder position adjustment within 10 seconds the massage function will automatically start to work Me...

Страница 15: ...wer body M2 mode press for 3 seconds enter the previous function M1 or M2 then it will return to the massage setting state that was previously stored in memory for massage High position Suitable posit...

Страница 16: ...idth Fixed position massage Small range partial massage back and forth Full back and forth body massage Upper body back and forth massage Lower body back and forth massage Massage position adjustment...

Страница 17: ...3 seconds to turn on or off the negative oxygen ionization function Function Key Description Display Adjust leg Adjust backrest Auto lying Lower leg up Press this key the lower leg rises slowly releas...

Страница 18: ...ge 3 Cut off the power supply of the whole machine As the picture shows Quick Armrest Key 3 Turn off the power and end the massage Function Key Description Switch Up Zero Gravity Down Auto mode USB Pr...

Страница 19: ...of the rear end of the seat frame Figure 1 2 After passing the connecting plug from the middle of the back end of the seat frame correspond to each pair of wiring plugs connect according to the mark...

Страница 20: ...f the seat frame and insert it into the bottom of the seat frame Then pull the cloth cover well and take care to prevent the tube from being broken Figure 4 5 Hands hold the front and rear ends of the...

Страница 21: ...eck whether the front and back ends of the armrest are in place Figure 8 9 Unzip the upper arm sleeve and then use the cross head screw to fix cross head screws through the hole of the space capsule T...

Страница 22: ...facilitate the disassembly and assembly of the R shaped pin Figure 1 2 Align one end of the lower leg with the fixed shaft and insert it Figure 2 3 Insert the R shaped pin move the calf to the other...

Страница 23: ...d head cushions Backrest cushion and backrest connected by zipper 1 head cushions and backrest pad connected by thread gluing 2 6 Head cushion and backrest pad s dismounting and use manual Put the hea...

Страница 24: ...able for short distance movement for long distances please use other assistive tools to move the massage chair Make sure that all wires are far above the ground tilt the backrest backward to a certain...

Страница 25: ...ated voltage 110 120V 60Hz Rated power input 150W Rated time 20Min Safety structure Class I Material introduction PVC PA steel parts and electric electron parts Figure 3 Figure 4 Product specification...

Страница 26: ...sed to violent sunlight 3 If the surface of the equipment is wet it is necessary to clean the surface with a cloth immediately and place it in a cool dry place 4 Smudges or other traces on the surface...

Страница 27: ...asives and environmentally friendly cleaners to clean the PU surface 4 For the dirty PU surface wipe the dirt with a soft cloth and avoid cleaning it with a brush Maintenance for PU synthetic leather...

Страница 28: ...g us valuable feedbacks With your inspiring rating COSTWAY will be more consistent to offer you EASY SHOPPING EXPERIENCE GOOD PRODUCTS and EFFICIENT SERVICE US office Fontana California UK office Ipsw...

Страница 29: ......

Отзывы: