background image

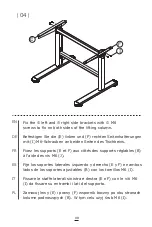
Comme indiqué sur la figure, faites d’abord passer l'arbre 
d'entraînement par les trous hexagonaux de support 
réglable (B), puis mettez la rondelle en plastique (L) dans 
l'arbre d'entraînement et passez ensuite par un autre 
support réglable (B), et enfin verrouillez avec le loquet 
(K).

Como se muestra en la figura, primero pase el eje de 
transmisión (H) a través de los orificios hexagonales del 
soporte ajustable (B), luego coloque la arandela de 
plástico (L) en el eje de transmisión y luego pase por el 
otro soporte ajustable (B), y finalmente bloquee con el 
pestillo (K).

FR

ES

Come mostrato in figura, far passare prima l'albero di 
trasmissione (H) attraverso i fori esagonali sul supporto, 
poi portare la rondella di plastica (L) nell'albero di 
trasmissione e poi passare attraverso un altro supporto e 
infine bloccare il chiavistello (K).

IT

Przełóż pręt synchronizacyjny (H) przez otwór w jednej z 
kolumn podnoszących (B). Następnie nałóż plastikowe 
podkładki (L) na pręt synchronizacyjny (H) i przełóż pręt 
przez otwór w drugiej kolumnie podnoszącej (B). Zamocuj 
przy użyciu zawleczek w kształcie litery „R” (K).

PL

10

Содержание HY10039

Страница 1: ...LEASE READ AND KEEP FOR FUTURE REFERENCE EN DE FR ES IT PL USER S MANUAL HANDBUCH MANUEL DE L UTILISATEUR MANUAL DEL USUARIO MANUALE UTENTE INSTRUKCJA OBS UGI Kids Desk Kinderschreibtisch Bureau pour...

Страница 2: ...eitenhalterung 1 Barre x 1 Support gauche x 1 Support droit x 1 Barra x1 Soporte lateral izquierdo x1 Soporte lateral derecho x1 Trave x1 Staffa laterale sinistra x1 Staffa laterale destra x1 G rna po...

Страница 3: ...lla x1 Chiave x1 Korba x 1 Klucz imbusowy x 1 Plastic gasket 2 Schrauben 4 R Typ Verriegelung 2 Kunststoffunterlegscheibe 2 Vis M8 x 4 Loquet x 2 Rondelle plastique x 2 Tornillo M8 x4 Pestillo x2 Aran...

Страница 4: ...Do not adjust the lifting column height before installation is complete Fine tuning EN Hinweis Stellen Sie die H he des Tischbeins erst nach Abschluss der Montage ein Feineinstellung DE Remarque Ne r...

Страница 5: ...M6 J Verwenden Sie die J M8 Schrauben f r die G Fu st tze um sie am Tischbein zu befestigen Fije el reposapi s G a los soportes ajustables B con los tornillos M8 J Utilizzare le viti M8 J per il poggi...

Страница 6: ...ghtened EN Hinweis Die Schrauben sind nicht fest angezogen DE Remarque Ne serrez pas les vis FR Nota No apriete los tornillos ES Nota Non stringere troppo le viti IT Uwaga ruby nale y dokr ci dopiero...

Страница 7: ...Tr ger mit I M6 Schrauben wie abgebildet Fixez la barre D avec des vis M6 I comme indiqu Fije la barra D con los tornillos M6 I como se muestra Fissare la trave D con le viti M6 I come mostrato Zamocu...

Страница 8: ...s E et F aux c t s des supports r glables B l aide des vis M6 J Fije los soportes laterales izquierdo y derecho E y F en ambos lados de los soportes ajustables B con los tornillos M6 I Fissare le staf...

Страница 9: ...d then pass through anotherlifting column and finally deduct the R type latch F hren Sie wie in der Abbildung gezeigt zuerst die H Antriebswelle durch die Sechskantl cher am Tischbein dann die L Kunst...

Страница 10: ...stico L en el eje de transmisi n y luego pase por el otro soporte ajustable B y finalmente bloquee con el pestillo K FR ES Come mostrato in figura far passare prima l albero di trasmissione H attraver...

Страница 11: ...Fixez le cadre de la table assembl e sur le panneau du bureau A l aide de vis M6 I Fije el marco del escritorio ensamblado al tablero del escritorio A con los tornillos M6 I Fissare il telaio del tav...

Страница 12: ...und dann anziehen DE Remarque veuillez d abord pr charger toutes les vis dans les trous puis les serrer FR Nota Por favor precargue todos los tornillos en los orificios primero y luego apri telos ES N...

Страница 13: ...o hexagonal gire la manivela en sentido horario o antihorario Ruotare la manovella inserita nel foro esagonale ruotare la manovella in senso orario o antiorario Zamocuj korb M w specjalnym otworze Obr...

Страница 14: ...Product display Produktanzeige Pr sentation du produit Exposici n del Producto Esposizione del Prodotto Produkt po zako czeniu monta u 14...

Страница 15: ...hsenen montiert werden 2 Spielen Sie nicht mit den Teilen 3 Geeignet f r Kinder im Alter von 3 12 Jahren DE 1 Ce produit doit tre assembl par des adultes 2 Ne pas jouer avec les pi ces 3 Ce produit co...

Страница 16: ...DE QUALIT et un SERVICE EFFICACE Con su calificaci n inspiradora COSTWAY ser m s consistente para ofrecerle EXPERIENCIA DE COMPRA F CIL BUENOS PRODUCTOS y SERVICIO EFICIENTE Con la tua valutazione inc...

Отзывы: