


1
2
06
07
INSTALLATION INSTRUCTIONS
Before Using Your Wine Cooler
To Install Stainless Steel Handle
• Remove the exterior and interior packaging.
• Check to be sure you have all of the following parts:
o 14 Beech Shelves
o 2 Keys
o Stainless Steel Handle
o Instruction Manual
o 2 Extra Screws for Installing Handle
•
IMPORTANT
: Before connecting this wine cooler to a power source, let it
stand upright for approximately
24 hours
. This will reduce the possibility of
a malfunction in the cooling system from handling during transportation.
• Clean the interior surface with lukewarm water using a soft cloth.
• Install the handle on the left side of the door.
1) Pull away the door gasket in the area where the handle is to be installed,
as Illustration #1. The gasket is easily removed by hand, no tools are
necessary.
2) Align the handle with the pre-installed screws on the door frame. Tighten
the screws with a screwdriver until the handles secure tightly against the
door frame, as Illustration #2. (Do NOT over tighten as this will cause
damage to the handle assembly).
3) Replace the door gasket to its original position.
Note
: This wine cooler includes stainless steel handles that are not required
to operate this wine cooler. If you choose not to use the handle supplied,
simply follow step 1 to access the pre-installed screws and remove them and
then place 2 decorative plugs (NOT included) into the two holes separately.
Continue on to step 3 to replace the door gasket to its original position.
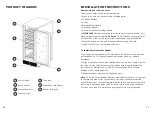
PRODUCT DIAGRAM
3
3
4
4
1
Control Panel
Beech Shelves
Exhaust Window
Leveling Legs
7
7
5
5
6
6
Top Hinge
Glass Door with Handle
Safety Child Lock
2


