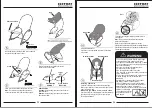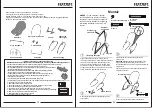
Cross Brace
Fit the cross brace between the side rails, as shown.
Hint:
The cross brace is designed to fit one way.
If it does not seem to fit, turn it around and try again.
M5x32 mm screw-2
M5 locknuts-2
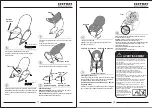
Lift
Press Button
UPRIGHT
Press Button
RECLINE
Lower
Seat Position
Upright:
While pressing the button on each side rail,
lift the seat back.
Recline:
While pressing the button on each side rail,
lower the seat back.
Buckle up the back of the gasket and the stull.
Make sure you hear a clatter.
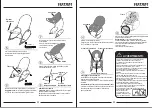
Vibrations Unit
With the vibrations unit facing forward, fit the notches on
the unit onto the side rails, as shown.
M5x42 mm screw-2
M5 locknuts-2
Restraint Belt
Restraint Belt
Restraint Pad
Kickstand
Rotate the kickstand out.
Push down on the seat bottom to be sure the kickstand
is in position.
WARNING:
1. To avoid choking, please dispose plastic bags
or keep them away from babies and children.
2. Caregivers should not leave when baby is seated.
3. It is very dangerous to use recliner on high plane
above floor (like decks)
4. Recliner is unsuitable for long time sleep.
5. Always apply restrain system.
6. Do not drag recliner with the toy stick.
7. No more use for the recliner when your baby can
sit by himself/herself.
8. This product contains small parts which can hurt
or cause choking. No use for children until
assembled.
9. Attached toys should be taken out by adults,
and play by children in adults’ custody.
10. Do not stand on the recliner to avoid falling.
11. Using this product as transportation facility or
elevator with baby sitting in it is forbidden.
12. Use chair mode instead of recliner mode when
children can sit straight.
13. Packages are not toys.
Do not play with them to
avoid danger.
Securing Your Child
Place your child in the seat. Position the restraint pad
between your child’slegs. Fasten the restraint belts to each
side of the restraint pad.
Make sure you bear a “click” on both sides.
Check to be sure the restraint system is securely attached
by puling it away from your child.The restraint system
should remain attached.
Pull
Power
Switch
Fit the plugs on each end of the toy bar into the sockets in
each side rail.
Hint:
The toy bar is removable. Press the ends of the
latches and lift the toy bar.
Make sure your child is properly secured in the seat.
Slide the power switch to the ON position for calming vibrations.
Slide the power switch to the OFF position to turn vibrations off.
Pull the ring for a short tune!
05
06


