background image


Page | 13       [email protected] 


+1.818.937.0700    877.CAMERA.8    www.arecontvision.com    [email protected] 


Wall Mount 

For a proper wall mount installation, the AV-WMJB wall mount and MD-CAP wall mount cap are 
required (sold separately). A wall mount should only be attached onto hard ceilings including 
wood, plastic, metal, and concrete. 

1.  Using the Mounting template, prepare the mounting provisions for the camera installation. 
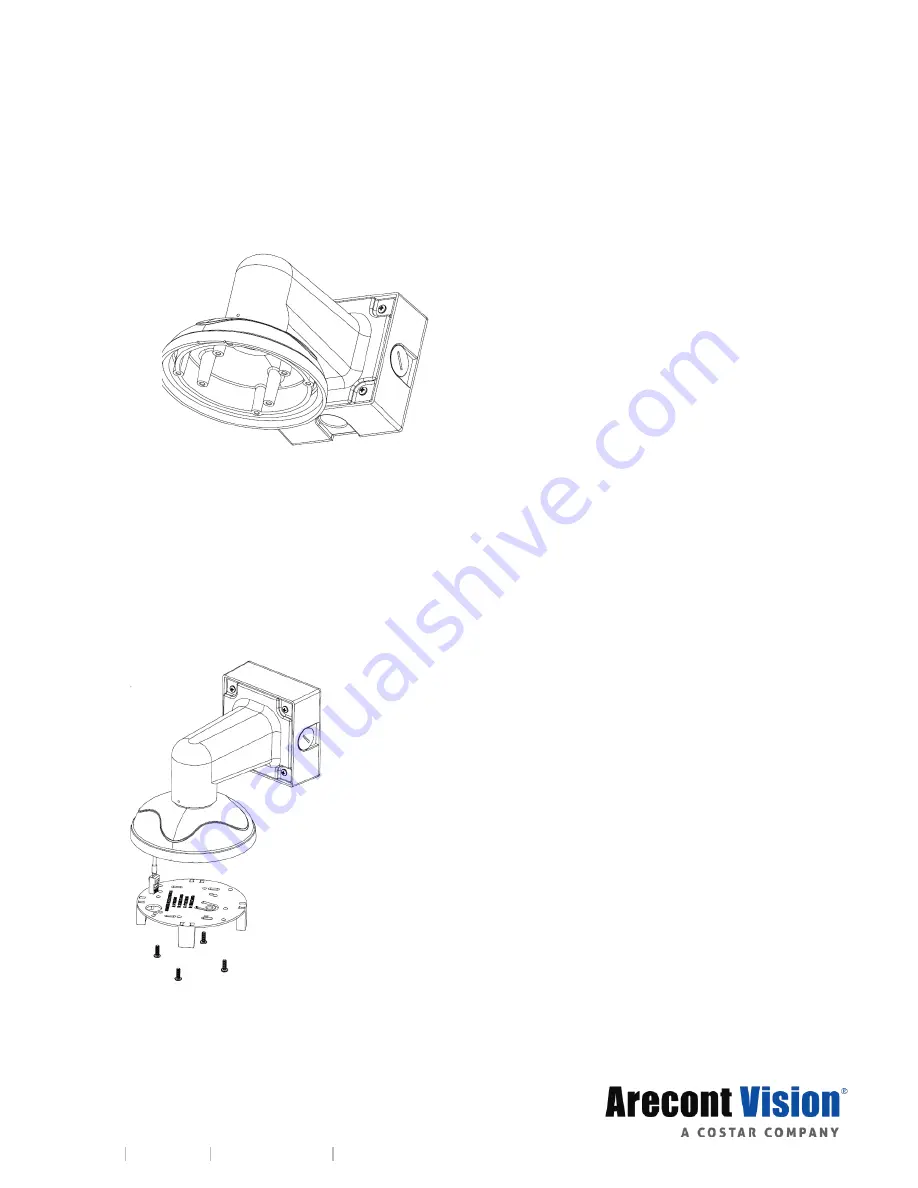
2.  Connect wall mount cap and wall mount as shown in Figure 1. 


Figure 1: Attach wall mount cap to the wall mount 
 
NOTE: The thread size for Top shield, pendant pole and mount is 1.5” NPT. 
 

3.  Attach the wall mount to the wall using the four drywall screws provided or any optional 

hardware suitable for the mounting surface. 

4.  Run the Ethernet Cable and outside power cable (if necessary) through the supplied rubber 

gasket and then through the wall mount. Ensure the gasket is seated properly. 

5.  Attach the mounting plate to the MD-CAP with the supplied screws as shown in Figure 2. 


Figure 2


Содержание ARECONT VISION MegaDome AV08ZMD-400

Страница 1: ...MegaDome 4K Installation Manual Models 8 Megapixel AV08ZMD 400 ...

Страница 2: ... Mount 10 Wall Mount 13 Pendant Mount 16 Pole Mount 19 Corner Mount 21 Electrical Box Adapter 23 Adjusting the Pan Tilt and Focus 24 Auxiliary I O Functions 26 Camera Power Up 30 Reset to Factory Default 32 Camera Discovery Setup and Configuration 33 Network Protocols 33 General Remote Focus 34 Refined Remote Focus 35 AV IP Utility Focus Tab 37 Mounting Templates 38 Support 39 ...

Страница 3: ...es and authorities having jurisdiction Wiring should be UL Listed and or Recognized wire suitable for the application 3 Always use hardware e g screws anchors bolts locking nuts etc which are compatible with mounting surface and of sufficient length and construction to insure a secure mount Package Contents This equipment should be unpacked and handled with care The original packaging is the safes...

Страница 4: ...over 3 1x Mounting Plate 4 1x Grommet with Through Hole 5 1x Grommet without Through Hole 6 1x Insertion Tool 7 4x 6 32 1 0 Wood Metal Sheet Screw 8 4x 6 32 1 0 Drywall Masonry Mounting Anchors 9 4x 8 32 0 5 Machine Screw 10 1x Security L key 11 1x Set Screw L key 12 1x Mounting Template 13 1x Magnetic core 1x I O cable 1x AC DC auxiliary power cable 1x CD with Manual and Software ...

Страница 5: ...tress neglect misuse abuse improper storage testing or connection or unauthorized repair or iv is no longer covered under the Warranty Period ARECONT VISION MAKE NO WARRANTIES OR CONDITIONS EXPRESS IMPLIED STATUTORY OR OTHERWISE OTHER THAN THE EXPRESS LIMITED WARRANTIES MADE BY ARECONT VISION ABOVE AND ARECONT VISION HEREBY SPECIFICALLY DISCLAIMS ALL OTHER EXPRESS STATUTORY AND IMPLIED WARRANTIES ...

Страница 6: ...0 camera line provides an all in one solution with integrated 8 megapixel day night camera remote focus remote zoom P Iris 4 4 10mm lens With the features of SNAPstream to reduce bandwidth without impacting image quality scaling binned mode privacy masking extended motion detection and flexible cropping the AV08ZMD 400 is a high sensitivity Power over Ethernet PoE IEEE 802 3af compliant camera Bui...

Страница 7: ...our 4 screws securing the dome cover 3 Remove the dome cover and protective foam Do not remove screws from the dome cover The MegaDome 4K camera has been designed to provide installers with flexible mounting options such as ceilings walls poles or corners NOTE When mounting the camera outdoors or in a wet environment use of supplied grommet is recommended Ensure the grommet properly seated flush w...

Страница 8: ...mounting parts prior to starting your installation Pendant mount Reference Pendant Mount Components Required 1 Pendant mount AV PMJB with integrated junction box 2 MegaDome 4K camera 3 MD CAP mounting cap Wall mount Reference Wall Mount Components Required 1 Wall mount AV WMJB with integrated junction box 2 MegaDome 4K camera 3 MD CAP mounting cap ...

Страница 9: ...4K camera 4 AV PMA pole mount adapter Corner mount Reference Corner Mount Components Required 1 Wall mount AV WMJB with integrated junction box 2 MD CAP mounting cap 3 MegaDome 4K camera 4 AV CRMA corner mount adapter 4 Use the Arecont Vision software AV IP Utility located on the CD or available for download at our website www arecontvision com for camera discovery and setup see Instruction Manual...

Страница 10: ...ovided to prepare the mounting provisions for the camera installation 2 Use the supplied security L key to loosen the four 4 tamper resistant screws securing the dome cover as shown in Figure 1 Do not remove screws from the dome cover Figure 1 3 Remove the protective foam and discard 4 Install four supplied dry wall anchors using the supplied mounting template 5 Align four supplied screws with the...

Страница 11: ...seated flush with the camera housing 7 Align the hole on MegaDome 4K camera with the hole on mounting plate and install the grommet on camera housing as shown in Figure 4 Figure 4 NOTE If using the side connection of the NPT port you need to install the supplied grommet without a through hole on the camera housing and remove the cap covering the side entrance otherwise leave the cap in place If us...

Страница 12: ...am on the lens not block the field of view 10 To configure the camera reference the camera discovery set up and configuration section CAUTION The captive screws must be used to properly secure the dome cover and camera housing Failure to use the captive fastener may result in serious injury When mounting the dome cover to the camera housing ensure that the gasket is properly seated and not folded ...

Страница 13: ... the camera installation 2 Connect wall mount cap and wall mount as shown in Figure 1 Figure 1 Attach wall mount cap to the wall mount NOTE The thread size for Top shield pendant pole and mount is 1 5 NPT 3 Attach the wall mount to the wall using the four drywall screws provided or any optional hardware suitable for the mounting surface 4 Run the Ethernet Cable and outside power cable if necessary...

Страница 14: ...igure 3 Figure 3 NOTE When mounting the camera outdoors or in a wet environment use of supplied grommet is recommended Ensure the grommet is properly seated flush with the camera housing 7 Align the hole on MegaDome 4K camera with the hole on mounting plate and install the grommet on camera housing as shown in Figure 4 Figure 4 8 Fasten securely four captive screws as shown in Figure 5 Figure 5 ...

Страница 15: ...block the field of view 10 To configure the camera reference the camera discovery set up and configuration section CAUTION The captive screws must be used to properly secure the dome cover and camera housing Failure to use the captive fastener may result in serious injury When mounting the dome cover to the camera housing ensure that the gasket is properly seated and not folded Failure to do so ma...

Страница 16: ...the camera installation 2 Connect top shield pendant pole and mount together as shown in Figure 1 Figure 1 Attach the mount cap and pendant mount NOTE The thread size of top shield pendant pole and mount is 1 5 NPT 3 Attach the pendant mount to the ceiling using the four wood screws provided or any optional hardware suitable for the mounting surface 4 Run the Ethernet Cable and outside power cable...

Страница 17: ... in Figure 3 Figure 3 NOTE When mounting the camera outdoors or in a wet environment use of supplied grommet is recommended Ensure the grommet is properly seated flush with the camera housing 7 Align the hole on MegaDome 4K camera with the hole on mounting plate and install the grommet on camera housing as shown in Figure 4 Figure 4 8 Fasten securely four captive screws as shown in Figure 5 ...

Страница 18: ...not block the field of view 10 To configure the camera reference the camera discovery set up and configuration section CAUTION The captive screws must be used to properly secure the dome cover and camera housing Failure to use the captive fastener may result in serious injury When mounting the dome cover to the camera housing ensure that the gasket is properly seated and not folded Failure to do s...

Страница 19: ...ion Box Adapter to the Pole Mount Adapter as shown in Figure 1 4 Remove the conduit plug on the junction box adapter and connect NPT conduit to the junction box adapter Figure 1 Figure 1 Attach conduit to AV JBA junction box adapter Reference Description 1 Remove conduit plug 2 Connect NPT conduit to junction box adapter ensure use of water seal tape NOTE Use silicon or water pipe seal tape to mak...

Страница 20: ...the pole and tighten the compression screws as shown in Figure 2 8 To attach the camera to the Wall Mount Adapter AV WMJB reference the Installation and Wall Mount section 9 To configure the camera reference the camera discovery set up and configuration section CAUTION The captive screws must be used to properly secure the dome cover and camera housing Failure to use the captive fastener may resul...

Страница 21: ...pter as shown in Figure 1 4 Remove the conduit plug on the junction box adapter and connect NPT conduit to the junction box adapter as shown in Figure 1 Figure 1 Attach conduit to SV JBA junction box adapter Reference Description 1 Remove conduit plug 2 Connect NPT conduit to junction box adapter ensure use of water seal tape NOTE Use silicon or water pipe seal tape to make sure no water leakage b...

Страница 22: ... attach the Corner Mount Adapter to an exterior 90 degree corner wall 8 To attach the camera to the Wall Mount Adapter AV WMJB reference the Installation and Wall Mount section 9 To configure the camera reference the camera discovery set up and configuration section CAUTION The captive screws must be used to properly secure the dome cover and camera housing Failure to use the captive fastener may ...

Страница 23: ...to a common single double or square electrical box 1 Using the supplied machine screws match the mounting holes on the mounting plate with the threaded holes on the electrical box Ensure every threaded hole is matched with a mounting hole 2 Attach the mounting plate to the user supplied electrical box as shown in Figure 1 Figure 1 Attach the mounting plate to common electrical box ...

Страница 24: ... shroud from the camera gimbal and then loose two Philips head screws and loose one set screw with the supplied set screw L key and then adjust the pan and tilt to obtain the desired field of view as shown in Figure 1 NOTE Do not remove the screws Figure 1 Loose camera head to adjust the field of view 4 Lock the camera head in place by fastening securely two Philips head screws and one set screw b...

Страница 25: ...AMERA 8 www arecontvision com avsales arecontvision com NOTE Make sure align locking features of the shroud with mating parts on the camera gimbal as shown in Figure 3 Figure 3 6 To adjust the zoom and focus see the Remote Zoom Focus Section of this manual ...

Страница 26: ...cally coupled solid state relay SSR and the input has an optocoupler Both the SSR and optocoupler have an isolation voltage of 1500 VRMS between the external terminals and internal camera circuitry The input is further protected with a serial 250Ω resistor and a debouncing circuit Arecont Vision AUX I O ALARM IN S D G ALARM OUT ALARM OUT 120V 100mA max Normally Open Close 0 12VDC 50mA max ALARM IN...

Страница 27: ... an active connection using the API command set Typical applications include turning on lights or activating doors and locks IN IN GND OUT OUT 0 120VDC 100mA max Figure 3 Relay wiring with power source to the camera Camera output can be turned on off with the following command http camera_ip set auxout on off The following table shows the output control and electrical characteristics Output Contro...

Страница 28: ... IN IN terminals can be used for external signaling devices such as door contacts or motion detectors Both normally open and normally closed devices are supported as shown in Figure 4 IN IN GND OUT OUT IN IN Open Close Figure 4 Figure 5 illustrates the unsupervised alarm conditions IN IN IN IN IN IN IN IN Normally Open Normally Closed Figure 5 The following table shows how camera detects unsupervi...

Страница 29: ...a can detect a range of voltage to trigger an internal alarm on off condition IN IN GND OUT OUT 0 12VDC 50mA max Figure 6 The following table shows the input voltage range and electrical characteristics Input Voltage Detection Terminals External Status Camera Status Voltage Range Current Range IN GND OFF OFF 0 1V 0 2mA ON ON 2 12V 10 50mA The status of the camera can be read with the following com...

Страница 30: ...NEC 800 CEC Section 60 or applicable local code 1 Connect the camera to a PoE port on 100Mbps network PoE switch using an Ethernet cable as shown in the image below Reference Description 1 PoE Connector NOTE Recommend to route the Ethernet cable as shown in the image below 2 If the camera is powered by an outside power supply 12 24 VDC connect the power cable 3 Connect the PoE switch to your compu...

Страница 31: ... 2 position connector on the main camera board The approximate location of the 2 position connector is circled below NOTE Cameras using auxiliary power with 802 1x enabled may need to manually power cycle the camera to reconnect to the network CAUTION Make the connections inside a watertight compartment Isolate unused power wires individually After connections are made ensure that the watertight c...

Страница 32: ...hall be in accordance with the National Electrical Code NFPA 70 ANSI and with all local codes and authorities having jurisdiction Wiring should be UL Listed and or Recognized wire suitable for the application Reset to Factory Default 1 Press and hold the reset button as shown in Figure 1 for 10 seconds and release the reset button The camera has been reset to the factory default If the camera is n...

Страница 33: ...r manual for the software is included on the CD that came with your camera or available on our website Network Protocols The Arecont Vision MegaDome 4K cameras support RTSP RTP TCP RTP UDP HTTP HTTPs DHCP TFTP QoS IP version 4 IPv4 IP version 6 IPv6 and 802 1x RTSP Cameras communicate with video management systems over Real Time Streaming Protocol Do not change the RTSP port unless you are sure yo...

Страница 34: ...g traffic IPv6 This camera supports the IPv6 internet layer protocol for packet switched internetworking across multiple IP networks IPv6 uses 128 bit addresses which allows for many more devices and users on the internet as well as extra flexibility in allocating addresses and efficiency for routing traffic 802 1x The IEEE 802 1x standard provides a general method for authentication and authoriza...

Страница 35: ...garding the Arecont Vision web interface is found separately in the AV IP Utility Web Browser Manual via the Arecont Vision website 3 Click the Full range Focus button The camera begins to autofocus with the lens stopping at the best overall point of focus Refined Remote Focus 1 Enable Digital Zoom Control for a more refined detailed focus ...

Страница 36: ... Window 5 Left click and drag to highlight the area within the zoomed window you created 6 Click Short range Focus button 7 The camera proceeds to go through the short range adjustment around the original focus It stops at the best point of focus using the new reference area When the box around the image illuminates green the camera has completed the focus For an additional focus press the manual ...

Страница 37: ...for scenes that are completely out of focus The camera automatically scans the full focus range of the scene to find the best focus position Short range Focus Best for scenes that are slightly of out of focus The camera quickly fine tunes for a precise focus position Stop Stops any command in progress Select Focus Window Allows the user to drag the box to the area where need to be focused on Enabl...

Страница 38: ...Page 38 support arecontvision com 1 818 937 0700 877 CAMERA 8 www arecontvision com avsales arecontvision com Mounting Templates Unit Inches ...

Страница 39: ...a on a dedicated network and test with AV200 Swap the troubled camera with a known good camera to see if the problem follows the camera or stays at the location 3 Contact Arecont Vision Technical Support one of three ways 1 Online Portal Support ArecontVision com 2 Phone 1 818 937 0700 option 1 3 Email support arecontvision com 4 Use the Arecont Vision software AV IP Utility located on the CD or a...

Отзывы: