background image


User Manual 


40 


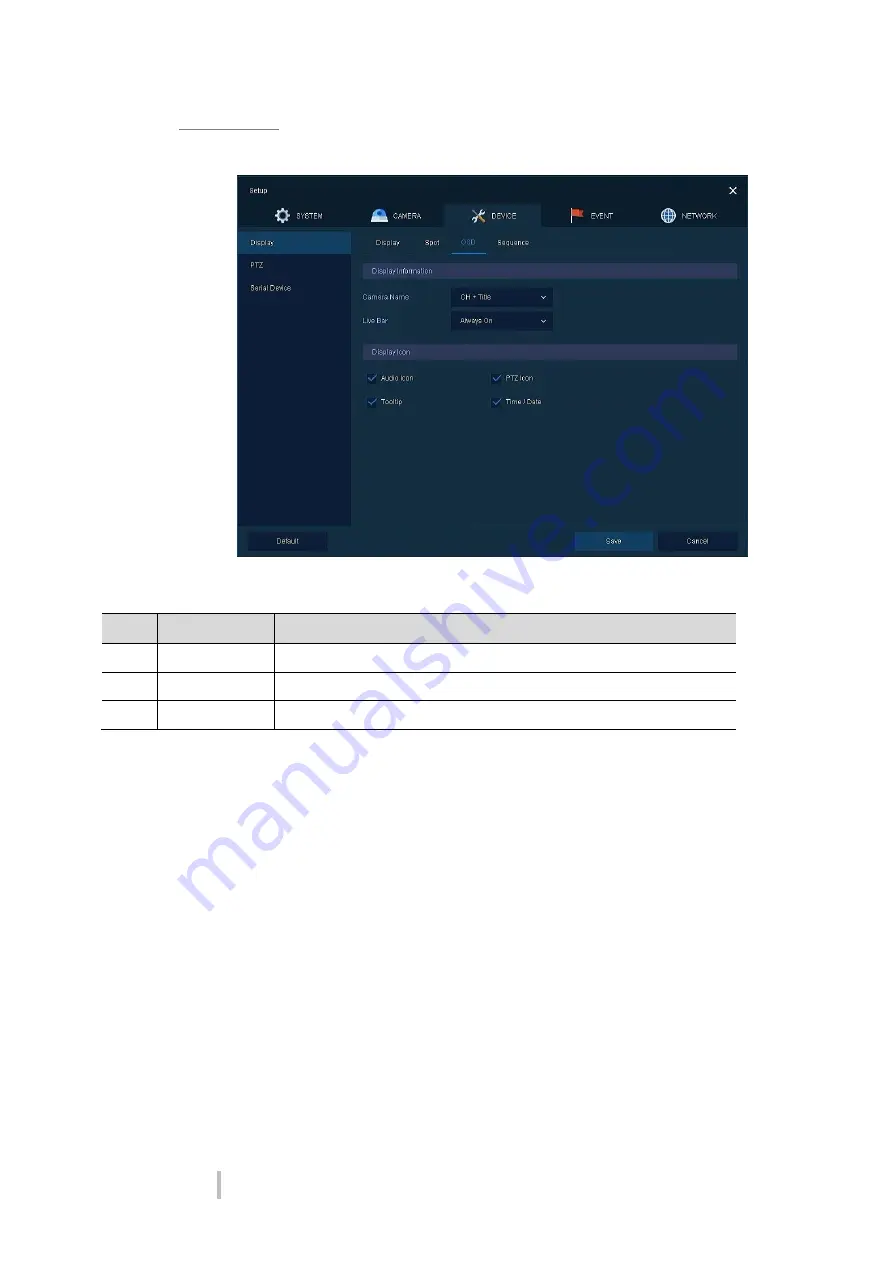
Display > OSD 

Set the OSD of the display device. 


Figure 4-21 DEVICE > Display > OSD 

Table 4-22 DEVICE > Display > OSD Item and Description 

No. 

Name 

Function 

Camera Name 

Select the way to display camera in live screen (Off, CH+Title, CH). 

Live Bar 

Select the way to display the live bar (Always On, Auto Hide). 

Display Icon 

Select/deselect icons to display in the live screen. 

Содержание CRT1200EN

Страница 1: ...User Manual 12 Channel HD Encoder CRT1200EN Please read this manual thoroughly before use and keep it handy for future reference ...

Страница 2: ...user to the presence of dangerous voltage within the products enclosure that may be ofsufficientmagnitudetoconstituteariskofelectricshock to persons The exclamation point within an equilateral triangle is intended to alert the user to the pres ence of important operating and maintenance servicing instructions in the literature accom panying theproduct CAUTION RISK OF ELECTRIC SHOCK DO NOT OPEN WAR...

Страница 3: ...ate radiofrequency energy and if not installed and used in accordance with the instruction manual may cause harmful interference to radio communica tions Operation of this equipment in a residential area is likely to cause harmful interference in which case the user will be required to correct the interferenceat his own expense This device complies with Part 15 of the FCC Rules Operation is sub je...

Страница 4: ...rom the apparatus 11 Only use attachments accessories specified by the manufacturer 12 Use only with the cart stand tripod bracket or table specified by the manufacturer or sold with the apparatus When a cart is used use caution when moving the cart apparatus combination to avoid injury from tip over 13 Unplug this apparatus during lightning storms or when unused for long periods of time 14 Refer ...

Страница 5: ...work 12 2 3 4 Time Date 12 3 Live Screen Configuration 13 3 1 Icons in Live screen 14 3 2 Live Launcher menu 15 3 3 Quick menu 16 3 3 1 PTZ Control 17 3 3 2 Status System log 18 3 3 3 Status Event 19 3 3 4 Status Stream 20 4 Setup menu 21 4 1 General buttons in Setup menu 23 4 2 SYSTEM 24 4 2 1 System 24 4 2 2 Time Date 26 4 2 3 Account User 29 4 2 4 Configuration Config 31 4 3 CAMERA 33 4 3 1 Bas...

Страница 6: ... 5 EVENT 45 4 5 1 System 45 4 5 2 Alarm In 46 4 5 3 Motion 49 4 5 4 Video Loss Setup 51 4 5 5 Notification 52 4 6 NETWORK 54 4 6 1 Basic WAN Port 54 4 6 2 DVRNS DDNS 55 4 6 3 E Mail 57 4 6 4 P2P 58 4 6 5 Notification Server 59 5 Webviewer 62 6 Products Specifications 66 ...

Страница 7: ...og cameras Users can monitor HD analog cameras through network and also can be monitored by local HDMI moni tor The device features include the following Convenient UI from user s viewpoint Composite input port for 12 channels Providing AHD TVI 960H and D1 1080p Full HD video transmission USB Data Back up Remote monitoring through a network viewer a web viewer and a mobile viewer ...

Страница 8: ...am CD 1 2 Encoder Description Each part is listed in the below Figure 1 1 Name and Connection of each front section Table 1 2 Name and Function of each front section No Name Function 1 Power status LED Pointing out device ON OFF 2 Channel status LED Pointing out connected channel 3 Network LED With a network viewer pointing out network in connection 4 USB port USB port is connected for USB mouse o...

Страница 9: ... 1 Audio In Camera audio input port 2 Video In Camera video input port 3 Audio Out Audio output port 4 CVBS Out CVBS output port 5 VGA VGA output port 6 HDMI HDMI output port 7 LAN Network connector 8 Alarm In Alarm in connector 9 Alarm Out Alarm out connector 10 RS485 RS 485 communication connector 11 DC12V Power supply connector ...

Страница 10: ...tall Encoder When installing a device connect rear of the device with each port on the basis of below connection map Figure 2 1 Connection map The device starts first like below sequences 1 Connecting with an exterior device 2 Starting a system 3 Setting a quick setup ...

Страница 11: ...ved or pressed which cause fires electric shocks or injury 3 Check to switch off and unplug the unit Warning Make sure to withdraw the mains plug before installing the device 4 Connect input ports of camera Note Connecting a camera port with the unit automatically detects the camera 5 Connect an audio input port with a Mic and output port with a speaker Note Assure regulations in the area whether ...

Страница 12: ...ort in front section of the unit with a mouse 10 Supply the main power after completion Attention Before connection match socket with adapter pins Note No power button supplying the main power automatically starts running the unit ...

Страница 13: ...ons in order 2 With buzzer sounds the start screen is presented 3 In Log in screen enter the ID Password and press OK Note Default ID Password is admin admin Click to see the MAC address If lost password inform the MAC address to supplier to create temporary password Attention Please change password after login due to security ...

Страница 14: ...twork 4 Time Date 2 3 1 Account How to set Account of Easy Installation 1 Click the keyboard icon to set ID and Password users want 2 With keyboard UI set the ID and Password and press OK 3 Press the Save button to save newly set ID and Password 4 Press Next button to end Account setting and move the next setting phase ...

Страница 15: ...D To identify device usages in controlling Encoder with RS485 through a keyboard Selecting the device ID In case of simultaneous use of equipment set ID with difference HDMI VGA Set resolution of a monitor connected to the device Note As for using many Encoders set ID with difference 2 Press Save button to save set value 3 Press Next to end System setting and move the next setting phase ...

Страница 16: ...ting phase 2 3 4 Time Date How to set the time date of Easy Installation 1 Set each item in Time Date setting screen Network Time Sync Select network for synchronizing with time server System Time Not for synchronizing with network time server set the device time otherwise ap plying for Daylight saving time select DST Time Zone Select time zone for the system being installed DST Start End For appl...

Страница 17: ...d in the corner of upper screen See 4 Setup to display detailed information about the setting menu 2 Live screen Show live video of connected cameras 3 Launcher menu Launcher menu is located in the corner of below screen See 3 2 Live Launcher to display detailed information about the launcher menu 4 Quick menu Clicking the right button of a mouse displays Quick menu See 3 3 Quick to display detail...

Страница 18: ... screen is marked as a blue frame mouse located live screen is marked as yellow one Figure 3 2 Live screen icon Table 3 2 Live screen icon and its description No Icon Description 1 CH1 CAM1 Channel numbers and camera titles 2 A camera with PTZ function 3 PTZ control function in process 4 Video loss icon 5 Mic on off 6 Speaker on off 7 Displaying present time and date ...

Страница 19: ...g in out status and logged in ID 2 Date Time Displaying present date and time 3 Moving to previous next partition screen 4 Displaying live screen in order set toggle 5 Selecting partition mode to mark in live screen single screen 4 9 and 16 partition 6 Stopping or replaying selected live screen images toggle 7 Audio on or mute chosen live screen toggle 8 Locking or releasing launcher menu toggle ...

Страница 20: ...times 3 Freeze Freezes the video selected live screen images toggle on off 4 Speaker Output Mute Turning on off a sound speaker 5 PTZ Control Controlling PTZ function 6 Stop Alarm Stopping monitoring alarm output and event 7 Spot Monitor Set the output mode of a spot monitor Auto Full and 4x4 8 Setup Opening setting menu pop up For more information about setting menu see section 4 Setup 9 Status O...

Страница 21: ... live screen Figure 3 5 Quick menu PTZ Control Table 3 5 Quick menu PTZ Control Item and Description No Item Description 1 Moving images with direction buttons 2 Moving images with PTZ ball 3 AF Adjusting screen focus automatically 4 Zoom Out Zoom function of PTZ camera 5 Zoom In 6 IRIS OFF Adjusting iris in the camera 7 IRIS On 8 Focus Far Manual focus adjustment 9 Focus Near 10 Open camera menu ...

Страница 22: ...enu Table 3 6 PTZ Control Item and Description in Quick menu No Item Description 1 Preset Tour Scan Pattern Run PTZ functions 2 Exit Transforming to live screen menu in PTZ Control menu 3 3 2 Status System log Users can see the system log information in System log tap in Status screen Figure 3 7 Status System log in Quick menu ...

Страница 23: ...rch Pressing search button search on the basis of set condition 6 System log list Displaying system log lists 7 Cancel Completing the status screen 3 3 3 Status Event Users can see the real time event information of the unit in Event tap in Status screen Figure 3 8 Status Event in Quick menu Table 3 8 Status Event Item and Description in Quick menu No Item Description 1 Temporary fixing or releasi...

Страница 24: ...p in Status screen Figure 3 9 Status Stream in Quick menu Table 3 9 Status Stream Item and Description in Quick menu No Item Description 1 Input Type Displaying the input video type 2 Main Stream Displaying the main stream status 3 Second Stream Displaying the second stream status ...

Страница 25: ...te Setup screen is available to click Setup in Quick menu by clicking the right button of the mouse Table 4 1 Setup menu Item and Description No Item Description 1 SYSTEM Setting the system environment 2 CAMERA Setting the camera 3 DEVICE Setting the non camera device connected with the encoder 4 EVENT Setting each event 5 NETWORK Setting the network environment ...

Страница 26: ...MERA Basic Basic Audio In Out Advanced Scan Mode Advanced DEVICE Display Display Spot OSD Sequence PTZ PTZ Serial Device Serial Device EVENT System System Alarm In Setup Schedule Motion Setup Schedule Video Loss Setup Notification Periodic Schedule NETWORK Basic WAN Port DVRNS DDNS DVRNS Dashboard DDNS E Mail E Mail P2P P2P Notification Server Notification Server Notification Message ...

Страница 27: ...ral buttons in Setup menu Table 4 3 Item and Description of General buttons in Setup menu No Item Description 1 Default Reverse changed setting value to default in factory 2 Save Save the set content 3 Cancel Cancel the set value 4 Restore Cancel the set value and reverse it to default 5 Apply Apply the content set ...

Страница 28: ...Figure 4 3 SYSTEM System System Table 4 4 SYSTEM System System Item and Description No Name Function 1 Language Set the system language 2 Device Name Enter the device name Only English is possible 3 Video Type Select image standard types NTSC PAL 4 Keyboard ID Select keyboard ID 1 255 5 System start Select Easy Installation in starting the system 6 Run Run Easy Installation ...

Страница 29: ...system Figure 4 4 SYSTEM System F W Upgrade Table 4 5 SYSTEM System F W Upgrade Item and Description No Name Function 1 Current Version Displaying the present tool version 2 Device Connect USB memory that has files to upgrade to the USB port select files to upgrade ...

Страница 30: ...hether to use summer time Time change Save changed time 2 DST Start Set the starting date of summer time 3 DST End Set the ending date of summer time 4 Display Format Select the format to present date and time 5 Time Zone Select time zone 6 Network Time Sync For using a specific network time server click the Use checkbox and enter the server address Sync Interval Select synchronization period 1 7 ...

Страница 31: ...of the system Figure 4 6 SYSTEM Time Date Holiday Table 4 7 SYSTEM Time Date Holiday Item and Description No Name Function 1 Year Select years to set holidays 2 Delete selected holidays 3 Add Holiday Add holidays 4 List Display added holiday lists ...

Страница 32: ...oliday Table 4 8 SYSTEM Time Date Holiday Add Holiday Item and Description No Name Function 1 Name Enter the holiday name 2 Date Display chosen date 3 Type Select the holiday types e g Selecting Relative and 1 first and Sun which designates annual January of the 1st Sunday as a holiday 4 Calendar Select the holiday to add ...

Страница 33: ... users 3 Group List Display a total group list 4 User List Display user lists across groups 5 Live view restricted access Do not display live video if log it out 6 Auto Login Click clear the automatic login checkbox 7 Auto Logout Select automatic logout time Null 1 min 2 min 3 min 4 min 5 min 6 min 7 min 8 min 9 min 10 min and 30 min 8 Password Change Cycle If enable user should change the passwor...

Страница 34: ...me 2 PERMISSION Select items to permit access 3 Select channels to permit access Press Add User button then Add User screen displays Figure 4 10 SYSTEM Account User Add User Table 4 11 SYSTEM Account User Add User Item and Description No Name Function 1 Name Enter the user name 2 ID Enter the user ID 3 Password Enter the password 4 Confirm Password Confirm the password 5 Group Select to the group ...

Страница 35: ...connector with USB USB Displays the USB device connected Refresh button Re recognize the device 2 Import Apply information saved in USB to the device Import Config with network setup The network setting information is brought from the setting information Import button The file in USB is brought to the designated device 3 Export Save the set information in the USB Export Config with network setup S...

Страница 36: ...2 SYSTEM Config Factory Default Table 4 13 SYSTEM Config Factory Default Item and Description No Name Function 1 Select All Unselect All Select deselect all items to be defaulted 2 Default Item Select deselect related items to be defaulted 3 Default button Default the system to the basics ...

Страница 37: ...nnels Figure 4 13 CAMERA Basic Basic Table 4 14 CAMERA Basic Basic Item and Description No Name Function 1 CH Display the channel name 2 Title Enter the camera name of relevant channels 3 Covert Select images to be shown in the Live screen by channels and whether to mark a status message or not OFF Video Only Video State All 4 Copy Covert Setup In Covert set items can be duplicated to other channe...

Страница 38: ...vert Setup Table 4 15 CAMERA Basic Basic Copy Covert Setup Item and Description No Name Function 1 From Select a channel converted setting 2 To Select a channel to be copied 3 Select All Unselect All Select deselect all channels Basic Audio In Out How to set audio of camera across channels Figure 4 15 CAMERA Basic Audio In ...

Страница 39: ...3 2 Advanced Set camera video stream and privacy mask Advanced Scan Mode Figure 4 16 CAMERA Advanced Scan Mode Table 4 17 CAMERA Advanced Scan Mode Item and Description No Name Function 1 CH Display channels 2 Scan Mode Automatically detects the camera input type or fixes the input video format to the selected type Auto AHD TVI 3 Copy Scan Mode Copies the currently set scan mode settings to anothe...

Страница 40: ...vanced Table 4 18 CAMERA Advanced Advanced Item and Description No Name Function 1 CH Display channels 2 Video Set brightness contrast and color of the camera 3 Privacy Mask Set the privacy field display field numbers set in parenthesis at most 4 setting available ...

Страница 41: ...select whether to use privacy field 3 New Mask Select privacy field again 4 Delete Mask Delete selected privacy field How to set Privacy Mask Users might set 4 Privacy Masks and the way to set Privacy Mask is as follows 1 Press New Mask button Mask Zone is automatically set as Mask1 2 Drag the area you want in the screen with a mouse Revision Select Mask No in Mask Zone and drag the area you want ...

Страница 42: ...creen Display Display Set the display device Figure 4 19 DEVICE Display Display Table 4 20 DEVICE Display Display Item and Description No Name Function 1 HDMI VGA Select the resolution of the display device 1024x768 1280x720 1920x1080 2 Event Popup Set duration of event popup 3 Monitor Relay Switch Send alarm out when screen layout changed ...

Страница 43: ...me Function 1 Sequence Set the channel and dwell time 5 10 20 30sec when the Auto mode of Spot Monitor is selected 2 Event Popup Sets the hold time of the full screen image of the channel where the event occurred Off 5 10 20 30sec Continuous If multiple channels have an event at the same time the event channel is shown as a spilt screen ...

Страница 44: ...y OSD Table 4 22 DEVICE Display OSD Item and Description No Name Function 1 Camera Name Select the way to display camera in live screen Off CH Title CH 2 Live Bar Select the way to display the live bar Always On Auto Hide 3 Display Icon Select deselect icons to display in the live screen ...

Страница 45: ...ked in the below table Full and Quad 3 Sequence List Display the sequence list based on division selected value 4 Add Sequence Add items to be included in the play sequence 5 NO Automatically controvert screens in number order 6 Division Displays as full 2X2 Quad 7 CH LIST Set automatic conversion CHs In case of choosing CH3 in No 1 CH3 is shown in advance 8 Dwell Time Set the remaining time for a...

Страница 46: ...Display Sequence Add Sequence Table 4 24 DEVICE Display Sequence Add Sequence Item and Description No Name Function 1 Dwell Time Select time to play 3 sec 5 sec 10 sec 15 sec and 30 sec 2 Division Select the partition screen to play Full Quad 3 Channel Selection Select channels to play ...

Страница 47: ...py PTZ Setup Apply setting history to all or selected channels in the same way 2 CH Display channels 3 ID Select camera ID connected to relevant channels 1 255 4 Protocol Select protocol of camera connected to relevant channels 5 Speed Select pan tilt of camera connected to relevant channels 1 5 Note For more information about camera ID protocol information and details see Instruction of relevant ...

Страница 48: ... camera USB device with the unit Figure 4 25 DEVICE Serial Device Serial Device Table 4 26 DEVICE Serial Device Serial Device Item and Description No Name Function 1 USB to Serial Set communication transmission value of USB device 2 RS 485 Set communication transmission value of RS 485 connector ...

Страница 49: ...tem event of the device Figure 4 26 Event System System Table 4 27 Event System System Item and Description No Name Function 1 System Restart Select deselect whether to use system restart event 2 Notification Select deselect whether to use mailing or mobile push in case of event 3 User Login Select deselect whether to use user login event ...

Страница 50: ...n No Name Function 1 Sensor Display sensor numbers 2 Use Select deselect whether to use alarm in the sensor 3 Type Select sensor types N O N C 4 Beep Select use time of buzzer sound null 5 sec 10 sec 20 sec 30 sec 1 min 10 min 30 min and 1 hour 5 Alarm Set alarm output 6 Noti Set email notices 7 Preset Set preset of PTZ camera 8 Copy Alarm Setup Copy alarm set value to other channels ...

Страница 51: ... Relay Select clear the Relay output checkbox Dwell Time Selecting alarm duration Keep 5 sec 10 sec 20 sec 30 sec 1 min 10 min 30 min and 1 hour 2 Monitor Popup Select deselect whether to use Monitor Popup when Alarm occurs 3 Popup camera channel selection screen opens 3 Remote Notifica tion Select deselect whether to use remote mailing and Push to Smart phone 4 Preset Preset of PTZ camera is runn...

Страница 52: ...30 Event Alarm In Schedule Item and Description No Name Function 1 Sensor Select the sensor to set the schedule 2 Schedule Type Selection Select the types of schedules 3 Schedule Table Display the schedule users set 4 Drag Field Display the area dragged with a mouse 5 Copy to Alarm Schedule Button Copy the schedule on alarm set to other sensors ...

Страница 53: ... motion area 4 Sens Select the sense level of the motion sensor Level 1 10 5 Beep Select use time of buzzer null 5 sec 10 sec 20 sec 30 sec 1 min 10 min 30 min and 1 hour 6 Alarm Set alarm output 7 Noti Set email notices 8 Preset Set preset of PTZ camera 9 Copy to Motion Setup Copy motion set value to other channels Note Placing your mouse on Alarm Noti Preset and clicking editing icon in right co...

Страница 54: ...ble 4 32 Event Motion Schedule Item and Description No Name Function 1 CH Select channels to set schedules 2 Schedule Type Selection Select the types of schedules 3 Schedule Table Display the schedule users set 4 Drag Field Display the area dragged with a mouse 5 Copy to Motion Schedule Copy the motion detection schedule to other channels ...

Страница 55: ...p Select use time of buzzer sound null 5 sec 10 sec 20 sec 30 sec 1 min 10 min 30 min and 1 hour 4 Alarm Set alarm output 5 Noti Set email notices 6 Preset Set preset of PTZ camera 7 Copy to Video Loss Setup Copy the Video Loss set value to other channels Note Placing your mouse on Alarm Noti Preset and clicking editing icon in right corner displays Event Video Loss screen For more information abo...

Страница 56: ...ENT Notification Periodic Item and Description No Name Function 1 Periodic Notifica tion Select deselect whether to use periodical alarms 2 Summary Send the event information 3 Interval Set the alarm interval 5 min 10 min 30 min and 1 hour 2 hour 6 hour 8 hour 12 hour and 24 hour 4 Select CH Select channels users want 5 Select All Unselect All Select deselect all channels ...

Страница 57: ...otion Figure 4 34 EVENT Notification Schedule Table 4 35 EVENT Notification Schedule Item and Description No Name Function 1 Schedule Type Selection Select the types of schedules 2 Schedule Table Display the schedule users set 3 Drag Field Display the area dragged with a mouse ...

Страница 58: ...tatic IP For using static IP enter IP address Subnet Mask and Gateway 2 DHCP Dynamic Select whether to use DHCP Dynamic 3 MAC Address Display the MAC Address 4 DNS Select manual and enter DNS otherwise choose automatic function 5 Port TCP Enter TCP port 6 Port Web Enter Web port 7 Bandwidth Limit Select bandwidth to limit no limits 50Mbps 10Mbps 5Mbps 2Mbps 1Mbps 500Kbps 400Kbps 300Kbps 200Kbps an...

Страница 59: ...and Description No Name Function 1 DVRNS Register DVRNS account ID Enter DVRNS ID default MAC address of the unit Password Enter DVRNS password Register Register DVRNS account 2 Dashboard Add delete Dashboard account Account Select the types of account Existing Account or New Account ID Enter Dashboard ID Password Enter Dashboard password Add Device Add Dashboard account Delete Device Delete Dashb...

Страница 60: ... to access in networking Figure 4 37 NETWORK DVRNS DDNS DDNS Table 4 38 NETWORK DVRNS DDNS DDNS Item and Description No Name Function 1 DDNS Site Select DDNS site 2 Host Name Enter the host name 3 User Name Enter the user name 4 User Password Enter the user password ...

Страница 61: ...ct SMTP server gmail com hotmail com aol com naver com daum com 2 Address Port Enter server address and port number 3 Image Attach Select deselect whether to attach JPG image 4 Authentication Select deselect using authentication and password 5 ID Enter the email ID 6 Password Enter the email password 7 Sender Write the sender 8 Receiver Write the receiver 9 Test Verify whether the email server is ...

Страница 62: ...R code scan Figure 4 39 NETWORK P2P P2P Table 4 40 NETWORK P2P P2P Item and Description No Name Function 1 P2P Registration Click button to check up registration status 2 P2P QR Code Scan QR code using mobile app to connect recorder 3 P2P Connection Display connection status ...

Страница 63: ...n No Name Function 1 Notification Server Select deselect whether to use Notification Server 2 Type Select TCP or UDP Protocol 3 IP Enter the server IP address or host name 4 Port Enter the server port 5 Test Send a test message to the server to check the connection status Click Save button when the transmission is successful TCP can check the results in the recorder but UDP should be checked in th...

Страница 64: ...e 4 42 NETWORK Notification Server Notification Message Item and Description No Name Function 1 Deleted registered notification message 2 Add Notification message edit window pop up 3 CH Camera channel 4 Event Display event type as Motion Alarm Video Loss 5 Message Display notification message Clicking Add opens Add Message Figure 4 42 NETWORK Notification Server Notification Message Add Message ...

Страница 65: ...able 4 43 NETWORK Notification Server Notification Message Add Message No Name Function 1 CH Select the channel to add a message 2 Event Select the event type motion alarm video loss 3 Message Create a message to send ...

Страница 66: ...Intel CoreTM i5 2550 3 30GHz or higher Intel CoreTM 2 Duo E7200 2 53GHz or high er RAM 2GB or higher 1 5GB or higher VGA ATI RadeonTM HD 3650 or NVIDIA Ge Force 8400GS or higher 1280x1024 32bpp or Higher Multi Monitor ATI RadeonTM HD 2400 or NVIDIA GeForce FX5500 or higher 1024x768 24bpp or high er HDD Over 6GB Over 1GB LAN Gigabit Ethernet 10 100 Mbps Ethernet 1 Enter IP address of a encoder in I...

Страница 67: ...Viewer users need to download Java The way to download is shown as follows In case of selecting Viewer Internet Explorer 1 Click Viewer 2 When Java download screen opens down load and install JAVA 3 Live images may be monitored ...

Страница 68: ...ase of selecting Viewer Chrome 1 After click Viewer jnlp file can be down loaded Click Keep button 2 Click webviewer_chrome jnlp 3 When Java download screen opens down load and install JAVA 4 Live images may be monitored ...

Страница 69: ...User Manual 65 In case of selecting Setup Users can set the menu in similar ways with local connected monitor Figure 5 1 Setup screen ...

Страница 70: ... 1000 Base T Max Network Throughput Unlimited Guarantee 288Mbps Support Bandwidth Control Remote Monitoring CMS Mobile Web Dashboard VM Third party VMS API Support API ONVIF Profile S Compliance EXTERNAL IN OUT Audio 4 RCA Input 1 RCA Output 1 HDMI Output Alarm 12 Input 1 Output Terminal block Serial Port 1 RS485 Terminal block PTZ OSD Control RS485 UTC USB 2 USB 2 0 LED Indicator 14 status LED 12...

Отзывы: