


Cortex Microcontroller and VEXnet Joystick User Guide
Page 11 of 14
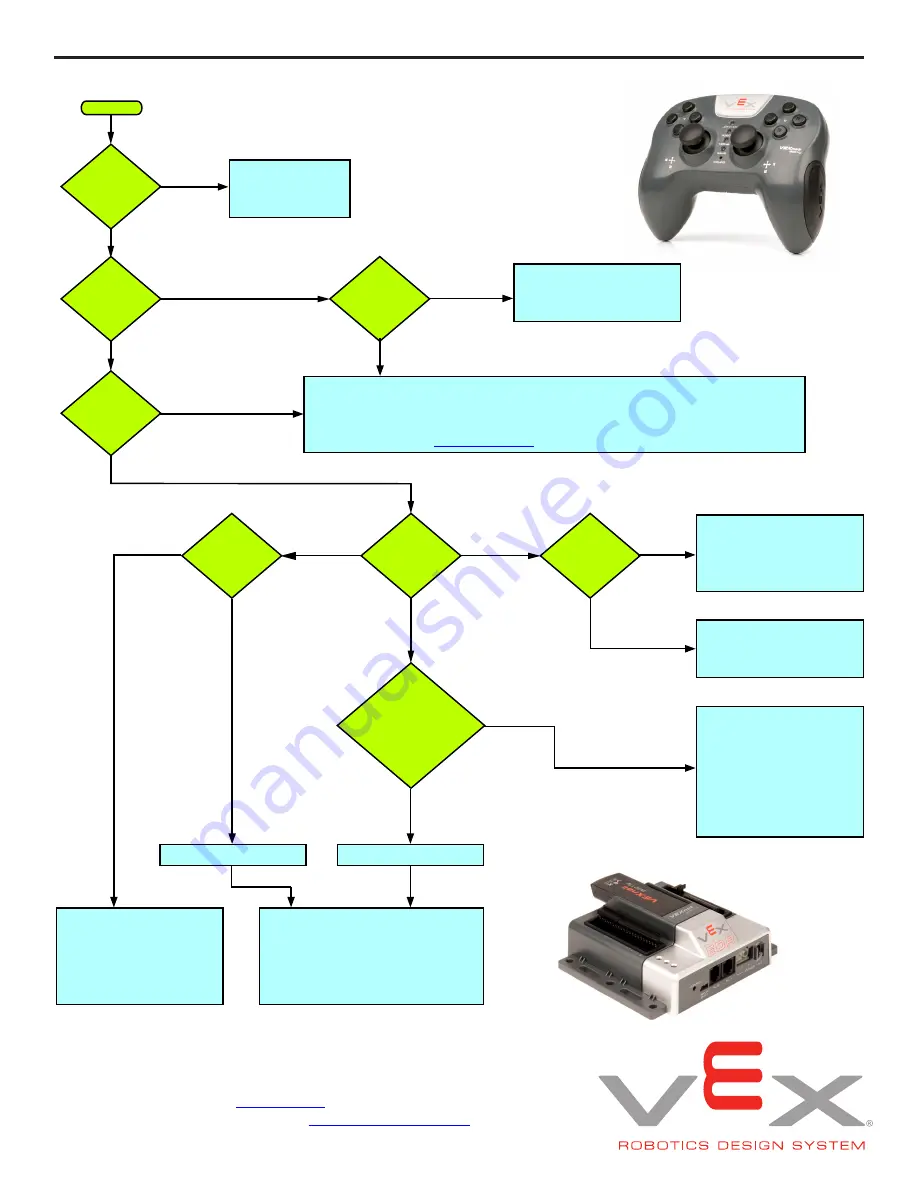
Is the
Joystick LED
solid?
Do
both units turn
on?
Are both
VEXnet LEDs
on?
Single
or double
blink?
Is the
Joystick LED
red?
Is
VEXnet
LED flashing multiple
colors?
What color
is the VEXnet
LED?
For
longer than 20
seconds?
Start
8. VEXnet Troubleshooting Flowchart
Update the VEXnet Firmware (Master CPU Firmware for ROBOTC users)
on both the Cortex and the Joystick using the Firmware Upgrade Utility
included with your programming software. This utility is also available on the
Downloads Page at
vexrobotics.com
.
Check batteries
and power
connections.
Joystick batteries are
dead. Replace batteries
before continuing.
Pair Cortex and Joystick.
For instructions, refer to
Section 1 of the Cortex
User Guide.
Signal may be blocked or units
may be out of range. Consider
moving key to a better location or
consider moving the Cortex closer
to the Joystick.
Poor signal strength.
Lost VEXnet link.
No VEXnet key detected.
Check key connection
and replace key if
necessary. Powercycle
unit when finished.
Units are correctly
linked. If the problem
persists, check user code
or try using the Default
Code which is available
from within your
programming software.
Units are establishing
VEXnet link. No action
required.
If the issue is still present after following this guide, update both the Cortex and
Joystick with the most recent version of the VEXnet Firmware (Master CPU
Firmware for ROBOTC users). If this does not resolve the problem, try using
a different set of VEXnet keys. If you need further assistance you can post a
question on the VEX Forum (
vexforum.com
) or contact VEX Technical Support
by phone at +1-903-453-0802 or email
.
NO
NO
NO
NO
NO
NO
YES
YES
YES
YES
YES
Flashing
Yellow
Other
Single
Double
Red
YES


