background image

2.1 Hardware Installation

This section outlines how to connect your 

Corinex Multimedia Headset

 to 

your  computer.  The  installation  is  very  simple,  all  you  need  to  do  is  to 
connect the headset cable to the input and output jacks of your sound card. 

The  headset  is  now  ready  for  using  with  the  software  of  your  choice. 
To  start  using  the  phone  with  NetMeeting  or  Skype,  please  refer  to  the 
next chapters. If you want to use the phone with the 

Corinex Softphone


software (included on the CD) and the VoIP service provider of your choice, 
proceed to chapter 3.

11

Using Corinex Internet Phone with Headset

Corinex Internet Phone with Headset

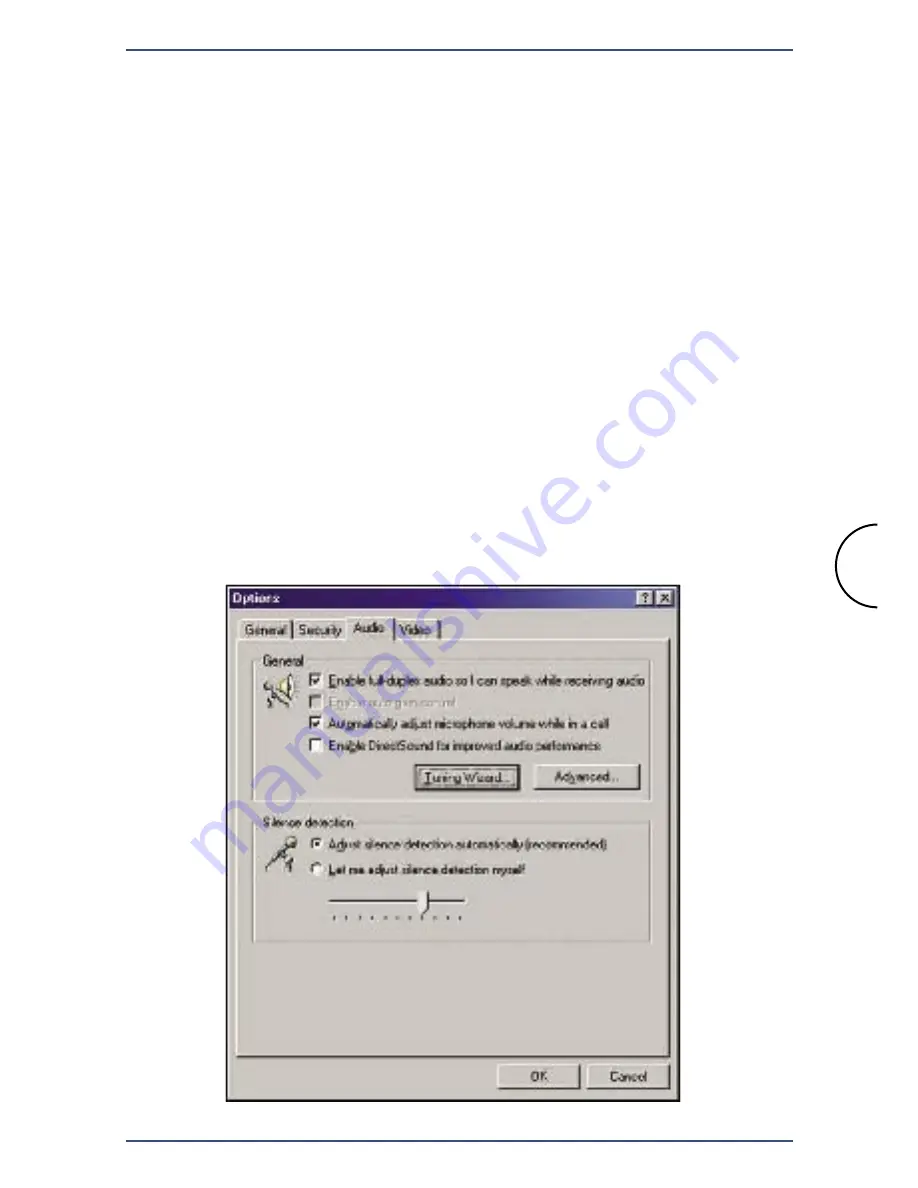
2.2 Using the Headset with NetMeeting

After plugging the headset to your computer, you can use it with Microsoft 
NetMeeting. All you have to do is to set up NetMeeting to use the internal 
soundcard as output/input device. Please follow the steps below:

  1. Start NetMeeting and click on 

Tools

 -> 

Options

. Then go to the tab  


Audio

.

Содержание Internet Phone with Headset

Страница 1: ...Manual Corinex Internet Phone with Headset...

Страница 2: ...ice Some features functions and operations described in this document may not be included and sold in certain countries due to government regulations or marketing policies The use of the product or it...

Страница 3: ...e is transferred to you You further acknowledge that title and full ownership rights to the Software will remain the exclusive property of Corinex Communications Corporation and or its suppliers and y...

Страница 4: ...rolled under any applicable export control laws and regulation and may be subject to any approval required under such laws and regulations 8 Precedence Except as set out above where separate terms are...

Страница 5: ...ultimedia Headset can now be used as an input output device with Skype You need to use the Skype software to dial a number No further steps are required to use the Skype service For further details se...

Страница 6: ...calls to other Free World Dialup users 4 Start the Softphone software which you find under Start Programs Corinex Softphone When the software is launched for the first time a wizard automatically star...

Страница 7: ...et voice calls 6 You can test your Free World Dialup account by dialing one of the test numbers below Use the keyboard or the keypad of the Softphone software to type the number followed by pressing t...

Страница 8: ...et with NetMeeting 11 2 3 Using the Headset with Skype 14 3 Using the Headset with Corinex Softphone 15 3 1 Using the Phone with Predefined Free SIP Operators 15 3 2 Using the Phone with Predefined Fr...

Страница 9: ...World Dialup or SIPphone and can be set up for working with any VoIP service supporting the SIP version 2 0 and H 323 version 4 protocols for making PC to PC or PC to Phone calls 1 2 Package Content W...

Страница 10: ...ocumentation than those included on the installation CD If you want to check and download the latest versions for your Corinex product go to www corinex com 1 3 System Requirements IBM compatible PC w...

Страница 11: ...ecording or playback This includes music and video players sound editors and other software 2 As an audio input output device in combination with common 3rd party software supporting voice communicati...

Страница 12: ...r to the next chapters If you want to use the phone with the Corinex Softphone software included on the CD and the VoIP service provider of your choice proceed to chapter 3 11 Using Corinex Internet P...

Страница 13: ...orinex Internet Phone with Headset 2 Click on Tuning Wizard The following window will appear Click Next to continue to the next screen 3 Here you can select the audio device for input output Please se...

Страница 14: ...ith Headset 4 On the next two screens you can adjust volume for playback and recording After this setting click Next and finish the configuration wizard The NetMeeting software is now configured to us...

Страница 15: ...lication and follow the steps below 1 Start the Skype application and click on Click on File Options and go to the tab Hand Headsets 14 Using Corinex Internet Phone with Headset Corinex Internet Phone...

Страница 16: ...get the access information necessary to start making phone calls Please refer to the following chapters to learn how to do it 3 1 Using the Phone with Predefined Free SIP Operators For your convenienc...

Страница 17: ...side The following screen will apear Now click on the Sign up link The next screen will ask for your personal information Fill in the fields your personal information and continue with the Next button...

Страница 18: ...et Phone with Headset 3 1 2 SIP Phone To sign up to this operator open your Internet browser application and go to the web site http www sipphone com Then click on the link My SIPphone Now click on th...

Страница 19: ...e with Headset The appropriate link to continue is located at the bottom of the web page Click on it Click here A security alert may appear To continue click on the Yes button Then fill out the fields...

Страница 20: ...ceed to chapter 3 3 3 2 Using the Phone with Predefined Free H 323 Operators Most H 323 VoIP operators charge for their services at the time of this printing There are currently no pre defined setting...

Страница 21: ...phone client first 1 Insert the installation CD it should start automatically If not start the application by selecting My Computer usually found on the desktop or Laptop start up screen Navigate to t...

Страница 22: ...e installation now you have to register the Corinex Softphone The following screen displays the registration dialog Fill in the Serial Number of the Corinex Internet Phone with Headset that is printed...

Страница 23: ...Softphone Click Next to continue 7 Wait while the installer copies all the files to your harddrive and the following information appears 8 The installation guide creates a shorcut on your desktop Onc...

Страница 24: ...he wizard can be launched any time by pressing MENU Start wizard bar Choose the protocol that your service provider supports The SIP protocol is currently more widespread among free Internet telephony...

Страница 25: ...ard in order to use the headset for communication 4 2 Advanced Configuration This section covers the configuration of the Corinex Softphone software when a router is used for connection of the network...

Страница 26: ...e service provider will be displayed for example Free World Dialup as seen below Now the software is waiting for your input using the interface on the screen Example User A has IP address 192 168 0 2...

Страница 27: ...check the configuration Registering problem couldn t find registrar The application was not able to find an authentication server at the ad dress you entered in the settings Please check the configur...

Страница 28: ...e from the provider which did not accept your username or password Please check your settings Registering problem couldn t find registrar The Softphone was not able to find a VoIP gateway at the addre...

Страница 29: ...Softphone and system messages from the VoIP service provider Message Meaning Reset The SIP module was restarted All server messages were deleted and if there was an ongoing call it was can celled Thi...

Страница 30: ...ing the ongoing call Hung up The call was ended Note If the dialed party doesn t support the codec which you have selected in the configuration the codec will be changed automatically to a supported...

Страница 31: ...hone can be adjusted by clicking on or 4 On the right side of the display you can see the phone speaker volume setting The phone speaker volume can be adjusted by clicking on or The speaker volume can...

Страница 32: ...mode Note You can also use the computer s keyboard for typing numbers when dialing 4 3 3 Making a VoIP Call Calling a number The simplest way to make a call is to type the number using the phone keyp...

Страница 33: ...he standby mode by clicking on the Dial but ton in the software interface All calls are marked according to the type of the call Call marking Type of call Outgoing Incoming X Missed To the right of th...

Страница 34: ...3 Deletes the currently selected number Dial Dial the currently selected number Cancel Closes the phonebook and returns to the stanby mode Adding new contacts For adding a new contact to the phonebook...

Страница 35: ...t tab is your User Number Your number and Password Some providers e g Ecuity require additional authentication information the Login name field In case your provider gave you a login name along with t...

Страница 36: ...tails see chapter 3 2a Connection Settings for SIP In this section you can set up the servers and ports which are used for con nection of the Softphone with a VoIP service provider All the information...

Страница 37: ...your VoIP account All you need to enter in the Account tab is your User Number Your number and Password In the Account name field type the name of your service provider or any other text of your choi...

Страница 38: ...eeper which is used for connection of the Softphone with a VoIP service provider This information must be provided by your VoIP provider Optionally you can specify STUN servers and Call Signalling Por...

Страница 39: ...l be used for announcing incoming calls and voice communication Ringing in The sound which will be played when someone tries to call you Any sound file in WAV format can be used by clicking the button...

Страница 40: ...to call you If you have multiple sound devices you can select which one you want to use Audio Out Device The sound device which will play the voice of your party Usually this will be set to use your...

Страница 41: ...It may happen that the Softphone s interface is too small for you especially if you use a high screen resolution e g 1600x1200 In such case you can click on Doublesize to enable magnification of the S...

Отзывы: