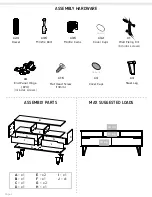


B
C
D
H
F
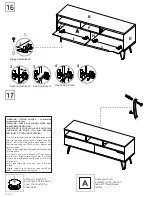
A
I
J
Hinge Adjustment
1
Side Adjustment
3
Depht Adjustment
2
5
Height Adjustmen
4
17
After you finish the
adjustment of the cams,
cover them whit the
cover caps.
A
After you finish
assembling the cabinet,
take off the adhesive
letters.
16
Page 8
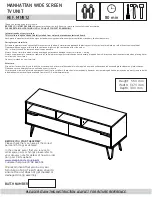
-WARNING! TIPPING HAZARD – Unanchored
furniture can tip over
-WARNING: CHECK FOR HIDDEN PIPES AND
CABLES BEFORE DRILLING.
-IMPORTANT: IF YOUR WALLS ARE NOT SOLID
LIKE BRICK OR STONE, YOU WILL REQUIRE
SPECIALIST FITTINGS (NOT SUPPLIED)
-Pre-drill small pilot hole on the back edge of the
furniture top using a 2mm drill bit. Attach the other
end of the fixing strip to the back edge of the
furniture top using the 15mm screw + washer and
securely tighten.
-Place fixing strip against the wall and mark position
for drilling hole.
-Drill hole in your wall to a depth of 30mm using a
6mm drill bit. If the surface of your wall is soft and
crumbly, we would advise you to use a 5mm drill bit
for a tighter fit.
-Insert plug into hole with end flush to the wall
surface.
-Attach fixing strip to the wall using the 25mm
screw + washer and securely tighten.
Содержание MANHATTAN MN912
Страница 3: ...Gx2 1 2 3 A Rotate A End Panel Hinge EPH Page 3 Repeat this in the following steps ...
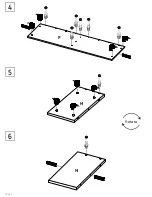
Страница 4: ...H Rotate H Page 4 4 5 6 F ...
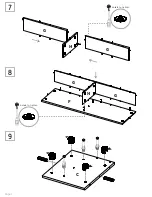
Страница 5: ...C G G H Rotate to tighten H G G F Rotate to tighten 7 8 9 Page 5 ...
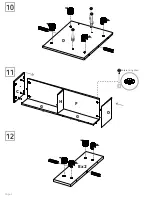
Страница 6: ...Ex2 D G G F C D H Rotate to tighten 10 11 12 Page 6 ...
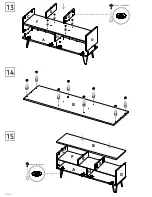
Страница 7: ...B B F A H D C E E Rotate to tighten H A F D C E E Rotate to tighten 13 14 15 Page 7 ...