

Ø8
25mm
A
x28
25mm
40mm
Ø4,5
Ø4,0
C
B
x18
x04
F
x10
Z
E
G
x28
x12
x04
8x8
6mm
x04
Ø3,5
25mm
D
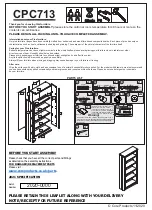
PARTS LIST
60min P3
P3
P3
P3
X
x01
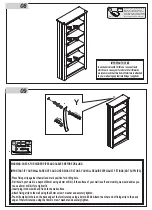
RED = PAINT
The RED sachet contains touch up
paint for your furniture. Please
retain for use should you require it
at any point in the future. Application
is best with a small paint brush which
can be cleaned in water after use.
Keep out of reach from children, keep away from eyes, if
product gets into eye rinse thoroughly and repeatedly with
water. Do not digest, if swallowed seek medical advise
from doctor.
Warning!
GOLD
GOLD
SILVER
Y
x01
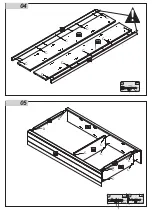
02
01
03
04
05
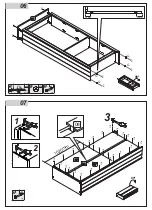
07
08
07
06
09
09
10
10
10
06
Thank you for choosing this furniture.
BEFORE YOU START ASSEMBLY
please store the carton at room temperature for 48 hours or more so the
contents can acclimatise.
PLEASE RETAIN ALL PACKING UNTIL YOU HAVE COMPLETED ASSEMBLY.
Information about your Pine furniture.
Our pine furniture ranges have been carefully crafted from solid wood and wood fibre based composite boards. Each piece of pine has unique
characteristics such as knots, variances in shading and graining. These are part of the natural character of the furniture itself.
Caring for your Pine furniture.
Extreme temperature can cause slight movements in the wood itself so please avoid placing your furniture close to radiators or other
direct sources of heat. Humidity should also be avoided.
Please avoid exposing your furniture to continued bright sunlight as it can affect the colour.
Any fluid spills should be removed as quickly as possible.
Always lift your furniture when moving as dragging may cause damage to your furniture or flooring.
After care.
Wipe the surfaces with a dry cloth and an occasional use of a normal household furniture polish. For the models with drawers, we also recommend
you use household spray polish occasionally on drawer grooves and runners as this will aid use. Please do not use detergents or chemicals
on your furniture.
BEFORE YOU START ASSEMBLY
Please check that you have all the correct parts and fittings
as detailed on the assembly instructions.
FOR DAMAGED/REPLACEMENT PARTS
Please visit
www.coreproducts.co.uk/parts
Batch
Number
PLEASE RETAIN THIS LEAFLET ALONG WITH YOUR DELIVERY
NOTE/RECEIPT FOR FUTURE REFERENCE
2020-0000
2021 SPECIFICATION
© Core Products 11/2020
CPC
713