background image

CA180 / CA180F

RC Helicopter

06

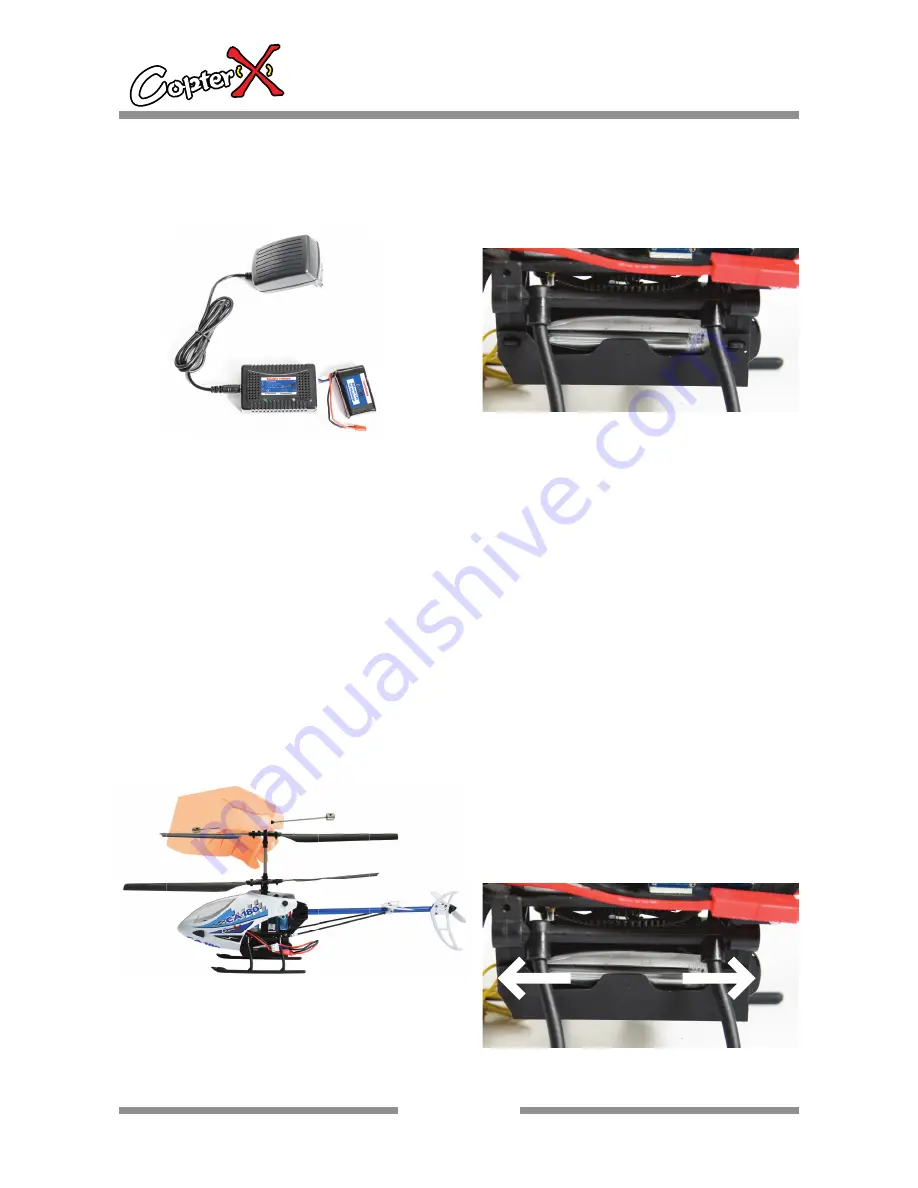
Battery and Charger

Please connect the adaptor, charger and 
battery as illustrated and plug the adaptor 
to a power supply.

Battery should be mounted inside the 
battery holder.

Warning: Do not leave battery unattended while charging! Improperly 
using/charging battery may result in damage! Do not disconnect the battery 
when the charger is in operation.

Balancing

Balancing helps the stability of the helicopter during the flight. The balance can be 
checked by turning the flybar 90 degrees to the helicopter (as illustrated). Please also 
make sure the battery is not apt to either one side.

3. Battery Usage

4. Operation and Fine Tuning of the Model

Содержание CA180

Страница 1: ...ttery 7 4V 800mAh Li Po Included Transmitter FM 4 Channel Included Servo High Speed High Torque 2 Installed On board electronics 3 in 1 Mixer ESC Gyro Installed Receiver 4CH Main Rotor Diameter 345mm...

Страница 2: ...1 Introduction and Safety Guidelines 2 Package Contents Radio Operation 3 Battery Usage 4 Operation and Fine Tuning of the Model 5 Basic Control 6 Flying 7 CA180 CA180F Parts List 1 2 4 6 6 9 9 12 CA...

Страница 3: ...ly fast and can be very dangerous if closed to the face Keep away from children The model is made from many small and possibly sharp parts Operate and store model away from children to avoid the possi...

Страница 4: ...ching batteries or motors directly after flying The antenna of the radio should be extended at all times during operation so the signal can be compromised Do not cut the antenna mounted on the radio a...

Страница 5: ...model Electric Parts 1 x CA180 CA180F CA180 shown here 1 x 4CH Radio Transmitter 1 x Li po Battery 1 x Li po Charger 1 x Power Adaptor Placed under foam box 2 x Servo Elevator Servo Aileron Servo 2 x...

Страница 6: ...of 4CH FM Radio Transmitter Antenna To deliver the radio signal Mode1 Elevator Trim Mode2 Throttle Trim Mode1 Throttle Trim Mode2 Elevator Trim Mode1 Throttle Aileron Stick Mode2 Elevator Aileron Sti...

Страница 7: ...nattended while charging Improperly using charging battery may result in damage Do not disconnect the battery when the charger is in operation Balancing Balancing helps the stability of the helicopter...

Страница 8: ...the ground until all trimming and setting are done Please make sure the throttle stick and trim are at the lowest position 1 Set throttle to the lowest point 2 Extend antenna 3 Turn on the power switc...

Страница 9: ...clockwise will subtract the rod Twisting anti clockwise will lengthen the rod Shortening the Aileron push rod causes the helicopter apt to the left Lengthening the Aileron push rod causes the helicop...

Страница 10: ...ight by fingering the rudder stick right Adding throttle let the helicopter fly higher Reducing throttle let the helicopter fly lower Rudder controls the helicopter s direction and tail motor s power...

Страница 11: ...ose downward slightly can avoid the tail rotor strike Keep focusing on the direction of the helicopter and control it by using the rudder control Move slowly upward Move slowly downward Nose slightly...

Страница 12: ...upwards and rudder to the right 3 After turning return elevator and rudder to neutral and add left aileron to correct the position Flying a circle helps the pilot control the helicopter even they are...

Страница 13: ...ing Skid for CA180 CA180 016 Shaft Retainer CA180 036 Rear Body for CA180F CA180 017 Gearing 4 8 3 CA180 018 Bearing 2 6 3 CA180 019 Servo Push Rod CA180 020 Hardware Set for CA180F CA180 021 Hardware...

Страница 14: ...www copterx com Copyright 2008 KY MODEL Company Limited...

Отзывы: