22
FTT699, FTT700, FTT700-USB - Version A- Released July 16, 2021 - Copernicus Educational Products Inc.
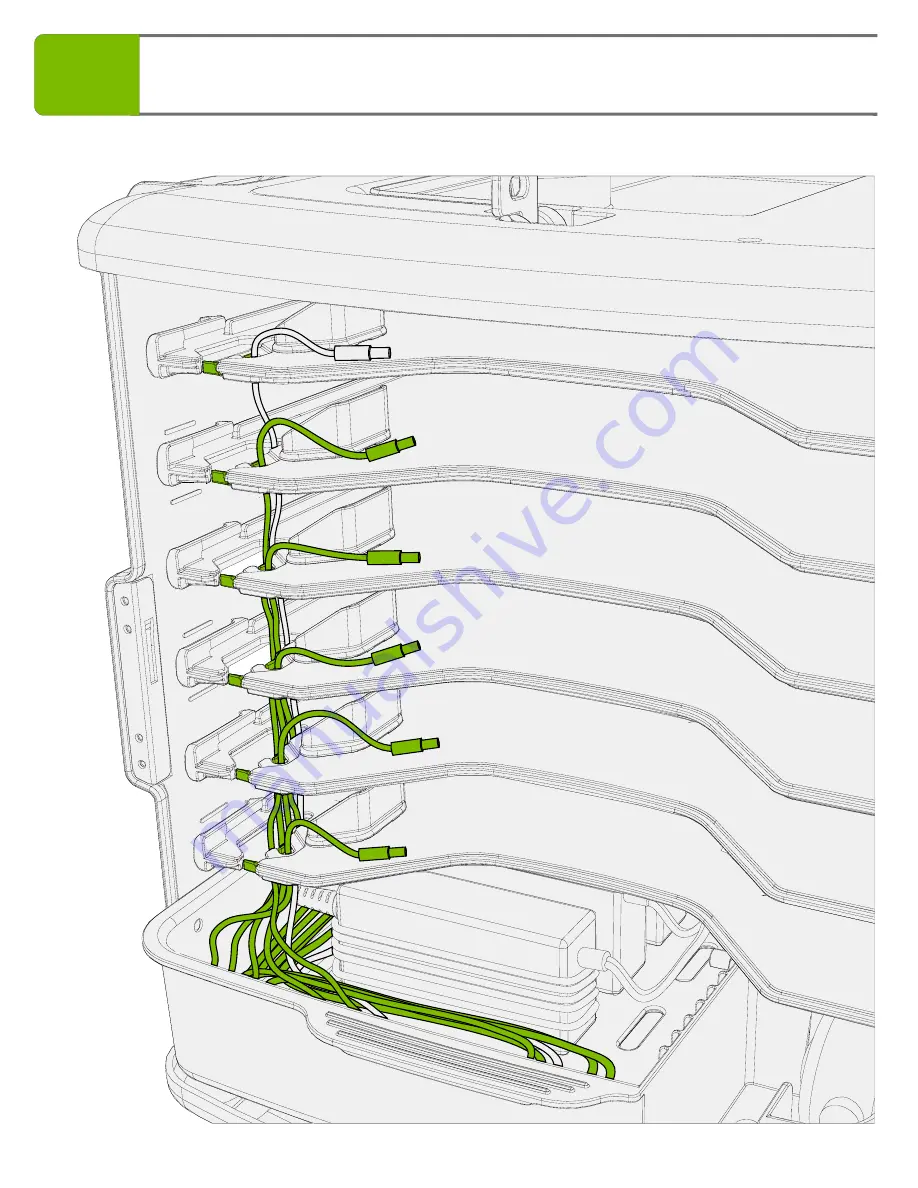
Repeat Step 13A and 13B until all remaining cables are clipped into shelves (as shown)
14
Страница 1: ...ING For assistance please contact us 1 800 267 8494 Email info copernicused com Have your packing slip ready for reference 2 Tech Tub 6 Device Setup FTT699 FTT700 FTT700 USB Please Recycle Assembly Gu...
Страница 2: ...f you have any questions concerns or ideas on how we can improve please let us know by contacting our Customer Solutions Ninjas at 1 800 267 8494 or info copernicused com Happy teaching Kaylyn Belcour...
Страница 3: ...mponents of this unit during a lightning storm Electrical Shock In its unassembled state this product contains parts that can be hazardous to small children This product should be assembled by an adul...
Страница 4: ...it pay close attention The symbol denotes a step needing extra attention to ensure it is done correctly The star symbol highlights an advisory note Watch for These Helpful Symbols Before You Begin As...
Страница 5: ...16 Wrench OR Screwdriver Back Foot Anchor Pin x2 A M4 x 15mm x4 D C E F M5 Lock Nut x2 M5 Square Nut x2 M5 Screw x2 B M5 Washer x2 Hardware Actual Size FTT700 5mm Driver Allen Key x1 Front Pin Bracke...
Страница 6: ...ench OR Screwdriver Back Foot Anchor Pin x2 A M4 x 15mm x4 D C E F M5 Lock Nut x2 M5 Square Nut x2 M5 Screw x2 B M5 Washer x2 Hardware Actual Size FTT699 5mm Driver Allen Key x1 Front Pin Bracket 2327...
Страница 7: ...6 Device Tech Tub Main Body x1 In FTT700 C Hook Loop Straps x6 Power Tray x1 23262 Shelf x6 23261 Device Positioning Rail x6 23271 Not to Scale Hardware Actual Size 5mm Driver Allen Key x1 Front Pin...
Страница 8: ...sed the Tech Tub Trolley 2 you will need to mount your Tech Tub onto theTrolley Frame first before proceeding with this assembly guide Please look inside the Trolley Frame box for the assembly guide t...
Страница 9: ...ts into one shelf FTT700 ONLY 1 Shelf x6 Device Positioning Rail x6 You will need Not to Scale Shelf x1 You will need Not to Scale Actual Size Press snaps into these holes in shelf E M5 Square Nut x2...
Страница 10: ...You will need Not to Scale Actual Size Install shelf in middle position aligned with holes for screws 1 2 2 1 Fasten shelf to tub using screws both sides 4 Install remaining shelves Shelf x5 You will...
Страница 11: ...acket onto Power Tray Insert side with two pegs into keyholes 1 Slide back till you hear a CLICK 2 You will need Not to Scale Power Tray x1 23262 Power Strip Mounting Plate x1 23275 FTT700 ONLY Please...
Страница 12: ...under power strip as shown 1 Fit power cable between ribs and Power Strip Mounting Plate 2 Fit 4 keyholes on Power Strip over 4 pegs on Power Strip Mounting Plate 4 Slide Power Strip back to secure it...
Страница 13: ...T POWER CABLE Wrap wall outlet power cable around power adapter leaving 6 of cable free THIS LINE IS 10 LONG USE IT TO MEASURE OUT 20 OF CABLE THIS LINE IS 6 LONG USE IT TO MEASURE OUT YOUR CABLES 1 2...
Страница 14: ...k of the Power Tray Plug first power adapter into power strip 1 2 Run cable to front of tray leaving excess cable hanging out 8A FTT700 ONLY If your power adapter is too wide to fit on the power strip...
Страница 15: ...s Educational Products Inc 15 8B OR Plug in remaining power adapters Power Brick Adapter Plug remaining power adapters into power strip 1 2 Run cables to front of tray leaving excess cable hanging out...
Страница 16: ...ce charging cables to front of Power Tray as shown If your power adapter is too wide to fit on the power strip but you did not order a FTT699 please contact customer service to order these extension c...
Страница 17: ...able around Power Adapter 1 HOOK Setup USB Hub 2 Place USB Hub and Power Adapter into Power Tray Do not pull cable too tight USB Hub Power Cable Route power cable around hook and out through back of P...
Страница 18: ...TT700 USB Version A Released July 16 2021 Copernicus Educational Products Inc 18 Plug in USB cables Plug USB cables into USB Hub 1 2 Run USB cables to front of tray leaving excess cable hanging out 11...
Страница 19: ...us Educational Products Inc 19 Position Power Tray for Cable Management 1 The rest of this assembly guide applies for FTT700 700 C and FTT699 12 Feed Power Strip power cable through hole in back of tu...
Страница 20: ...ernicus Educational Products Inc 20 Push cable through first green clip 1 2 Push cable through second green clip Feed first cable into cable management clip on top shelf 13A The process is the same fo...
Страница 21: ...ucational Products Inc 21 The process is the same for USB cables Push cable through first green clip 1 Push cable to back of opening 2 Continue inserting cable into first cable management clip on all...
Страница 22: ...22 FTT699 FTT700 FTT700 USB Version A Released July 16 2021 Copernicus Educational Products Inc Repeat Step 13A and 13B until all remaining cables are clipped into shelves as shown 14...
Страница 23: ...FTT700 FTT700 USB Version A Released July 16 2021 Copernicus Educational Products Inc 23 When pushing the tray in pull the cable to keep it out of the way of the tray 15 Slide Tray all the way into t...
Страница 24: ...r devices into Tech Tub Device Positioning Rails are removable if you require more space for larger devices To remove push on the top edge and rotate up out of holes in shelf If you wish to discard De...
Страница 25: ...ice power cable into each device 17 Once step 17 is complete plug power strip or usb hub power cable into wall outlet FTT699 FTT700 FTT700 USB Version A Released July 16 2021 Copernicus Educational Pr...
Страница 26: ...FTT700 USB Version A Released July 16 2021 Copernicus Educational Products Inc 26 8 Turn on power strip via access hole on front of tray 18 Slide Power Tray out and slide USB Hub power switch into on...
Страница 27: ...FTT699 FTT700 FTT700 USB Version A Released July 16 2021 Copernicus Educational Products Inc 27 8 2 Wrap Power Strip power cable around cable hooks when moving Tech Tub 19...
Страница 28: ...Locks 6 Open the front door of upper tub and slide locking pin through metal tab 5 2 Close and lock front door of Tech Tub to secure devices Connect a 6 Device Tub to a 6 Device Tub or a 10 Device Tu...
Страница 29: ...dware using attached template stapled to end of this guide 2 then complete steps below to secure your Tech Tub onto surface 2 Surface Mounting Tech Tub 2 Slide rear feet of Tech Tub onto the pins Fit...