Copernicus SCC102 Скачать руководство пользователя страница 19

SCC102 SCC202 - Version D - Released November 6, 2020 - Copernicus Educational Products Inc.

19

The display on the Copernicus Self-regulation Classroom Cruiser allows the user to monitor their progress. During a session 
on the bike, the rider can alternate through Time, Speed, Distance, Calories, RPM, and Scan. The user can track their 
progress from one ride to the next.

FUNCTION KEY:
1. MODE: 

To select your specific mode and/or turn on display

FUNCTIONS

:

1. SCAN 

- Repeatedly displays all functions alternately (in the following order) 

2. TIME 

- Counts the total time elapsed (counts up to 99:59 MIN.) 

3. SPEED

 - Displays your current pedaling speed (00.00 up to 999.9MPH)

4. DISTANCE

 - Measures the total distance traveled (0.00-999.99Miles)

5. CALORIES

 - The number of calories burned (0.0-999.9 KCAL)

6. ODOMETER

 - Counts the total accumulated distance.

7. RPM

 - Displays the amount of rotations per minute.

Display Instructions

HOW TO USE:
1. AUTO ON/OFF:

Begin pedaling or press the MODE button to turn on the display . Once the display is on, it will remain active while in 
motion. The display will automatically turn off when it has reached approximately 4 minutes without any motion.

2. RESET:

To reset the display , hold down the MODE button for 3 seconds. You can also reset by removing the batteries.

3. DISPLAY:

The top number on the display shows SPEED in miles per hour. The function shown at the bottom of the display is changed 
by pressing the MODE key. An arrow will point to the function being displayed. When you want a specific function 
displayed on the bottom, press MODE until arrow points to the function. That function will be displayed on screen until 
you press the MODE key. When you want the display to automatically alternate through the functions on the bottom, press 
MODE until arrow points to SCAN. If display is in SCAN mode, one arrow will point to SCAN, and a flashing arrow will point 
to the function currently being displayed.

4 . BATTERY/TROUBLESHOOT :


The display uses two AAA batteries, which are included. If the display becomes difficult to read, please try installing new 
batteries. If problems persist, please contact our customer service ninjas for assistance.

+

+

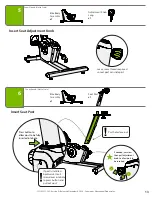
HOW TO CHANGE DISPLAY BATTERIES :


1. Remove the display from the bike housing

2. Locate the battery holder on the back side and install 2x AAA batteries

3. Re-insert the display into the bike housing. See Step 5 of this guide for 
reference.

+

+

SPEED

OTHER FUN’C

MODE

Содержание SCC102

Страница 1: ...small parts present a hazard To be used under direct supervision of an adult WARNING Self regulation Classroom Cruiser Please Recycle For assistance please contact us 1 800 267 8494 Email info coperni...

Страница 2: ...s concerns or ideas on how we can improve please let us know by contacting our Customer Solutions Ninjas at 1 800 267 8494 or info copernicused com Happy teaching Kaylyn Belcourt President Self regula...

Страница 3: ...tedonasolid levelsurface A complete visual inspection and test of the features and functions of the assembled Self regulation Classroom Cruiser is to be made prior to use Immediately report worn loose...

Страница 4: ...iption Self regulation Classroom Cruiser PreK 2 Self regulation Classroom Cruiser Grades 3 6 Lowest Position Highest Position User Maximum Height 126cm 50 149cm 59 User Maximum Weight 65kg 143lb 65kg...

Страница 5: ...yourself with them Please note that in its unassembled state this product contains parts that can be hazardous to small children This product should be assembled by an adult Follow the steps in seque...

Страница 6: ...rt x1 Handle Bar Post Short ZSCC 33150 x1 M6 x 33mm ZSCC 430131 x3 D Left Pedal ZSCC 21126 x1 Right Pedal ZSCC 21127 x1 Allen Key Large ZSCC 43040 1x Allen Key Small ZSCC 43041 1x M6 x 16mm ZSCC 43012...

Страница 7: ...Assembly x1 Handle Bar Assembly ZSCC 21129 x1 M8 x 45mm ZSCC 43018 x2 A M8 x 55mm ZSCC 43019 x4 B M6 Lock Washer ZSCC 43020 x4 E M8 Flat Washer ZSCC 43022 x8 F Hardware Actual Size In Box 1 Seat Post...

Страница 8: ...Back Foot Front Foot Leveler Wheel Adjustment Knob Short Adjustment Knob Long Handle Bars Handle Bar Post Short SCC102 Only Handle Bar Post Long SCC202 Only Seat Post Short SCC102 Only Seat Post Long...

Страница 9: ...Back Feet x2 A Actual Size You will need Not to Scale 1 2 You will need Not to Scale Leveler x4 Allen Key Large x1 x4 F A F F x2 I A F F I I Back Foot x1 Front Foot X1 Wheel x2 Front Foot Assembly x1...

Страница 10: ...020 Copernicus Educational Products Inc 10 F B G Add Feet to Main Body Assembly x4 B Actual Size You will need Not to Scale 3 2 Person Task Allen Key Large 1x Main Body 1x F x4 G x4 Foot Assembly Back...

Страница 11: ...Use other hand to align and turn threads clockwise by hand into crank arm until fully threaded in You should not feel resistance while tightening pedal by hand Align 15mm multi tool socket with flat...

Страница 12: ...ther hand to align and turn threads counter clockwise by hand into crank arm until fully threaded in You should not feel resistance while tightening pedal by hand Align 15mm multi tool socket with fla...

Страница 13: ...o Scale 6 Seat Post x1 Insert Seat Post Bike Body Assembly x1 Bike Body Assembly x1 Leave some threads exposed so seat post can slide past Post holes face out If needed unscrew then pull adjustment kn...

Страница 14: ...e before attaching to seat post You will need Not to Scale 8 Insert Handle Bar Adjustment Knob Adjustment Knob Short x1 Bike Body Assembly x1 Leave some threads exposed so seat post can slide past 3 E...

Страница 15: ...out If needed unscrew then pull adjustment knob to allow post to be inserted 1 2 Press button to allow post to be fully inserted into hole If post is installed backwards insert screwdriver into hole t...

Страница 16: ...in your SCC AC box For SCC102 and SCC202 models does not include desktop proceed to Step 12 12 Multi Tool x1 You will need Not to Scale Actual Size Handle Bar Cover x1 x3 D x3 J Attach Cover to Handl...

Страница 17: ...adjust the seat first turn the seat post knob counterclockwise approximately 3 turns to loosen it Next pull the knob slide the seat post upward or downward to the desired position and then release th...

Страница 18: ...iding Position The previous tables are a guideline each rider should adjust to their own comfortable riding position Adjust seat to the height of your hip bone You should be able to reach the handleba...

Страница 19: ...hed approximately 4 minutes without any motion 2 RESET To reset the display hold down the MODE button for 3 seconds You can also reset by removing the batteries 3 DISPLAY The top number on the display...

Страница 20: ...ke Tip bike up onto wheels and move to desired location 3 1 2 3 How to Level Feet The Classroom Cruiser should be set up and operated on a solid level surface If the exercise bike rocks slightly on yo...

Страница 21: ...ot flat or there may be a small object under the front or rear levelers 2 The levelers have not been leveled properly during assembly 1 Remove object 2 Adjust the levelers See page 19 The adjustment k...

Отзывы: