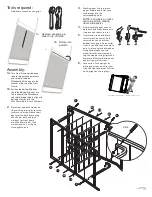
3.
Working from the top, place
upper, middle and lower wire
rack prongs into the
corresponding holes.
NOTE: Long bars on racks
are to be on top making
items slide easier.
4.
Now attach
long
bent arms to
both back and front frame as in
step one and shown in inset.
5.
Insert caster stems into black
caster inserts on frames. Push
casters in by hand until they
bottom out against lip on caster
stem. If you find they are hard to
push in, place a piece of wood or
vice-grips between the two
wheels directly over stem and
tap the wood or vice grips with a
hammer until caster bottoms out
against lip on caster stem.
6.
Lock casters. Turn upright by
placing your foot on caster that
is on the floor and pivot. Pull the
unit upright by the top legs.
Tools required:
Adjustable wrench or vice grips.
Assembly:
1a.
Turn Front Frame upside down,
remove the packaging material
and carefully slide the
Whiteboard all the way into the
channel at the top of the Front
Frame.
1b
.
Position the Bottom Stretcher
Angle the Bottom Stretcher into
the bottom of the Whiteboard
and rotate into position to align with
bolt holes Fasten with two
M6 x 40mm Bolts & Lock Washers
2.
Place front and back frames on
sides making sure holes for wire
racks are to inside. Attach
short
bent arms to back frame using
M6 x 40mm bolts and lock
washers. For front frame
use M6 x 45mm bolts, lock
washers and nuts as shown.
Hand tighten only.
Pull upright by pivoting on bottom locked caster.
3b
3a
2
4
3c
3b
3a
2
4
3c
2 & 4
XS005-2008-E
September 30, 2008
2 of 4
1a. Remove packaging &
slide to top of frame
1b. Rotate into
position


