background image

RC005 - Version D - Released November 24, 2022 - Copernicus Educational Products Inc.

3

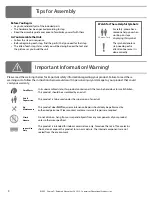
Tips for Assembly

Before You Begin:

Ÿ

Lay out and identify all of the included parts. 

Ÿ

The hardware has been packed according to step

Ÿ

Read the assembly guide over once to familiarize yourself with them.

As You Assemble the Unit:

Ÿ

Follow the steps in sequence.

Ÿ

Before beginning each step, find the part(s) that you need for that step.

Ÿ

The title of each step states what you will be doing. Review the text and 
the pictures as you build the unit.

The symbol denotes a 
step needing extra 
attention to ensure it is 
done correctly.

Watch for These Helpful Symbols

:

For safety, please have 
someone help you when 
working on steps 
displaying this symbol.

2-Person Task

Please read the warnings below for important safety information regarding your product. Failure to read these 
warnings or to follow the instructions below could result in personal injury or damage to your product that could 
void your warranty. 

Indoor Use
Only

This product is intended for indoor comercial use only. To reduce the risk of fire or electric 
shock, do not expose this product to rain or moisture. The internal components are not 
sealed from the environment.

In its unassembled state, this product contains parts that can be hazardous to small children. 
This product should be assembled by an adult.

Small Parts

This product is to be used under the supervision of an adult.

Adult  
Supervision

Do not climb on, hang from or suspend objects from any components of your product 
unless otherwise specified. 

Climb
Hazard

Important Information! Warning!

This product does 

NOT

 require maintenance. Repairs should only be performed by 

authorized personnel. Please contact customer service if repairs are required.

No 
Maintenance

Содержание Royal RC005

Страница 1: ...c 1 Classic Royal Reading Writing Center RC005 Assembly Guide Check out our other products online at www copernicused com For assistance please contact us by telephone at 1 800 267 8494 or email at info copernicused com Have your packing slip ready for reference Please Recycle ...

Страница 2: ...a draw to win Copernicus product Make a Warranty Claim We offer a Lifetime Warranty on almost everything we make Please call 1 800 267 8494 or email info copernicused com to start your warranty claim Proof of purchase will be required upon warranty claim i e copy of invoice Replace your Whiteboard Have a well used whiteboard that needs replacing Our whiteboards carry a five year warranty and repla...

Страница 3: ...rtant safety information regarding your product Failure to read these warnings or to follow the instructions below could result in personal injury or damage to your product that could void your warranty Indoor Use Only This product is intended for indoor comercial use only To reduce the risk of fire or electric shock do not expose this product to rain or moisture The internal components are not se...

Страница 4: ...m Wrench 1x Front Frame Top 1x J Tools Not to Scale A C M6 x 40mm Screw 8x M4 Lock Nut 8x M4 x 19mm Shoulder Bolt 8x D E M6 Lock Washer 8x M6 Lock Nut 8x Allen Key for M6 Hardware 1x F Allen Key for M4 Hardware 1x Fast Lead Screw 37mm 2x Fast Lead Screw 15mm 6x K I M6 x 19mm Screw 8x Tub Channel 2x Frame Wire 1x Back Feet Left Right 2x Back Frame Stretcher 2x Back Riser Left Right 2x Front Feet Le...

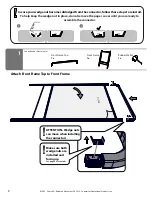
Страница 5: ...me 1x F ro n t In case your wedge nut becomes dislodged from the connector follow these steps to reinstall To help keep the wedge nut in place do not remove the paper cover until you are ready to assemble the connector 1 2 Make sure both wedge nuts are installed and facing up See page 5 for details ATTENTION Wedge nuts can move when installing the connectors Rubber Mallet 1x ...

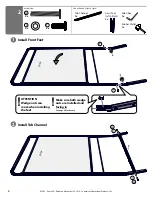
Страница 6: ...ed Not to Scale 2 F 2x Tub Channel 1x A I 2x 2x Allen Key 1x Rubber Mallet 1x B a c k Install Front Feet 1 2 Install Tub Channel Make sure both wedge nuts are installed and facing in See page 5 for details ATTENTION Wedge nuts can move when installing the feet F F Front Feet Left Right 2x A I I A B a c k ...

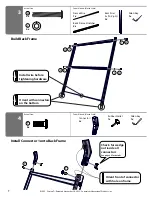
Страница 7: ...Scale 3 Allen Key 1x Actual Size 4 F 2x Install Connector 1 onto Back Frame Rubber Mallet 1x Allen Key 1x Connector 1 2x You will need Not to Scale Install wire before tightening hardware A I A I A I A I Orient with connectors on the bottom Back Riser Left Right 2x Check for wedge nut inside all connectors See page 5 for details F F Orient front of connector with hole on frame ...

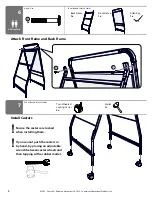
Страница 8: ... to Scale 5 Attach Back Frame Feet 1 2 Install Tub Channel Actual Size F 2x Tub Channel 1x A I 2x 2x Allen Key 1x Rubber Mallet 1x Back Feet Left Right 2x Make sure both wedge nuts are installed and facing in See page 5 for details ATTENTION Wedge nuts can move when installing the feet F F A I I A ...

Страница 9: ... E Actual Size You will need Not to Scale 6 Allen Key 1x 2 Person Task 7 Install Casters If you cannot push the casters in by hand try placing an adjustable wrench between caster wheels and then tapping with a rubber mallet Twin Wheeled Locking Caster 4x Mallet 1x You will need Not to Scale Ensure the casters are locked when installing them E E ...

Страница 10: ...Scale Actual Size D M4 x 19mm Shoulder Bolt 8x M4 Lock Nut 8x Tub Rack 2x J Allen Key for M4 Hardware 1x Adjustable Wrench or 7mm Wrench 1x 2 Person Task 1 2 D J D D D J J J D D D D J J J J Do not over tighten or Tub Racks will not slide easily 9 Install Metal Shelf onto Assembled Frame Metal Shelf 1x You will need Not to Scale Wire side down ...

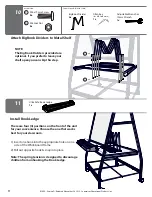
Страница 11: ...e on one side of the Whiteboard Frame 2 Pull out opposite hook snap into place Note The spring tension is designed to discourage children from unhooking the Book Ledge Attach Big Book Dividers to Metal Shelf You will need Not to Scale Actual Size NOTE The Big Book Dividers provided are optional If you prefer to leave your shelf open you can skip this step Big Book Divider 4x C M6 x 19mm Screw 8x M...

Страница 12: ... Install Chart Loops and S Hooks Chart Loop Hooks 2x 13 You will need Not to Scale Lined Magnetic Dry Erase Board 1x Install Lined Magnetic Dry Erase Board Use hooks on frame of Lined Magnetic Dry Erase Board to hang it on the back of the easel You can hang it in landscape or portrait orientation S Hooks 2x 1 2 ...

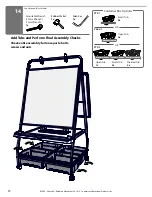
Страница 13: ...rform Final Assembly Checks Check entire assembly for loose parts bolts screws and nuts Adjustable Wrench 10mm Wrench 7mm Wrench 1x Rubber Mallet 1x You will need Not to Scale Open Tub 1x Container Box Options OR Open Tub 4x Small Tub 8x Small Tub 2x Divided Tub 2x PTP 1 PTP 2 OR Allen Key 1x C68 4 1 ...

Отзывы: