background image

such as DVD player or set-top-box.

6. 

VIDEO/S-VIDEO OUTPUT


Connect the Video/S-Video output port to the display.

7. 

DC 5V 

Plug the 5V DC power supply into the splitter and connect the 
adaptor to AC wall outlet.

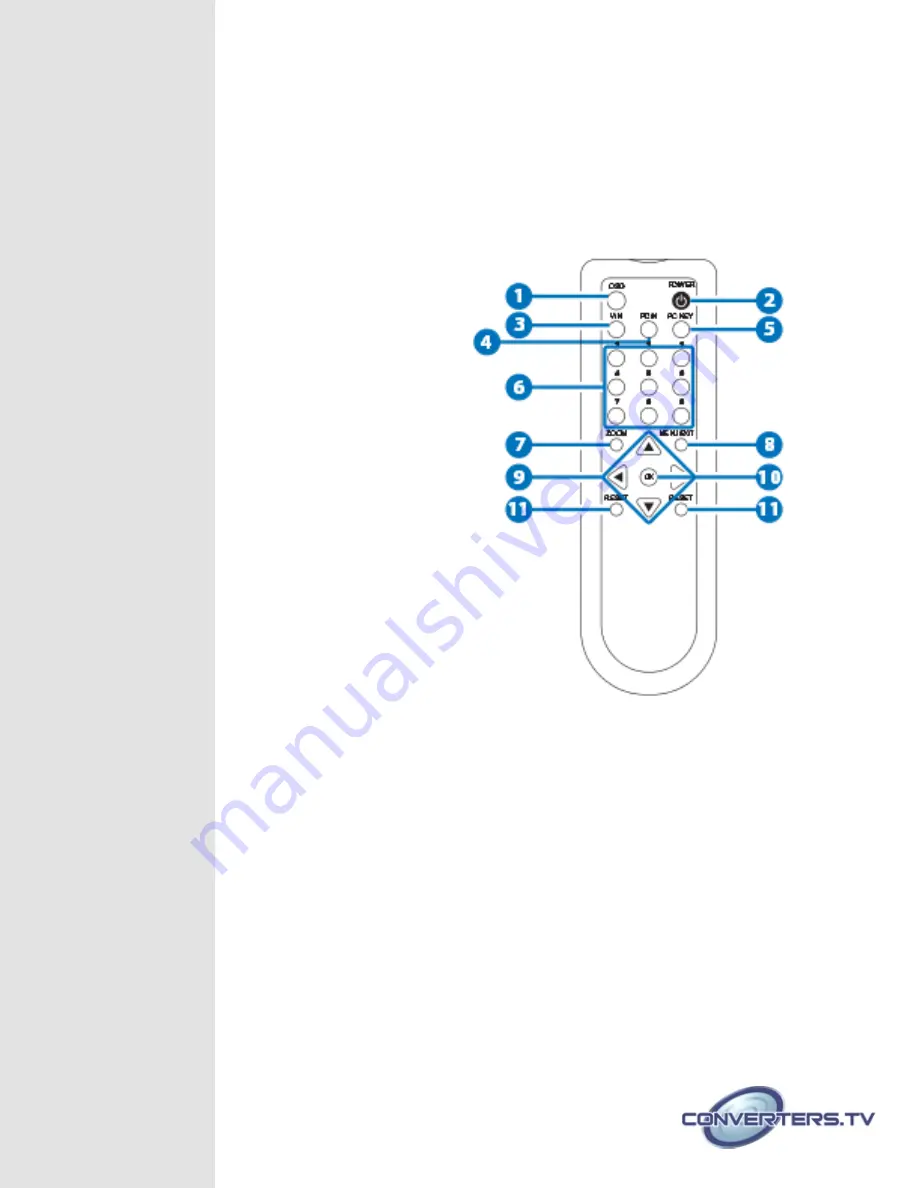
Remote

1. 

OSD

Press to turn ON/OFF the OSD 
on the display.

2. 

POWER 

Press to power ON or to 
Standby for the system.

3.  

V IN


Press to select Video input 
source.

4.  

PC IN 

Press to select PC input source.

5.  

PC KEY 

Press the button to display PC 
screen or the combination 
of PC and Videoor S-Video 
screen.

6.  

1 ~ 9 

When in PC mode, press each key to 
Zoom the picture to the 
specific area.

7.  

ZOOM 

Press to turn ON/OFF the ZOOM 
function, excepted for Video input 
source.

8.  

MENU/EXIT 

Press to enter MENU mode and press 
again to EXIT the menu or return to 
previously page.

9.  

▲▼◄► 

a.
Press each key to pan the PC picture to different position follow by each key definition.
b.
To enter the Sub-menu.

10.  

OK 

Press OK to confirm the selection

11.  

RESET

Press once to reset current setting values back to factory default value.

Содержание 15195

Страница 1: ...PC CV SV Video System Overlay Processor 15195 Operation Manual ...

Страница 2: ...to 85Hz Cross platform compatibility for PC Macintosh and Notebook Plug and Play design no software driver required Simultaneously design no software driver required Can be adjust from front panel RS 232 or remote control Note 1 The system did not support video format conversion For example NTSC in to NTSC out PAL in to PAL out or SECAM in to SECAM out 2 In Overlay mode suggest the users to preser...

Страница 3: ...rough various control or setting values 6 ENTER Press to enter or to confirm the selection 7 MENU EXIT Press to enter MENU mode and press again to EXIT the menu or return to previous page Back Panel 1 RS 232 Connect 3 5mm phone jack to D Sub 9pin adaptor to the PC Notebook device for RS 232 control 2 PC INPUT Connect the input source equipment such as PC NB for PC signal input 3 PC OUTPUT PASS THR...

Страница 4: ...urce 5 PC KEY Press the button to display PC screen or the combination of PC and Videoor S Video screen 6 1 9 When in PC mode press each key to Zoom the picture to the specific area 7 ZOOM Press to turn ON OFF the ZOOM function excepted for Video input source 8 MENU EXIT Press to enter MENU mode and press again to EXIT the menu or return to previously page 9 a Press each key to pan the PC picture ...

Страница 5: ...600 bps Data bit 8 bit Parity None Stop Bit 1 Flow Control None Command Description Power1 power on normal Power0 power off standby Key0 Chroma Key Blue Key1 Chroma Key Green key2 Chroma Key Red key3 Chroma Key Black Output0 output mode PC Output1 output mode Video Output2 output mode PC KEY Output3 output mode CV KEY Output4 output mode MIXER System0 output video system NTSC System1 output video ...

Страница 6: ...ion 4 Zoom5 PC ZOOM position 5 Zoom6 PC ZOOM position 6 Zoom7 PC ZOOM position 7 Zoom8 PC ZOOM position 8 Zoom9 PC ZOOM position 9 ZoomC PC PAN center ZoomL PC PAN left ZoomU PC PAN up ZoomR PC PAN right ZoomD PC PAN down Panel0 Front panel lockout on Panel1 Front panel lockout off CVCONTx video Contrast x 0 63 CVBRIGHTx video Brightness x 0 63 CVCOLORx video Color x 0 63 CVHUEx video Tint x 0 63 ...

Страница 7: ...POSx PC H Position x 0 63 PCVPOSx PC V Position x 0 63 PCPHASEx PC Phase x 0 63 ASPECTRS PC aspect reset PCCONT58 PCVSIZE31 PCHPOS31 PCVPOS31 PCPHASE KEYPHASEx KEY Adjust Phase x 0 63 KEYLEVELx KEY Adjust Level x 0 63 KEYRESET KEY adjustment reset KEYPHASE31 KEYLEVEL31 RMCODEx Remote Code adjustment reset Remote Code x 0 3 STATUS Retrieve video scaler all status POWER KEY OUTPUT SYSTEM OSD DISPLAY...

Страница 8: ...T 0 63 Default 58 BRIGHT 0 63 Default 31 COLOR 0 63 Default 31 HUE 0 63 Default 31 DETAIL 0 63 Default 10 RESET EXIT PC ASPECT H SIZE 0 63 Default 31 V SIZE 0 63 Default 31 H POSITION 0 63 Default 31 V POSITION 0 63 Default 31 PHASE 0 63 Default 10 will depend on the input resolution RESET EXIT CV PICTURE CONTRAST 0 63 Default 58 BRIGHT 0 63 Default 31 COLOR 0 63 Default 31 HUE 0 63 Default 31 DET...

Страница 9: ...0 up to 85Hz 800 x 600 up to 85Hz 1024 x 768 up to 85Hz 1280 x 1024 up to 85Hz 1600 x 1200 up to 60Hz NTSC NTSC4 43 PAL PAL M PAL N SECAM Input Port 1 x PC 1 x Video 1 Vp p 75ohm 1 x S Video 1 Vp p 75ohm Output Format NTSC NTSC4 43 PAL PAL M PAL N SECAM Output Port 1 x PC Pass through 1 x Video 1 Vp p 75ohm 1 x S Video 1 Vp p 75ohm ESD Protection Human Body model 8kV air gap discharge 4kV contact ...

Страница 10: ...Connection Diagram ...

Отзывы: