!
6
GB
79
ASSEMBLY
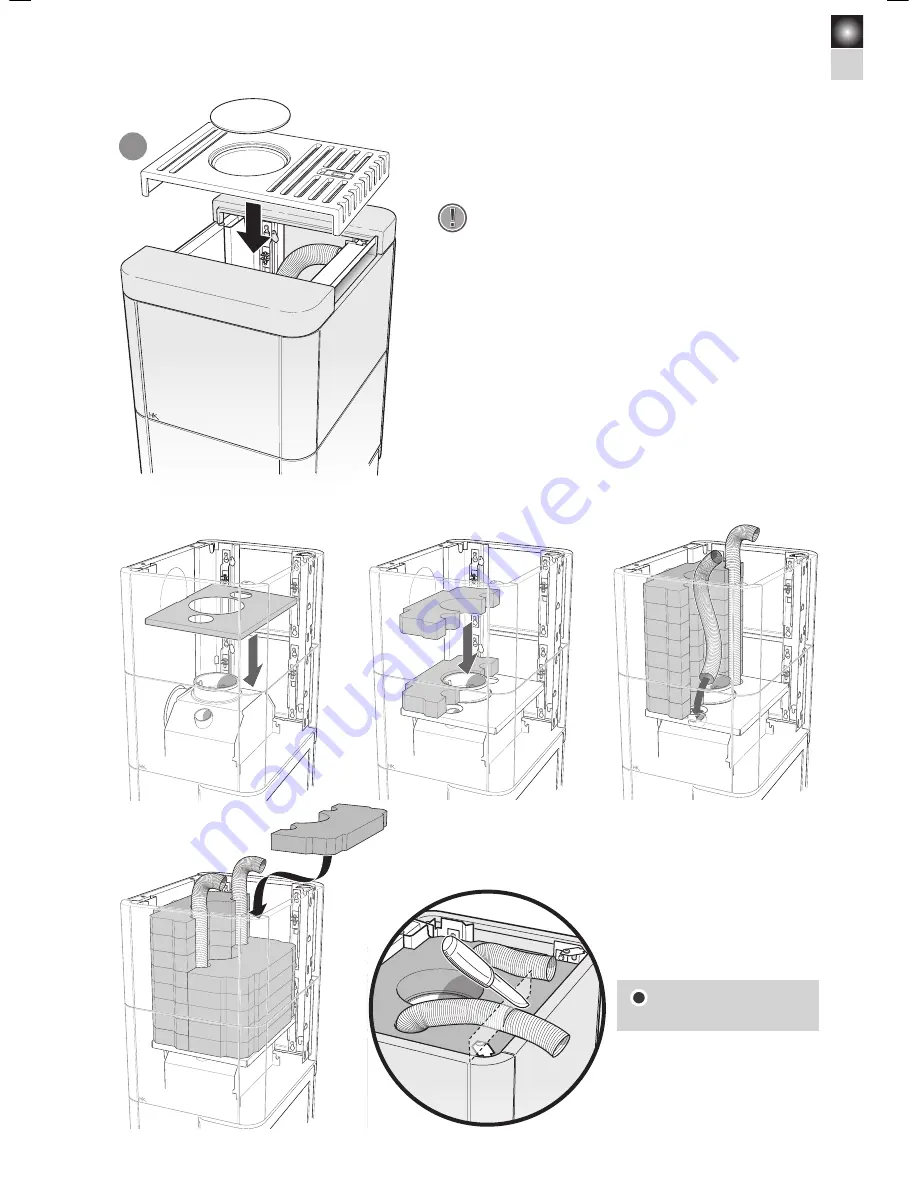
Check that the damper can be opened and closed without problem.
Installation of heat reservoir(option)
Go to page 78 for final installation and joining
Страница 1: ...www contura eu Installation instructions C26K High...
Страница 2: ...CLARED PERFORMANCE Essential characteristics Performance Harmonised technical specification Reaction to fire A1 WT Minimum distance to combustible material 100 mm to rear 600 mm to side Other safety d...
Страница 3: ...ation Read how to best light your stove in the lighting instructions The stove becomes very hot During operation certain surfaces of the stove become very hot and can cause burn injuries if touched Al...
Страница 4: ...ised technician This manual contains instructions on how the stoves must be assembled and installed To ensure the function and safety of the stove we recommend that the installation be carried out by...
Страница 5: ...utside that is connected to the connector on the underneath of the stove The amount of air needed for combustion is approx 25m3 h The connector has an external diameter of 67 mm When installing ducts...
Страница 6: ...chimney of at least 12 Pa The draft is affected both by the length and area of the chimney and by how well sealed it is The minimum recommended chimney length is 3 5 m and a suitable cross sectional...
Страница 7: ...tion distances are not less than those that are given in the figures below The minimum distance in front of the stove opening to combustible parts of the building or interior decoration must be at lea...
Страница 8: ...so the courses do not end up uneven and crooked Otherwise this can result in abnormally large gaps and uneven lines During assembly check that all tiles stand horizontally and that all parts in a cou...
Страница 9: ...MONTERING 1 0 1 0 V A N A D I U M N o 7 C H R O M E 1 0 1 0 V A N A D I U M N o 7 C H R O M E 5 mm GB 73 ASSEMBLY Place the profile edge to edge with the tile s side...
Страница 10: ...10 10 VA NA DIU M No 7 C H R O M E GB 74 ASSEMBLY Wait to tighten this screw until the next tile is in place...
Страница 11: ...Y When installing the two upper courses Wait to tighten the screws in the tile until all parts are in place and all adjustments have been made Prevent the side panels from dipping forward by hooking t...
Страница 12: ...10 10 VANA DIUM No 7 CHROME GB 76 ASSEMBLY Not with the heat reservoir option...
Страница 13: ...in the rear profile and tightening the screws Tighten the screws until the upper plates align with the upper edge ASSEMBLY Final inspection of the installation It is extremely important that the insta...
Страница 14: ...ean Ensure that joints are clean and dry before applying the sealant ASSEMBLY Adjustment screws for placement in the guide plate to support the top plates Adjust them so they are at the same height as...
Страница 15: ...6 GB 79 ASSEMBLY Check that the damper can be opened and closed without problem Installation of heat reservoir option Go to page 78 for final installation and joining...
Страница 16: ...285 23 Markaryd Sweden www contura eu Contura reserves the right to change colours materials dimensions and models at any time without special notice Your dealer can give you the most up to date infor...