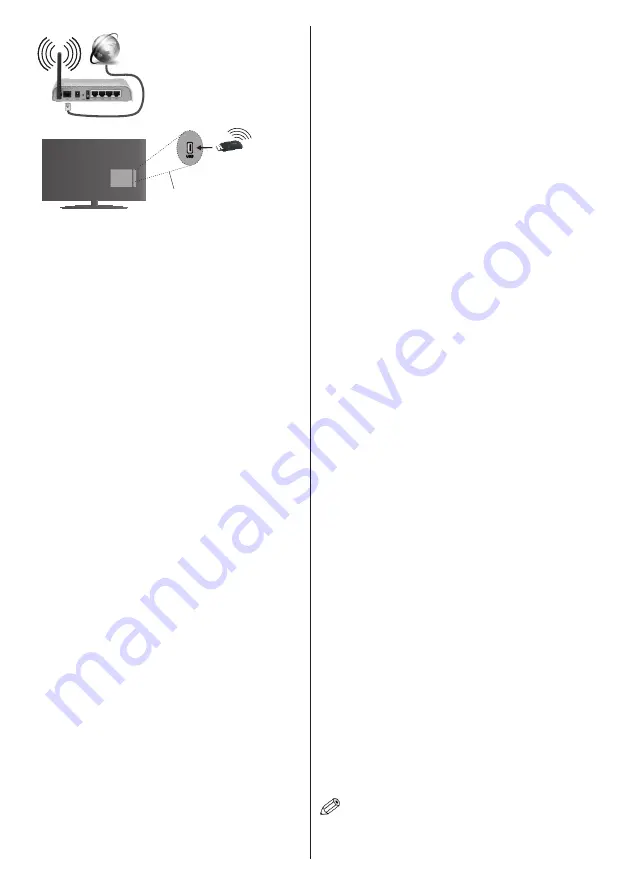
background image

English

   - 56 -

Broadband ISP 

connection

Wireless LAN 

adaptor

USB inputs on the 

rear left side of the TV

A Wireless-N router (IEEE 802.11a/b/g/n) with 

simultaneous 2.4 and 5 GHz bands is designed to 

increase bandwidth. These are optimized for smoother 

and  faster  HD  video  streaming,  file  transfers  and 

wireless gaming.

• 

Use a LAN connection for quicker file sharing 

between other devices like computers.

• 

The frequency and channel differ depending on the area.

• 

The transmission speed differs depending on the 

distance and number of obstructions between the 

transmission  products,  the  configuration  of  these 

products, the radio wave conditions, the line traffic 

and the products that you use. The transmission may 

also be cut off or may get disconnected depending 

on the radio wave conditions, DECT phones or any 

other WiFi 11b appliances. The standard values of 

the transmission speed are the theoretical maximum 

values for the wireless standards. They are not the 

actual speeds of data transmission.

• 

The location where the transmission is most effective 

differs depending on the usage environment.

• 

The Wireless LAN adaptor should be connected 

directly to the TV’s USB port. USB hubs are not 

supported. You  can  plug  your  wifi  dongle  into  a 

extension dock in cases where network quality is 

poor and the wifi dongle needs to be placed to a 

location with better signal quality.

• 

The Wireless LAN adaptor supports 802.11 a,b,g & 

n type modems. It is highly recommended that you 

should use the IEEE 802.11n communication protocol 

in order to avoid any possible problems while watching 

videos.

• 

Use the other USB input, if you experience problems 

with audio/video performance.

• 

You must change your modem’s SSID when there are 

any other modems around with the same SSID. You 

can encounter connection problems otherwise. Use 

a wired connection if you experience problems with a 

wireless connection. 

Configuring Wireless Device Settings

To enable Wi-Fi features, plug in the Wi-Fi dongle to one 

of the USB ports. Open the 

Network/Internet Settings


menu and select 

Network Type

 as 

Wireless Device

 to 

start connection process.
The TV will scan the wireless networks automatically. 

A list of available networks will be displayed. Please 

select your desired network from the list. 

Note:

  If  the  modem  supports  N  mode,  you  should  set  N 

mode settings.

If the selected network is protected with a password, 

please enter the correct key by using the virtual 

keyboard. You can use this keyboard via the directional 
buttons and the 

OK

 button on the remote control. 

Wait until the IP address is shown on the screen.
This means that the connection is now established. 

To disconnect from a wireless network, highlight 

Network Type 

and press Left or Right buttons to set 

as 

Disabled

.

Highlight 

Internet Speed Test

 and press the 

OK

 button 

to check your internet connection speed. Highlight 

Advanced


Settings 

and press the 

OK

 button to open 

the advanced setting menu. Use directional and numeric 

buttons to set. Press the 

OK

 button to save settings 

when complete. 

Other Information

The status of the connection will be displayed as 

Connected

 or 

Not


Connected

 and


the current IP 

address, if a connection is established.

Connecting to your mobile device via WiFi

• 

If your mobile device has WiFi feature, you can connect 

it to your TV via a router, in order to access the content 

in your device. For this, your mobile device must have 

an appropriate sharing software.

• 

Connect to your router following the steps stated above 

in the 

Wireless Connectivity

 section.

• 

Afterwards, engage your mobile device with the router 

and then activate the sharing software on your mobile 

device. Then, select files that you want to share with 

your TV.

• 

If the connection is established correctly, you will be 

able to access the shared files from your mobile device 

via the 

Media Browser

 of your TV.

• 

Enter the 

Media Browser

 menu and the playback 

device selection OSD will be displayed. Select your 

mobile device and press the 

OK 

button to continue.

• 

If available, you can download a virtual remote 

controller application from the server of your mobile 

device application provider. 

Note: 

This feature may not be supported on all mobile 

devices.

Содержание CELED49S0116B3

Страница 1: ...D49S0116B3 Lisez toutes les instructions avant d utiliser ce téléviseur et conservez le manuel d utilisation dans un lieu sûr pour pouvoir vous y référer ultérieurement MODE D EMPLOI OPERATING INSTRUCTIONS ...

Страница 2: ...NTRETENIR CHEZ SOI VEUILLEZ CONFIER L ENTRETIEN À UN PERSONNEL QUALIFIÉ Remarque Respectez les consignes à l écran afin d utiliser les fonctions y relatives Pendant des phénomènes météorologiques extrêmes tempêtes foudre et de longues périodes d inactivité aller en vacances débranchez le téléviseur du secteur La prise d alimentation est utilisée pour débrancher le téléviseur de l alimentation sect...

Страница 3: ...e explication se rapporte uniquement à l endroit du produit portant le symbole correspondant Veuillez en tenir compte pour des raisons de sécurité Équipement de classe II Cet appareil de par sa conception ne nécessite pas de bran chement sécurisé à un système électrique de mise à la terre Équipement de classe II avec mise à la terre fonctionnelle Cet appareil de par sa conception ne nécessite pas ...

Страница 4: ...ouvez accéder aux paramètres d économie d énergie dans le menu Système Image Sachez que les réglages de certaines images ne pourront pas être accessibles pour modification Si vous appuyez sur le bouton droit alors que l option Auto est sélectionnée ou sur le bouton gauche alors que l option Paramètres Personnels est sélection née le message L écran s éteindra dans 15 se condes s affiche à l écran ...

Страница 5: ...du bouton vers le bas et maintenez le enfoncé pendant quelques secondes le téléviseur passe alors en mode veille Remarques Si vous éteignez le téléviseur vous devrez reprendre la même procédure pour régler le volume Impossible d afficher le menu principal à l écran à l aide du bouton de commande Fonctionnement de la TV à l aide de la télécommande Appuyez sur le bouton Menu de votre télécommande po...

Страница 6: ...tèmes de recyclage appropriés pour l élimination de ces produits Remarque Le symbole Pb en dessous du symbole pour les piles indique que ces piles contiennent du plomb Produits Pile Pour en savoir plus www quefairedemesdechets fr Spécifications Télédiffusion PAL BG DK II SECAM BG DK Réception des chaînes VHF BAND I III UHF BAND U HYPERBAND Réception numérique TV numérique par câble terrestre entiè...

Страница 7: ...ique 12 Retour rapide Lecture rapide en arrière 13 Pause Suspend la lecture d un média en cours lance l enregistrement programmé 14 Enregistreur Enregistre les programmes 15 Lecture Démarre la lecture du média sélectionné 16 Arrêter Suspend définitivement la lecture du média en cours 17 Avance Rapide Lecture rapide en avant des médias comme les films 18 Sous Titres Active et désactive les sous tit...

Страница 8: ...ement de la TV à l aide de la télécommande 1 Mise en veille Marche 2 Volume haut bas 3 Sélection de la Source 4 Info 5 Mettre en sourdine 6 Programme suivant précédent 7 Taille de l image 8 Mono Stereo Dual II Langue de sous titre audio ...

Страница 9: ...u VGA Vous ne saurez utilisez le VGA et le YPbPr de manière interchangeable Pour activer la fonction audio PC YPbPr vous devrez utiliser les entrées audio latérales ainsi qu un câble audio YPbPr PC non fourni pour la connexion audio Si un périphérique externe est branché à l aide des prises PÉRITEL le téléviseur passe automatiquement en mode AV Pendant la réception des chaînes DTV Mpeg 4 H 264 ou ...

Страница 10: ...que est activée le téléviseur procède à la recherche d émissions analogiques une fois les autres réglages initiaux terminés Vous pouvez en outre choisir un type de diffusion comme favori La priorité est accordée au type d émission sélectionné pendant le processus de recherche et les chaînes associées seront listées au dessus de la Liste des chaînes Une fois terminé appuyez sur le bouton OK pour co...

Страница 11: ... lire les enregistrements Un retard Lip Sync peut survenir pendant le décalage temporel L enregistrement radio n est pas pris en charge Le téléviseur peut enregistrer jusqu à dix heures de programmes Les programme enregistrés sont divisés en partitions de 4 Go Si la vitesse d écriture du disque USB connecté est insuffisante l enregistrement peut échouer et l option de décalage horaire peut ne pas ...

Страница 12: ...ichiers de photo de musique et de film stockés sur un disque USB en connectant ce dernier à votre téléviseur Branchez un disque USB à l une des entrées USB située sur le côté du téléviseur En appuyant le bouton Menu lorsque vous êtes encore en mode Navigateur média vous aurez accès aux options D image de son et de Réglage En appuyant une fois de plus sur le bouton Menu l écran disparaîtra Vous pou...

Страница 13: ... Vous pouvez régler le volume à l aide de la télécommande de votre téléviseur Pour activer cette fonction définissez l option Haut parleurs du menu Système Paramètres Autres sur Amplificateur Les haut parleurs du téléviseurs seront coupés et le son de la source visionnée pro viendra du système audio connecté Remarque L appareil audio devrait prendre en charge la fonction de Contrôle du Système Aud...

Страница 14: ...puyant sur les boutons Gauche ou Droit Zoom Image Règle le format et la taille de l image souhaités Mode Film Les films sont enregistrés à un nombre d images par seconde différent des programmes de télévision normaux Activez cette fonction lorsque vous regardez des films afin de mieux visualiser les images accélérées Carnation La fonction Carnation peut être modifiée entre 5 et 5 Changer de Couleu...

Страница 15: ...Volume Cette fonction règle le son pour obtenir le niveau de sortie prévu entre les programmes Casque Sortie de ligne Si vous voulez connecter un amplificateur externe à votre télé à l aide d une fiche pour casque audio sélectionnez l option Sortie de ligne Si vous avez branché des casques à votre téléviseur définissez cette option en tant que Casque Veuillez vous assurer avant d utiliser les casq...

Страница 16: ...Remarque La fonctionnalité de description audio du son ne peut pas être disponible lors de l enregistrement ou lorsque vous êtes en mode décalage temporel Netflix Vous pouvez voir votre numéro ESN et désactiver Netflix à partir de cet onglet Le numéro ESN est un numéro d identification unique pour Netflix créé spécialement pour identifier votre téléviseur Plus Affiche les autres options de réglage...

Страница 17: ... Recherche et mémorise les stations analogiques Balayage De Chaîne Manuel Cette fonction peut être utilisée pour une entrée de diffusion directe Recherche des Chaînes Réseau Recherche les chaînes liées dans le système de diffusion Antenne Numérique Recherche les chaînes d antenne réseau Câble Numérique Recherche les chaînes de câble réseau Recherche Fine Analogique Vous pouvez utiliser ce réglage ...

Страница 18: ...rès avoir saisi le code PIN approprié le menu Paramètres du Contrôle parental s affiche Verrouillage Menu Cette option permet d autoriser ou de verrouiller l accès à tous les menus ou menus d installation du téléviseur Verrouillage Maturité Une fois définie cette option recherche l information relative aux émissions paren tales et si ce niveau parental est inactivé l accès à la diffusion n est pas...

Страница 19: ...terie Sélectionnez l option Enregistrement et appuyez sur la touche OK Si l événement sera diffusé plus tard il est ajouté à la liste des Minuteries qui doivent être enregistrées Si l événement programmé est en cours de diffusion l enregistrement débutera immédiatement Pour annuler un enregistrement existant sélectionnez l événement enregistré et appuyez sur la touche OK Ensuite sélectionnez l opt...

Страница 20: ...és au téléviseur Dans un tel cas déconnectez l un des appareils Pas d image L absence d image signifie que votre TV ne reçoit aucune transmission Assurez vous également que la bonne source d entrée a été sélectionnée L antenne est elle correctement connectée Est ce que le câble d antenne est endommagé Les fiches appropriées sont elles utilisées pour brancher l antenne En cas de doute demandez cons...

Страница 21: ...Hz 31 1280 x 960 75Hz 32 1280 x 960 85Hz 33 1280 x 1024 60Hz 34 1280 x 1024 75Hz 35 1280 x 1024 85Hz 36 1400 x 1050 60Hz 37 1400 x 1050 75Hz 38 1400 x 1050 85Hz 39 1440 x 900 60Hz 40 1440 x 900 75Hz 41 1600 x 1200 60Hz 42 1680 x 1050 60Hz 43 1920 x 1080 60Hz 44 1920 x 1200 60Hz Compatibilité des Signaux AV et HDMI Source Signaux pris en charge Disponible EXT PÉRITEL PAL O SECAM O NTSC4 43 O NTSC3 ...

Страница 22: ... 5 Mbps 1 080 P 60 fps 62 5 Mbps Motion JPEG 640 x 480 30 fps 10 Mbps Autre 1 080 P 30 fps 40 Mbps avi MPEG1 2 MPEG4 Sorenson H 263 H 263 H 264 WMV3 Motion JPEG mkv MPEG1 2 MPEG4 H 263 H 264 WMV3 Motion JPEG asf Sorenson H 263 H 264 WMV3 Motion JPEG flv WMV3 1 080 P 30 fps 40 Mbps swf RV30 RV40 1 080 P 30 fps 40 Mbps wmv Formats de Fichiers Image Pris en Charge Pour le Mode USB Image Photo Résolut...

Страница 23: ...ouche2 8 Kbps 384 Kbps MPEG1 2 Couche3 8 Kbps 320 Kbps WMA 128 bps 320 Kbps 8KHz 48KHz WMA 10 Pro M0 192 kbps 48KHz WMA 10 Pro M1 384 kbps 48KHz WMA 10 Pro M2 768 kbps 96KHz mkv mka MPEG1 2 Couche1 32 Kbps 448 Kbps 16KHz 48KHz MPEG1 2 Couche2 8 Kbps 384 Kbps MPEG1 2 Couche3 8 Kbps 320 Kbps AC3 32 Kbps 640 Kbps 32KHz 44 1KHz 48KHz AAC HEAAC 8KHz 48KHz WMA 128 bps 320 Kbps 8KHz 48KHz WMA 10 Pro M0 1...

Страница 24: ...8KHz AAC HEAAC 8KHz 48KHz swf MPEG1 2 Couche3 8 Kbps 320 Kbps 16KHz 48KHz ec3 EAC3 32 Kbps 6 Mbps 32KHz 44 1KHz 48KHz rm rmvb ra AAC HEAAC 8KHz 48KHz LBR cook 6 Kbps 128 Kbps 8KHz 11 025KHz 22 05KHz 44 1KHz wma wmv WMA 128 bps 320 Kbps 8KHz 48KHz WMA 10 Pro M0 192 kbps 48KHz WMA 10 Pro M1 384 kbps 48KHz WMA 10 Pro M2 768 kbps 96KHz webm VORBIS Jusqu à 48 KHz Formats de Fichiers de Sous Titrage Pri...

Страница 25: ...l aide des câbles convertisseurs DVI DVI à HDMI non fournis 56Hz 60Hz 66Hz 70Hz 72Hz 75Hz 640 x 400 þ 640 x 480 þ þ þ þ 800 x 600 þ þ þ þ þ 832 x 624 þ 1024 x 768 þ þ þ þ þ 1152 x 864 þ þ þ 1152 x 870 þ 1280 x 768 þ þ 1360 x 768 þ 1280 x 960 þ þ 1280 x 1024 þ þ 1400 x 1050 þ þ 1440 x 900 þ þ 1600 x 1200 þ 1680 x 1050 þ 1920 x 1080 þ 1920 x 1200 þ ...

Страница 26: ...le du réseau Entrée LAN à l arrière du téléviseur réseau prise murale Configuration des paramètres des périphériques câblés Type de réseau Le type de réseau peut être sélectionné comme Dispositif câblé ou Dispositif sans fil en fonction de la connexion active du téléviseur Sélectionnez l option Dispositif Câblé si vous connectez via un réseau Ethernet Test de débit Internet Sélectionnez le bouton ...

Страница 27: ... qualité audio vidéo Vous devez changer le SSID de votre modem si d autres modems aux alentours partagent le même SSID Dans le cas contraire vous pouvez rencontrer des problèmes de connexion Utilisez une connexion avec fil si vous avez des problèmes avec votre connexion sans fil Configuration des paramètres des périphériques sans fil Pour accéder aux fonctions du Wi Fi branchez la clé Wi Fi à l un...

Страница 28: ...o d identification unique de votre PC ou modem a été régulièrement enregistrée il se peut que votre téléviseur ne soit pas connecté à Internet Dans ce cas l adresse MAC est authentifiée chaque fois que vous êtes connecté à Internet Il s agit d une précaution contre tout accès non autorisé Puisque votre téléviseur dispose de sa propre adresse MAC votre fournisseur Internet ne peut valider cette adr...

Страница 29: ...ction Partage Audio Vidéo Remarque Certains PC peuvent ne pas avoir la capacité d utiliser la fonction Partage Audio Viidéo en raison des paramètres Administrateur et Sécurité tels que les PC commerciaux Pour une meilleure connexion de la télé au réseau à domicile l application Nero doit être installée Installation de Nero MediaHome Pour installer Nero MediaHome veuillez procéder comme suit Remarq...

Страница 30: ...e direction de votre télécommande pour sélectionner celui de votre choix Vous pouvez accéder au contenu de votre choix en appuyant sur OK après votre choix Appuyez sur le bouton Return Back pour revenir à l écran précédent En outre vous pouvez accéder à certaines fonctions en utilisant la fonction de raccourci définie pour les boutons numériques et de couleur sur la télécommande Appuyez sur la tou...

Страница 31: ...du site web URL dans la barre d adresse puis cliquez sur bouton pour le parcourir Saisissez les mots de passe dans la barre d adresse et cliquez sur le bouton pour rechercher les sites web concernés Cliquez sur les liens pour parcourir les sites web concernés Lorsque vous déplacez le curseur vers le milieu de l écran les raccourcis assignés aux boutons de couleur de la télécommande apparaissent Vo...

Страница 32: ...éléviseur Dans ce mode vous pouvez faire défiler la liste des chaînes récupérées de votre téléviseur et cliquez sur l image miniaturisée pour voir les détails des pages ENREGISTREMENTS Vous pouvez voir vos enregistrements s disponible et aide mémoires actifs à partir de cet onglet Pour supprimer une entrée appuyez simplement sur l icône de suppression sur chaque ligne EPG Vous pouvez voir les prog...

Страница 33: ...r accéder au gadget Ouverture du Portail appuyez sur la Flèche du haut sur le coin inférieur gauche de l écran Vous pouvez accéder à la page d accueil du portail en appuyant sur le gadget Ouverture du Portail Remarque Une connexion Internet est nécessaire Cette fonction ne fonctionne pas si une page du portail n est pas utilisée Fonction Smart à distance Vous pouvez utiliser votre appareil mobile ...

Страница 34: ...ft Recording 42 Instant Recording 42 Watching Recorded Programmes 42 Recording Configuration 42 Media Browser Menu 43 FollowMe TV if available 43 CEC and CEC RC Passthrough 43 E Manual 43 TV Menu Contents 44 General TV Operation 47 Using the Channel List 47 Configuring Parental Settings 47 Electronic Programme Guide EPG 47 Teletext Services 48 Software Upgrade 48 Troubleshooting Tips 48 PC Input T...

Страница 35: ... by qualified personnel before operating it any further Do not expose the TV to direct sunlight open flames or place it near intense heat sources such as electric heaters Listening in excessive volumes from earphones and headphones may cause hearing loss Ensure that no open flame sources such as lit candles are placed on top of the TV To prevent injuries this TV must be securely attached to a wall...

Страница 36: ...nergy Saving to Minimum Medium Maximum or Auto the TV will reduce the energy consumption accordingly If you like to set the Backlight to a fixed value set as Custom and adjust the Backlight located under the Energy Saving setting manually using Left or Right buttons on the remote Set as Off to turn this setting off Note Available Energy Saving options may differ depending on the selected Mode in t...

Страница 37: ...n To turn the TV off Press the middle of the button down and hold it down for a few seconds the TV will turn into standby mode Notes If you turn the TV off this circle starts again beginning with the volume setting Main menu OSD cannot be displayed via control button Operation with the Remote Control Press the Menu button on your remote control to display main menu screen Use the directional butto...

Страница 38: ... for batteries indicates that this battery contains lead Products Battery Specification TV Broadcasting PAL BG DK II SECAM BG DK Receiving Channels VHF BAND I III UHF BAND U HYPERBAND Digital Reception Fully integrated digital terrestrial cable TV DVB T C Number of Preset Channels 1 000 Channel Indicator On Screen Display RF Aerial Input 75 Ohm unbalanced Operating Voltage 220 240V AC 50Hz Audio G...

Страница 39: ...xt Displays teletext where available press again to superimpose the teletext over a normal broadcast picture mix 21 Media browser Opens the media browsing screen 22 EPG Electronic programme guide Displays the electronic programme guide 23 Exit Closes and exits from displayed menus or returns to previous screen 24 Directional buttons Helps navigate menus content etc and displays the subpages in TXT...

Страница 40: ...ish 39 Remote Control 2 Operation with the Basic Remote Control 1 Standby On 2 Volume up down 3 Source selection 4 Info 5 Mute 6 Programme up down 7 Image size 8 Mono Stereo Dual II Audio Subtitle language ...

Страница 41: ...dio cable not supplied for audio connection If an external device is connected via the SCART socket the TV will automatically switch to AV mode When receiving DTV channels Mpeg4 H 264 or while in Media Browser mode output will not be available via the scart socket When using the wall mounting kit available from third party in the market if not supplied we recommend that you plug all your cables in...

Страница 42: ...u can activate Store Mode option at this point This option will configure your TV s settings for store environment and depending on the TV model being used the supported features of it may be displayed on the top of the screen as an info banner This option is intended only for store use It is recommended to select Home Mode for home use This option will be available in System Settings More menu an...

Страница 43: ...rts from timer when teletext is on teletext is automatically turned off Also teletext usage is disabled when there is an ongoing recording or playback Timeshift Recording Press Pause button while watching a broadcast to activate timeshifting mode In timeshifting mode the programme is paused and simultaneously recorded to the connected USB disk Press Play button again to resume the paused programme...

Страница 44: ...ice from the Sources List menu When new CEC source device is connected it will be listed in source menu with its own name instead of the connected HDMI ports name such as DVD Player Recorder 1 etc The TV remote is automatically able to perform the main functions after the connected HDMI source has been selected To terminate this operation and control the TV via the remote again press Quick Menu bu...

Страница 45: ...of the picture by pressing Left or Right buttons Picture Zoom Sets the desired image size format Film Mode Films are recorded at a different number of frames per second to normal television programmes Turn this feature on when you are watching films to see the fast motion scenes clearly Skin Tone Skin tone can be changed between 5 and 5 Colour Shift Adjust the desired colour tone HDMI Full Range W...

Страница 46: ...age depending on the broadcaster and the country Parental Enter correct password to change parental settings You can easily adjust Menu Lock Maturity Lock Child Lock or Guidance in this menu You can also set a new PIN or change the Default CICAM PIN using the related options Note Some menu options may not be available depending on the country selection in the First Time Installation Default PIN ca...

Страница 47: ...nnected HDMI CEC compatible device to turn on the TV and switch to its input source automatically Press Left or Right button to enable or disable the feature Speakers To hear the TV audio from the connected compatible audio device set as Amplifier You can use the remote control of the TV to control the volume of the audio device Installation Menu Contents Automatic channel scan Retune Displays aut...

Страница 48: ...ance Italy or Austria Maturity Lock s value will be set to 18 as default Child Lock If this option is set to ON the TV can only be controlled by the remote control In this case the control buttons on the TV will not work Set PIN Defines a new PIN number Default CICAM PIN This option will appear as greyed out if no CI module is inserted into the CI slot of the TV You can change the default PIN of t...

Страница 49: ...ows you to see the teletext page and the TV broadcast at the same time Press once more to exit If available sections in the teletext pages will become colour coded and can be selected by pressing the coloured buttons Follow the instructions displayed on the screen Digital Teletext Press the Text button to view digital teletext information Operate it with the coloured buttons cursor buttons and the...

Страница 50: ... displayed on the screen while starting a recording try restarting the recording If you still get the same error it is possible that your USB disk does not meet the speed requirements Try connecting another USB disk PC Input Typical Display Modes The following table is an illustration of some of the typical video display modes Your TV may not support all resolutions Index Resolution Frequency 1 64...

Страница 51: ...60Hz O 1080i 50Hz 60Hz O HDMI 480i 480p 60Hz O 576i 576p 50Hz O 720p 50Hz 60Hz O 1080i 50Hz 60Hz O 1080p 24Hz 25Hz 30Hz 50Hz 60Hz O X Not Available O Available In some cases a signal on the TV may not be displayed properly The problem may be an inconsistency with standards from the source equipment DVD Set top box etc If you do experience such a problem please contact your dealer and also the manu...

Страница 52: ...0fps 62 5 Mbps 1080P 60fps 62 5 Mbps Motion JPEG 640x480 30fps 10 Mbps Other 1080P 30fps 40 Mbps avi MPEG1 2 MPEG4 Sorenson H 263 H 263 H 264 WMV3 Motion JPEG mkv MPEG1 2 MPEG4 H 263 H 264 WMV3 Motion JPEG asf Sorenson H 263 H 264 WMV3 Motion JPEG flv WMV3 1080P 30fps 40 Mbps swf RV30 RV40 1080P 30fps 40 Mbps wmv Supported Picture File Formats for USB Mode Image Photo Resolution width x height Rem...

Страница 53: ...2 8Kbps 384Kbps MPEG1 2 Layer3 8Kbps 320Kbps WMA 128bps 320Kbps 8KHz 48KHz WMA 10 Pro M0 192kbps 48KHz WMA 10 Pro M1 384kbps 48KHz WMA 10 Pro M2 768kbps 96KHz mkv mka MPEG1 2 Layer1 32Kbps 448Kbps 16KHz 48KHz MPEG1 2 Layer2 8Kbps 384Kbps MPEG1 2 Layer3 8Kbps 320Kbps AC3 32Kbps 640Kbps 32KHz 44 1KHz 48KHz AAC HEAAC 8KHz 48KHz WMA 128bps 320Kbps 8KHz 48KHz WMA 10 Pro M0 192kbps 48KHz WMA 10 Pro M1 3...

Страница 54: ...32Kbps 640Kbps 32KHz 44 1KHz 48KHz AAC HEAAC 8KHz 48KHz swf MPEG1 2 Layer3 8Kbps 320Kbps 16KHz 48KHz ec3 EAC3 32Kbps 6Mbps 32KHz 44 1KHz 48KHz rm rmvb ra AAC HEAAC 8KHz 48KHz LBR cook 6Kbps 128Kbps 8KHz 11 025KHz 22 05KHz 44 1KHz wma wmv WMA 128bps 320Kbps 8KHz 48KHz WMA 10 Pro M0 192kbps 48KHz WMA 10 Pro M1 384kbps 48KHz WMA 10 Pro M2 768kbps 96KHz webm VORBIS Up to 48KHz Supported Subtitle File ...

Страница 55: ...cable not supplied you can refer to the following resolution information 56Hz 60Hz 66Hz 70Hz 72Hz 75Hz 640x400 þ 640x480 þ þ þ þ 800x600 þ þ þ þ þ 832x624 þ 1024x768 þ þ þ þ þ 1152x864 þ þ þ 1152x870 þ 1280x768 þ þ 1360x768 þ 1280x960 þ þ 1280x1024 þ þ 1400x1050 þ þ 1440x900 þ þ 1600x1200 þ 1680x1050 þ 1920x1080 þ 1920x1200 þ ...

Страница 56: ...ring Wired Device Settings Network Type The Network Type can be selected as Wired Device Wireless Device or Disabled in accordance with the active connection to the TV set Select this as Wired Device if you are connecting via an ethernet Internet Speed Test Highlight Internet Speed Test and press the OK but ton TV will check the internet connection bandwidth and display the result when complete Ad...

Страница 57: ...USB ports Open the Network Internet Settings menu and select Network Type as Wireless Device to start connection process The TV will scan the wireless networks automatically A list of available networks will be displayed Please select your desired network from the list Note If the modem supports N mode you should set N mode settings If the selected network is protected with a password please enter...

Страница 58: ...n Ensure that you have already logged on to your PC with an authorized username password and also ensure that your domain is active prior to sharing any files in your media server program on your PC If the domain is invalid this might cause problems while browsing files in Audio Video Sharing mode Using Audio Video Sharing Network Service Audio Video Sharing featureusesastandardthateases the viewi...

Страница 59: ...llation begins and finishes automatically A progress bar will indicate the state of the installation process 9 Click the Finish button The installation is completed You will be directed to the web site of the nero software 10 A shortcut is now placed on your desktop Congratulations You successfully installed Nero MediaHome on your PC Run Nero MediaHome by double clicking on the shortcut icon Inter...

Страница 60: ...r visit websites using the web browser Enter the address of a website URL into the address bar and click on the button to visit Enter keyword s into the address bar and click on the button to search for the related websites Click on the links to visit the related websites When you hover the cursor down to the middle of the screen the shortcuts assigned to the coloured buttons of the remote control...

Страница 61: ...delete icon found on each row EPG You can view the broadcast schedules of selected channel lists through this tab You can also navigate through channels by pressing on the selected channel on the EPG grid Please note that updating refreshing the EPG information may take a while depending on your network and web service quality Note Internet connection is required for WEB based EPG informations POR...

Страница 62: ...on is required This function will not work if a portal page is not in use Smart Remote Feature You can use your mobile device as a remote control for your TV once it has connected to the TV To use smart remote s full features tap on the Up arrow on the bottom left side of the screen Voice Recognation You can tap on the Microphone widget and manage your application giving voice commands such as Por...

Страница 63: ... MARCHE 71 Watt CONSOMMATION D ENERGIE ANNUELLE 103 kWh an CONSOMMATION ELECTRIQUE EN MODE VEILLE 0 5 Watt CONSOMMATION ELECTRIQUE EN MODE ARRET RESOLUTION DE L ECRAN 1920x1080 TV Durée de disponibilité des pièces détachées fonctionnelles 3 ans à partir de la date de fabrication du produit Article 6 de la loi N 2014 344 du 17 mars 2014 Article L 111 3 Code de la consommation ...

Страница 64: ...www continentaledison fr 50333920 ...

Отзывы: