background image

Medical Test Supply

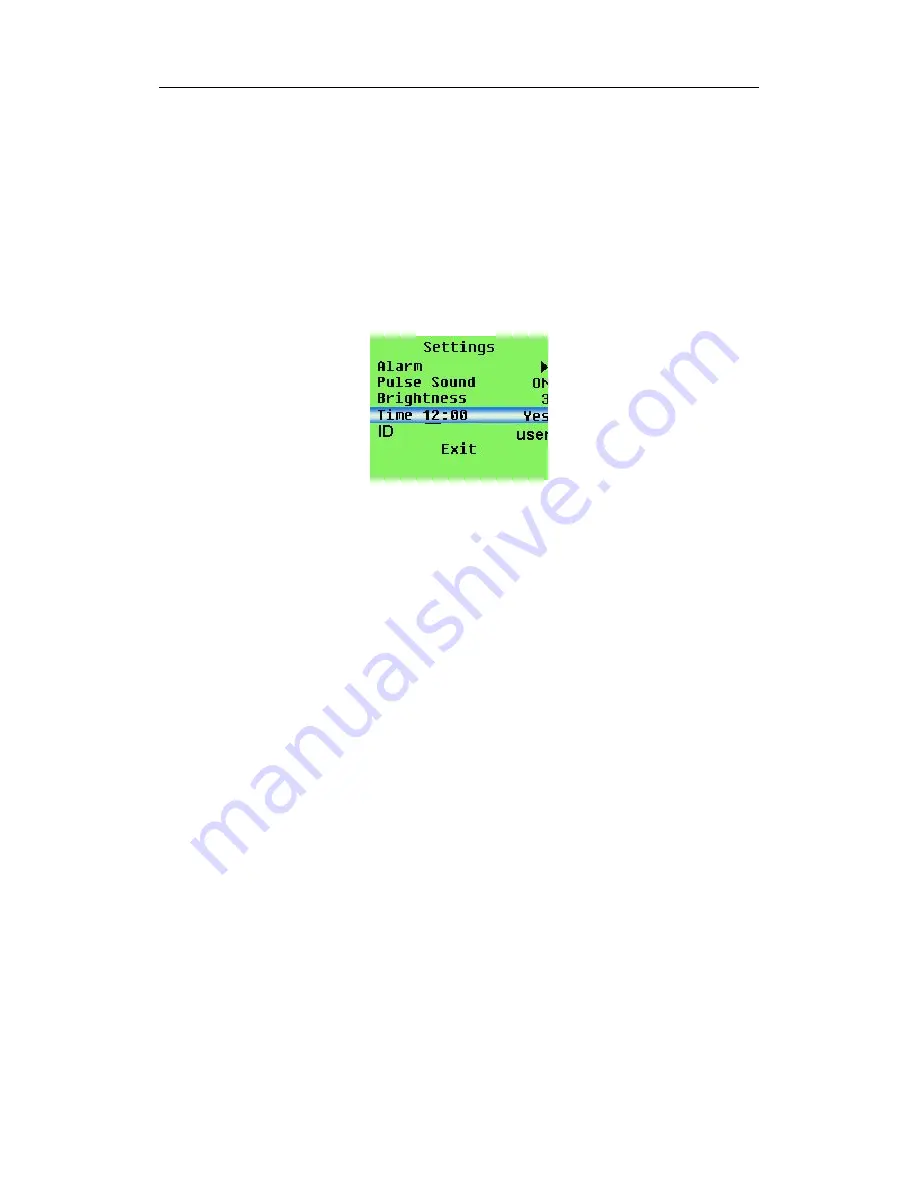
 " Do you really want to recover the memory" dialog box will be displayed when pressing the "men
u"button ,then press the"up button"or"down button"to choose setting,then press the"menu button"to 
confirm setting,the dialog box will be displayed as figure 10:It needs to set the starting time for data 
storage by users, users can change the setting value by pressing the"up button"or"down button",and 
confirm the setting value by pressing the"menu button",the black cursor will move to next place after 
setting.When the black cursor move to “Yes"(store) or "No"(don't store),press the"up button"or"dow
n button"to choose setting,then press the"menu button"to confirm setting.

c.

  When the"Stop"is displayed on menu,the

Do you really want to stop recording

dialog box will 

be displayed when pressing the "menu button".then press the"up button"or"down button"to choose s
etting,then press the"menu button"to confirm setting.

Figure 10.

d.   

If the data storage function is being turned on, when return to the measuring interface, a red "RE

C"sign and a flashing red dot would appear on screen, which means the device is in a state of storing.

e.

  In the state of storing, whatever interface the device is on (measuring interface, menu interface), t

he sign "Recording" would appear on the screen in 30 seconds, and then the screen will be automatic
ally shut down. If pressing any button(power on/off excluded) at this moment, the sign "Recording" 
would appear on the screen, and then the screen will be automatically shut down again;if pressing th
e "power on/off button", the device would return to the former interface.

f.

  If turning on the data storage function, the former data storage will be automatically removed.

g.

  In te state of data storing, after the screen is automatically shut down, the pulse sound indication  

would be off for saving power. 

h.


When the storage space is full, it displays “Memory is full” on the screen, and then shut down in 

a few seconds. But it will still display “Memory is full” by the next time you turn on the device on 
the purpose of warning the user, if press any button(power on/off excluded) again, it will enter the 
measuring interface.

e

Device ID  

The user could modify device ID by software "SpO

2

 Assistant".

f

) 

Exit the main menu

On the main menu interface,press the"up button"or"down button" in order to move the menu choice 
bar to"Exit",then press the"menu button"to exit the main menu.

E.  PC software operation

Please connect the device with computer by the USB data line , then double click "SpO2 Assistant "i
con to run the PC software.The functions such as uploading data and change device ID could be 
carried out by the software. Please refer to <SpO

2

 Assistant user manual> for detail.

CMS-60C

Содержание CMS60C

Страница 1: ...rformance issues and any monitoring abnormality human injury and equipment damage due to users negligence of the operation instructions The manufacturer s warranty service does not cover such faults Owing to the forthcoming renovation the specific products you received may not be totally in accor dance with the description of this User Manual We would sincerely regret for that This product is medi...

Страница 2: ...1 MAIN PERFORMANCE 4 4 2 MAIN PARAMETERS 4 5 INSTALLATION 5 5 1 VIEW OF THE FRONT PANEL 5 5 2 UNDERSIDE VIEW AND LEFT VIEW 5 5 3 REARVIEW 5 5 4 ACCESSORIES 6 6 OPERATING GUIDE 6 6 1 APPLICATION METHOD 6 6 2 ATTENTION FOR OPERATION 10 6 3 CLINICAL RESTRICTIONS 11 7 MAINTAIN TRANSPORTATION AND STORAGE 11 7 1 CLEANING AND DISINFECTING 11 7 2 MAINTAIN 11 7 3 TRANSPORTATION AND STORAGE 11 8 TROUBLESHOO...

Страница 3: ...Medical Test Supply APPENDIX 14 CMS 60C ...

Страница 4: ... local laws and regulations Please check the packing before use to make sure the device and accessories are totally in accordance with the packing list or else the device may have the possibility of working abnormally Please choose the accessories and probe which are approved or manufactured by the manufacturer or else it may damage the device Please choose the battery chargers which should be ens...

Страница 5: ...r closed default setting for good This function could be turned on through menu operation if you need Please check the chapter 6 1 as a reference The device may not work for all patients If you are unable to achieve stable readings discontinue use 2 Overview The pulse oxygen saturation is the percentage of HbO2 in the total Hb in the blood so called the O2 concentration in the blood It is an impor...

Страница 6: ...ty 5 95 c Atmospheric pressure 500hPa 1060hPa Operating Environment a Temperature 10 40 b Relative Humidity 30 75 c Atmospheric pressure 700hPa 1060hPa 3 Principle Principle of the Oximeter is as follows An experience formula of data process is established taking use of Lambert Beer Law according to Spectrum Absorption Characteristics of Reductive Hemoglobin Hb and Oxyhemoglobin HbO2 in glow near ...

Страница 7: ... SpO2 Measuring range 0 100 Accuracy When the SpO2 measuring range is 70 100 the permission of absolute error is 2 below 70 unspecified B Measurement of pulse rate Measuring range 30bpm 250bpm Accuracy 2 bpm or 2 select larger C Resolution SpO2 1 Pulse rate 1bpm D Measurement Performance in Weak Filling Condition SpO2 and pulse rate can be shown correctly when pulse filling ratio is 0 4 SpO2 error...

Страница 8: ... Probe jack It is used to connect a SpO2 sensor to measure the oxygen saturation and pulse rate 2 USB port It is used to connect a personal computer to export the trend data or real time data or charge the lithium battery via a data line 5 3 RearView Finger 4 RearView Refer to Figure 4 and insert the lithium battery properly in the right direction CMS 60C ...

Страница 9: ...g about a few seconds the power is on and the device will start to self inspect The device displays the measuring interface after self inspecting e Do not shake the finger and keep the patient in a stable state during the process f The data can be read directly from the screen on the measuring interface Fingernails and the luminescent tube should be on the same side If the alarm function is on the...

Страница 10: ... ction the specific method is as follows Figure 6 Main Menu Interface a Alarm setting On the main menu interface press the up button or down button move the menu choice bar to Alarm then press the menu button to enter the alarm setting menu of figure 7 Figure 7 Alarm Setting Menu a The highest lowest alarm limit setting Press the up button or down button to choose the parameter to be adjusted then...

Страница 11: ...f by pressing the menu button press on to start the function and press off to close it c Backlight adjustment On the main menu interface press the up button or down button move the menu choice bar to Brightness then press the menu button to change the number in order to adjust the brightness of s creen d Data storage setting This device has the function of 24 hours data storage it has the capabili...

Страница 12: ...ording would appear on the screen in 30 seconds and then the screen will be automatic ally shut down If pressing any button power on off excluded at this moment the sign Recording would appear on the screen and then the screen will be automatically shut down again if pressing th e power on off button the device would return to the former interface f If turning on the data storage function the form...

Страница 13: ...occur and the battery icon turns red in the state of flashing High priority indicating that immediate operator response is required 6 2 Attention for operation A Please check the device before using and confirm that it can work normally B The finger should be in a proper position see the attached illustration of figure 3 for reference or else it may result in inaccurate measure C The SpO2 sensor a...

Страница 14: ...a reference value for judgment of anemic anoxia and toxic anoxia some patients with serious anemia may also report good SpO2 measurement 7 Maintain transportation and storage 7 1 Cleaning and Disinfecting Using medical alcohol to disinfect the device nature dry or clean it with clean soft cloth 7 2 Maintain A Please clean and disinfect the device before using according to the User Manual 7 1 B Ple...

Страница 15: ...rectly 3 The malfunction of the device 1 Please recharge the battery 2 Please Install the battery again 3 Please contact the local service center The display is off suddenly The battery is drained away or almost drained away Please recharge the battery The device cannot be used for full time after charge 1 The battery is not full charged 2 The battery is broken 1 Please recharge the battery 2 Plea...

Страница 16: ...Medical Device Directive 93 42 EEC of June 14 1993 a directive of the European Economic Community 10 Function Specification Information Display Mode The Pulse Oxygen Saturation SpO2 2 digit digital TFT display Pulse Rate PR 3 digit digital TFT display Pulse Intensity bar graph bar graph TFT display SpO2 Parameter Specification Measuring range 0 100 the resolution is 1 Accuracy 70 100 2 Below 70 un...

Страница 17: ... Range Continuous bar graph display the higher display indicate the stronger pulse Battery Requirement Voltage 3 7 rechargeable lithium battery 1 Battery working life Charge and discharge no less than 500 times Power Adapter Input Voltage 100 to 240 VAC 50 60 Hz Output voltage 5 VDC Output current 250mA Output power 1 25 W Oximeter Probe Wavelength 660nm 880nm Dimensions and Weight Dimensions 87 L...

Страница 18: ...Medical Test Supply Spo2 alarm 330ms 20ms Pulse rate alarm 330ms 20ms Probe error alarm 16ms 20ms CMS 60C ...

Отзывы: