Constellation audio PERSEUS Скачать руководство пользователя страница 18


18 


Maintenance 

 
The Perseus requires no regular maintenance. If the phono preamp’s surface becomes dusty, simply wipe it 
off with a soft dry cloth. Do not spray cleaners on the surface. 
 
To clean fingerprints from the surface of the Perseus, spray a small amount of mild window cleaner such as 
Windex onto a soft dry cloth, then use the cloth to remove the fingerprints. Do not spray the cleaner directly 
onto the preamplifier. 
 

Troubleshooting


Unit will not turn on 

1. Try the following steps in order. After you perform each step, touch the Standby button on the front of the 
unit and wait a few seconds to see if the touchscreen illuminates. If any one of the steps restores the power 
(i.e., allows the Standby button to turn the unit on), there is no need to continue to the next steps. 

A. Check power cable connections between the wall and the Perseus's power supply. Push the wall plug 
and the connector at the power supply in firmly. 
B. Check power cables between Perseus and power supply. DO NOT pull out these cables while the 
power supply is on. 
C. Make sure the master power switch on the rear of the power supply is turned on. 
D. If the Perseus is plugged into an AC line conditioner, make sure the line conditioner is turned on. 
F. Flip the master power switch off and on again. This will reset the Perseus's internal circuit breaker.  
G. Check the circuit breaker for the AC circuit that the Perseus is plugged into. If the breaker is tripped, 
flip it back on. If it will not turn on, there is likely a short circuit somewhere in the lines or in a device 
connected to this AC circuit. Check the power cords for your components to make sure none have been 
damaged. 
H. If none of these conditions restores power, it is possible one of the Perseus's internal fuses is blown. 
Do not attempt to change the fuse yourself—the Perseus requires the use of special high-voltage fuses 
that are not commonly available. Contact your Constellation Audio dealer for service. 


Unit is on but no sound is produced 

1. Try the following steps in order. If any one of the steps restores the sound, there is no need to continue to 
the next steps. 

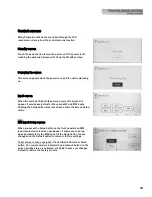
A. Check you are on the correct input. Cycle through available inputs using the front touchscreen 
controls. Remember that MC-1 and MC-3 are for XLR inputs, and MC-2 and MC-4 are for RCA inputs. 
B. Check that the turntable is on and that the stylus is contacting the surface of the record. 
C. Check the speaker icon in the lower right corner of the touchscreen. If there is an X next to the icon, 
the unit is in mute mode. Press the Mute button directly beneath the speaker icon to restore the sound. 
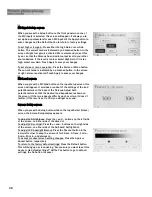
D. If one of the MC inputs is selected, push the Setup button under the LCD display, then push the MC 
Load button on the LCD screen. If the resistive load is set to 000, turn the back-panel MC load 
adjustment knobs to bring the loading up to the recommended resistance in ohms for your cartridge. 
E. Check the connections between the turntable and the Perseus, and between the Perseus and the 
preamp. If a cable is disconnected, reconnect it. If this does not restore sound, try substituting a 
different set of cables in order to make sure the original set was functioning properly. 
F. Check the connection between your amp and the speaker. Make sure the speaker cable has not 
come loose. If it has, turn the power off on your amp, then re-install the cable. 
G. Check that the volume is at a sufficient level. Do not turn the volume all the way up to check this, as 
if sound is reestablished while the preamp is set to output maximum volume, damage can be done to 
your speakers and amplifiers. 
H. If none of these actions restores the sound, contact your Constellation Audio dealer. 


Содержание PERSEUS

Страница 1: ......

Страница 2: ...n or excessive humidity The lightning flash with arrowhead within an equilateral triangle is intended to alert the user to the presence of uninsulated dangerous voltage within the product s enclosure that may be of sufficient magnitude to constitute a risk of electrical shock to persons The exclamation point within an equilateral triangle is intended to alert the user to the presence of important ...

Страница 3: ...king a few minutes to read this manual before you operate the Perseus you will be assured of getting maximum performance from this component Contents Page Topic 4 Before you install the Perseus Unpacking Power supply setup Installation notes In the event of malfunction 6 Turntable and preamp connections XLR inputs RCA inputs XLR outputs RCA outputs Chassis and signal grounds 10 Other connections o...

Страница 4: ...nto the Analog Left power socket on the power supply as shown above Repeat with the Analog Right and Control power connections At this point you can plug the Perseus power supply into the wall socket Leave the master power switch off until you connect your other equipment to the Perseus DO NOT remove the power cables while the unit is powered on If you do happen to accidently pull one of them out ...

Страница 5: ...us on all the time to ensure maximum performance and the best possible sound quality Installing the Perseus in a place where it will be exposed to direct sunlight or moisture or where it will not have adequate ventilation will void your warranty Connected components The Perseus phono preamp is designed to be paired with any high quality turntable and with any quality preamp ideally Constellation s...

Страница 6: ... differently from those on most preamps For example the left channel connection for input MC 1 is at the far right side of the back panel and the right channel connection for MC 1 is at the far left side Connecting the cables in the usual side by side fashion will result in an incorrect installation and the mixing of sounds from different tonearms or turntables The MC input numbers from left to ri...

Страница 7: ...ts for each input you can use either XLR or RCA but not both The RCA input numbers from left to right looking at the back of the Perseus are MC 2right MC 4right MC 4left MC 2left IMPORTANT NOTE To preserve true dual mono operation the Perseus uses a symmetrical circuit layout This configuration requires that the Perseus s back panel connections be laid out a little differently from those on most p...

Страница 8: ...l the plug out Be sure to match the output to the correct channel on your preamp As you are looking at the back of the Perseus the output on the left side is for the right channel the output on the right is for the left channel 6 RCA output RCA unbalanced outputs are also supplied for preamplifers not equipped with XLR connections When connecting to an amplifier be sure to match the output to the ...

Страница 9: ... and turntable to the signal ground Experiment and go with whatever configuration gives the best results 8 Signal ground The signal ground terminal is one of two ground terminals provided on the Perseus Two separate grounds provide more grounding options and will allow you to reduce hum to an absolute minimum Typically the signal ground will be connected to the ground terminal on the tonearm while...

Страница 10: ...ower jack on the phono preamp to the Control power jack on the power supply Before connecting these cables switch off the Perseus s power supply and disconnect it from the AC power Failing to do this can damage the Perseus or its power supply 10 RS 232 This DB 9 style serial connection can be used to interface the Perseus with third party control systems such as those from AMX Crestron and Control...

Страница 11: ...ated copper cables designed for aerospace use Each of these cables is rated to handle 30 amps Each cable mates with a matching jack on the preamp Be sure to connect the Analog Left power jack on the phono preamp to the Analog Left power cable from the power supply the Analog Left power jack on the phono preamp to the Analog Right power cable from the power supply and the Control power jack on the ...

Страница 12: ... you back to the previous control screen For example from the MC Load screen pushing this button will take you back to the Input Setup screen 17 Standby power Push this button to turn the Perseus on and off When you turn the unit on it will take a few seconds for the power supply and preamp to warm up When the Perseus is ready for use its LCD screen will illuminate Press the mute button on the Per...

Страница 13: ...e settings recommended by the manufacturer of your cartridge or experiment and use the settings that sound best to you But always use the same settings on both switch arrays Below are the functions for each switch CAPACITIVE LOADING SW1 and SW2 off No capacitive loading SW1 or SW2 on 100 pF SW1 and SW2 on 200 pF RESISTIVE LOADING SW3 and SW4 off 47 KΩ SW3 on SW4 off 33 KΩ SW3 off SW4 on 10 KΩ SW3 ...

Страница 14: ... cartridge or your taste We recommend you start with the knob in the C position and adjust if necessary 23 Low frequency EQ knob This knob adjusts the response of the passive RIAA EQ circuitry at 50 Hz in 2 dB steps It can be used to fine tune the sound to suit your system your turntable your cartridge or your taste We recommend you start with the knob in the C position and adjust if necessary ...

Страница 15: ...ar It provides selectors for the various MC and MM inputs Pushing the Setup button from this screen enters the Screen Setup mode MM Input Setup screen When you press the Setup button on the front panel when MM input is selected this screen will appear It allows you to set up basic parameters for the MM input Hit the Apply button to save changes and the Default button to return to factory settings ...

Страница 16: ...screen will appear It provides a readout of the settings of the load potentiometers on the back of the Perseus Adjust both potentiometers so that the desired load impedance is shown on the screen If the two readouts differ by an ohm or two it doesn t matter If the level is set to 000 you will get no sound Screen Setup screen When you press the Setup button while on the Input Select Home screen the...

Страница 17: ... illuminate The Input Select screen will then appear with the most recently used input selected STEP 4 If the input you want is not selected select the desired input by pushing one of the onscreen buttons for MC 1 MM etc The button for the selected input will go dark STEP 5 If you need to set up either of the MC inputs push the Setup button on the front panel Set the operation for high gain or low...

Страница 18: ...s internal fuses is blown Do not attempt to change the fuse yourself the Perseus requires the use of special high voltage fuses that are not commonly available Contact your Constellation Audio dealer for service Unit is on but no sound is produced 1 Try the following steps in order If any one of the steps restores the sound there is no need to continue to the next steps A Check you are on the corr...

Страница 19: ...t In other words the XLR input numbers are 1 3 3 1 the RCA input numbers are 2 4 4 2 2 Check to make sure the cables between the Perseus and the preamp are connected correctly Excessive hum is heard 1 Check to make sure the ground cables between the turntable and the Perseus are firmly connected 2 Experiment with various ground connection configurations to see which produces the least hum The reco...

Отзывы: