

6 Product overview
6.1 Product
10
13
14
15
16
17
18
19
1
3
2
4
5
9
6
7
8
11
12
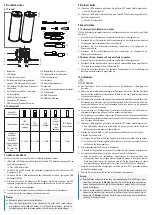
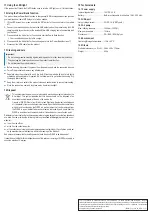
1 Control panel
2 LED screen
3 Battery status icon
4
On/Off button (start/stop inflation, LED
light on/off)
5 SET button (product on/off, switch
pressure unit)
6 Up button (increase pressure value, turn
Power Bank on/off)
7 Down button (decrease pressure value)
8 Charging socket (DC input)
9 USB output port (Power Bank function)
10 Storage compartment for air pipe
11 Air outlet threaded hole
12 LED light
13 Air pipe
14 French (Presta) valve adapter
15 Ball needle
16 Plastic tapered nozzle
17 Car charger
18 USB to DC charging cable
19 USB to Micro-USB cable
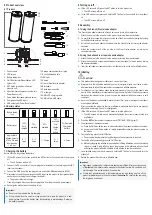
6.2 Battery status
Battery status
icon
Battery level
100%
Fully
charged
75%
available
50%
available
25%
available
Low
Charge
the
battery
0% Depleted
Charge the
battery.
Approximate
inflation times for
a 700 x 23c road
bike tyre using
1 to 6 bar.
6 – 7
times
2 – 3
times
1 – 2 times
0 – 1
times
0 times
7 Charging the battery
Before first use, fully charge the battery.
1. (If the LED screen is on) press and hold the SET button for 3 seconds to turn the product
off.
Æ
The LED screen will turn off.
2. Connect the DC connector of the charging cable (included) to the charging socket (DC
input) on the product.
3. Connect the USB end of the charging cable to a suitable USB power adapter (5V2A).
Alternatively, connect the charging socket (DC input) on the product to the cigarette lighter
socket in your car using the car charger (included).
Æ
The product will start to charge.
4. Once fully charged, disconnect the charging cable from the product and power supply.
Recharge the product when the battery is low.
Important:
Do not use the product while it is charging.
lf the product will not be used for a long period of time, store the product in a cool
and dry place. Prevent the battery from fully depleting to avoid damage. Recharge
the battery regularly.
8 Turning on/off
(If the LED screen is off) press the SET button to turn the product on.
Æ
The LED screen will turn on.
(If the LED screen is on) press and hold the SET button for 3 seconds to turn the product
off.
Æ
The LED screen will turn off.
9 Assembly
9.1 Using the French (Presta) valve adapter
The French valve adapter converts a French valve on a tyre to a Schrader valve.
1. Attach the air pipe to the air outlet on the product by turning the pipe clockwise.
2. On your bike tyre, loosen the locking nut on the tip of the French valve by turning the locking
nut anti-clockwise as far as it will go.
3. Screw the French valve adapter (included) onto the French valve by turning the adapter
clockwise.
4. Attach the connector end of the air pipe to the French valve adapter by turning the
connector clockwise.
9.2 Using the ball needle or tapered nozzle adapter
1. Attach the air pipe to the air outlet on the product by turning the pipe clockwise.
2. Attach the ball needle or tapered nozzle adapter (both included) to the air pipe by turning
the adapter clockwise.
3.
Insert the ball needle or tapered nozzle to the inflation valve on the ball or inflatable item.
10
Inflating
CAUTION!
This product is not designed to inflate truck, vans, or bus tyres.
Always refer to the instruction manual of your car, motorcycle, bicycle, sport balls, or other
inflatable items to follow the manufacturer recommended inflation pressure.
To inflate your car tyre, always check the owner’s manual of your car or the driver’s side
door to fill the manufacturer’s recommended tyre pressure. Note that the inflation pressure
marked on the sidewall of the tyre only shows the maximum inflation pressure in cold
conditions.
Never use the product unattended to avoid the risk of fire, injury, or damage to the product
or connected inflatable.
1.
After connecting the product to the tyre or inflatable, make sure that all parts are properly
attached to avoid injury. Check for misalignment.
2. (If the LED screen is off) press the SET button to turn the product on.
Æ
The LED screen will turn on and automatically display the current pressure in the tyre
or inflatable.
3. Press the
SET
button to select the pressure unit (PSI / BAR / KPA / Kg/cm2).
4. To adjust and set the pressure value:
Press the Up/Down button once to increase/decrease the pressure value on the screen.
Long press the Up/Down button to rapidly increase/decrease the pressure value on
the screen.
5.
To start inflating, press the On/Off button.
Æ
The product will automatically stop inflating once the set pressure is reached.
6.
To stop the inflation manually, press the On/Off button.
Manually stopping the inflation is required when inflating inflatables, such as swimming
rings or air beds. During inflation, check the pressure in the inflatable with your hand
and stop the product whenthe inflatable is fully inflated to avoid over-inflation.
7.
Once finished using the product, press and hold the SET button for 3 seconds to turn the
product off.
8.
Detach the product from the tyre or inflatable item.
Important:
High-speed compressed air will generate heat during inflation. After a continuous use
of
8 minutes
, the product must be stopped for 8 minutes to allow it to cool down and
avoid damage. This will help extend its service life.
If there is an abnormal sound or the temperature is too high during use, turn off the
product immediately and let it cool for at least
15 minutes
. Be careful when removing
the air pipe as it can be hot.