5
5.5 Mains cable
WARNING
Do not tamper with power supply components. Risk of death by elec-
tric shock!
● Always ensure proper connection.
● Never use damaged power supply components.
● Do not modify power supply components.
■
The mains outlet must be located near to the device and be easily accessible.
■
Never plug in or unplug the mains plug when your hands are wet.
■
Never pull the mains plug from the socket by pulling at the cable. Always pull it from the
mains socket using the intended grips.
■
Unplug the mains plug from the mains socket if you do not use the device for an exten-
ded period of time.
■
Disconnect the mains plug from the mains socket in thunderstorms for reasons of safety.
■
Make sure that the mains cable is not squeezed, bent, damaged by sharp edges or put
under mechanical stress.
■
Avoid excessive thermal stress on the mains cable from extreme heat or cold.
■
Do not modify the mains cable. Otherwise the mains cable may be damaged. A dam-
aged mains cable can cause a deadly electric shock.
■
Do not touch the mains cable if it is damaged.
– First, power down the respective mains socket (e.g. via the respective circuit breaker)
and then carefully pull the mains plug from the mains socket.
– Never use the product if the mains cable is damaged.
■
A damaged mains cable may only be replaced by the manufacturer, a workshop com-
missioned by the manufacturer or a similarly qualified person, so as to prevent any
danger.
■
Ensure that cables are not pinched, kinked or damaged by sharp edges.
■
Always lay cables so that nobody can trip over or become entangled in them. This poses
a risk of injury.
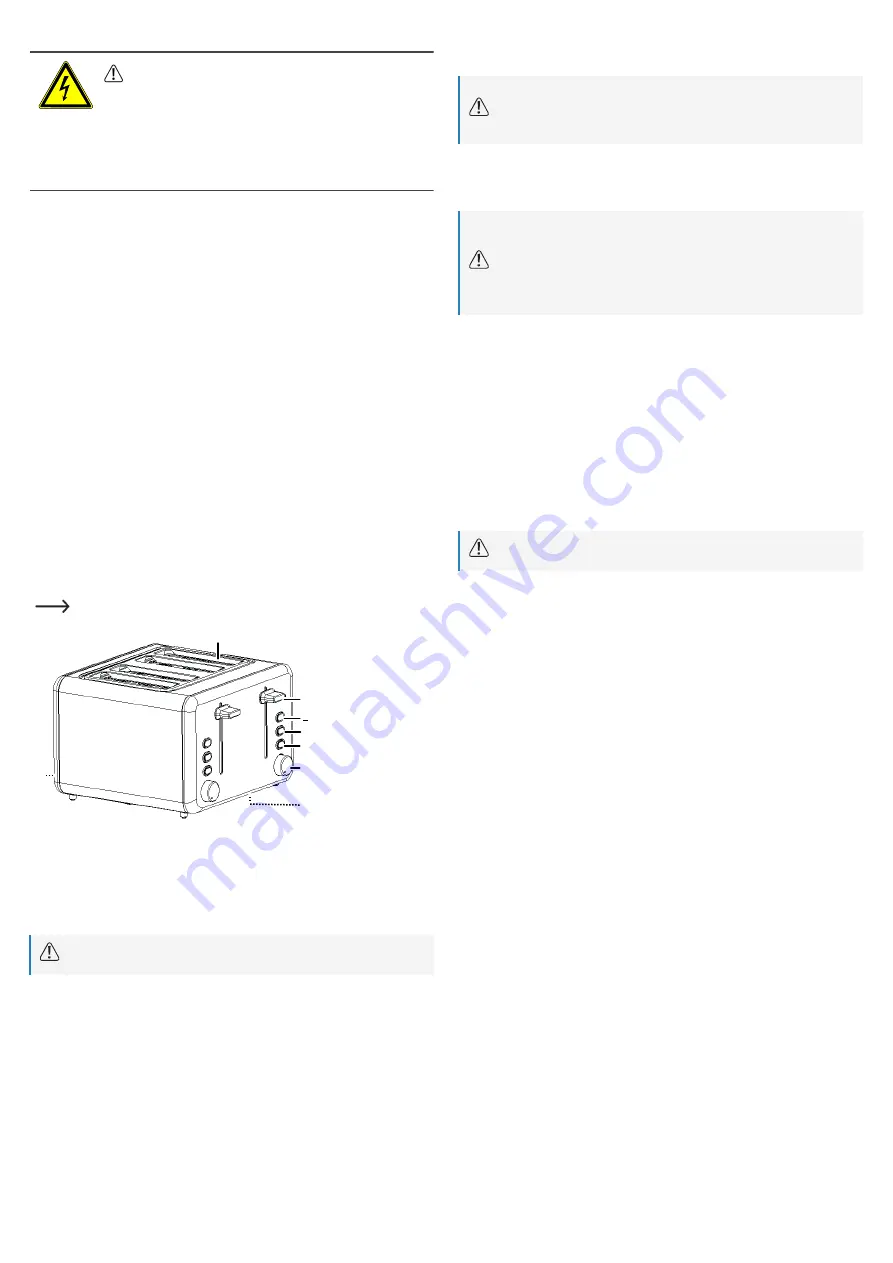
6 Product overview
The image is for reference only.
1
2
3
4
5
6
7
8
1
Crumb tray(s)
2
Bread slot
3
Slot lever
4
DEFROST button
5
REHEAT button
6
CANCEL button
7
Browning control dial (toasting time)
8
Cable organizer
7 Setting up
Important:
Risk of fire! Remove all packing/protective material and before use.
1. Completely unwind the power cable from the cable organizer before using the product.
2. Place the product on a dry, level heat resistant surface.
3. Connect the product to the power supply.
8 Operation
8.1 Before first use
Important:
When the product heats up for the first time, residue left over from the manufac-
turing process may result in a harmless odor or smoke. This is normal and not a
cause for concern.
(With nothing inserted) operate the product at the lowest setting for at least one heating
cycle. Make sure there is adequate ventilation.
8.2 Toasting
Important:
■
Never leave the product unattended during use.
■
Never insert sharp or metallic objects into the bread slot. Contact with live ele-
ments can cause damage and/or result in electric shock!
■
Risk of fire! Only toast plain bread. Do not toast bread with any additives e.g.
butter.
P
RECONDITIONS
:
a
Make sure the crumb tray is completely inserted before toasting.
1. Set the browning control dial to the desired position (1 = light, 7 = dark).
à
Experiment with different settings to get the best result.
2. Insert a piece of bread into a bread slot.
3. Slide the slot lever all the way down until it latches into place. The
CANCEL
button will
light up to indicate heating has begun.
à
The slot lever will only latch when the product is connected to the power supply.
à
If the toaster starts to smoke, immediately press the
CANCEL
button to stop toasting.
4. When finished, heating will stop, and the bread will automatically eject.
8.3 Removing stuck bread
Important:
Risk of damage! Never use sharp objects to remove stuck bread.
P
RECONDITIONS
:
a
Bread is stuck inside a slot.
1. Disconnect the product from the power supply.
2. Allow the product to completely cool down.
3. Remove the stuck bread.
9 Additional features
9.1 CANCEL toasting
Press the
CANCEL
button anytime during the toasting process to:
■
Stop heating.
■
Eject inserted slices of bread.
9.2 REHEAT toast
Use this function to reheat cold toast (e.g., ejected toast that has been left). This function will
gently warm the toast up without browning it.
1. Insert a piece of bread into a bread slot.
2. Slide the slot lever all the way down until it latches into place. The
CANCEL
button will
light up to indicate heating has begun.
3. Press the
REHEAT
button to activate this function. The
REHEAT
button will light up to in-
dicate the function is activated.
4. When finished, heating will stop, and the bread will automatically eject.
9.3 DEFROST toast
Use this function to defrost frozen bread. This function will gently defrost the toast without
browning it.
1. Set the browning control dial to the desired position (1 = light, 7 = dark).
2. Insert a piece of bread into a bread slot.
3. Slide the slot lever all the way down until it latches into place. The
CANCEL
button will
light up to indicate heating has begun.
4. Press the
DEFROST
button to activate this function. The
DEFROST
button will light up to
indicate the function is activated.
5. When finished, heating will stop, and the bread will automatically eject.


