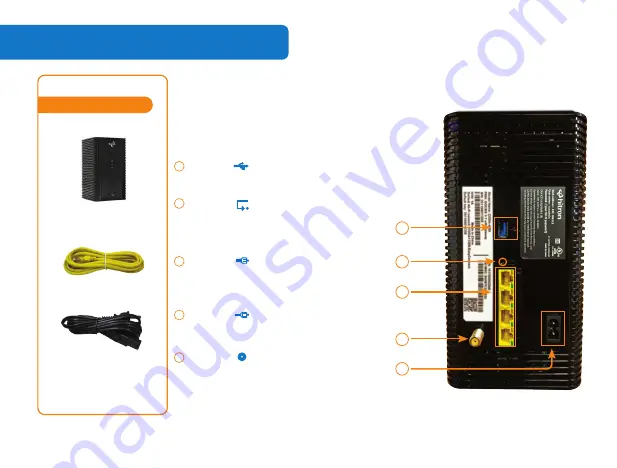
Package Contents
2.
HITRON CODA 4680
INTERNET MODEM
Package Contents
ETHERNET CABLE
1
STEP/ ÉTAPE
Check the box contents/
Vérifiez le contenu de la boîte
Look in the box and make sure you have the following:
Regardez dans la boîte et assurez-vous d’avoir les items suivants :
5
User configuration/
Configuration du profil d'utilisateur
Ethernet Method/
Méthode Éthernet
Wi-Fi Method/
Méthode Wi-Fi
Setup complete/
Installation terminée
Wireless Devices (Optional) /
Périphériques sans-fil (optionnel)
6
QUICK START GUIDE
GUIDE DE DÉMARRAGE
ETHERNET CABLE
CÂBLE ETHERNET
QUICK START GUIDE
GUIDE DE DÉMARRAGE
CODA D3.1 Wi-Fi Gateway
(MoCA Optional)
Read me
first!
Lisez-moi
d’abord!
Connect to the network
Connexion à Internet
Set up your wireless network
Configuration du réseau sans-fil
CODA-4580/4680/ 4780
CODA-4582/4682/ 4782
POWER CORD
BLOC D’ALIMENTATION
2
STEP/ ÉTAPE
Connect the cable port/
Branchement du câble
Connect the device’s CABLE connector to a cable outlet in your home.
Branchez le câble coaxial à partir du connecteur CÂBLE du modem
jusqu’à une prise coaxiale de votre maison.
3
STEP/ ÉTAPE
Connect the power adapter/
Branchement de l’alimentation
Connect the included power adapter from the POWER port to a wall
outlet.
Branchez le bloc d'alimentation à partir du port d’ALIMENTATION du
modem jusqu’à une prise électrique.
4
STEP/ ÉTAPE
STEP/ ÉTAPE
STEP/ ÉTAPE
Access LAN for initial configuration /
Accédez au réseau local pour configuration initiale
Connect your wireless devices with the correct SSID and Passphrase
chosen in Step 5.
Connectez vos appareils sans-fil avec votre SSID et « Passphrase » choisis
à l'étape 5.
IP addresses/
Adresses IP
If your CODA is successfully connected to the network (see LED display) but you cannot access the
Internet from a connected computer, your device’s IP address may be set up incorrectly.
Si votre CODA est correctement connecté au réseau (voir la section Affichage DEL), mais que votre
appareil n'a pas accès à Internet, il se peut que l'adresse IP de ce dernier ne soit pas configurée
correctement.
In your device’s control panel, ensure that the computer is configured to receive an IP address
automatically (recommended) or that it has a static IP address in the following range:
192.168.100.10~192.168.100.254. For more information, consult your operating system’s documentation.
Dans le panneau de configuration de votre appareil, assurez-vous que celui-ci soit configuré pour
recevoir une adresse IP automatiquement (recommandé) ou qu'il dispose d'une adresse IP statique dans
la plage 192.168.100.10~192.168.100.254. Pour plus de renseignements, consultez la documentation
portant sur votre système d'exploitation.
Congratulations! You have successfully set up your CODA. If you have any problems, see the section
below for help identifying the problem.
Félicitations! Vous avez configuré votre CODA avec succès. Si vous rencontrez un problème, consultez
la section ci-dessous pour vous aider à en déterminer la nature.
To connect a wireless device with the Wi-Fi Protected Setup button (WPS), You need
to first access the GUI with the user “cusadmin” and your Wi-Fi Passphrase as
password, enter the Wireless page to enable WPS and set Encrypt Mode to AES then
save the changes. Press the WPS button on the unit and on the device you wish to
connect within 2 minutes of each other while they are in the coverage area.
Pour connecter un périphérique sans-fil avec le bouton WPS
(« Wi-Fi Protected Setup »), vous devez d'abord accéder à
l'interface usager avec l'utilisateur « cusadmin » et votre
« Passphrase » Wi-Fi comme mot de passe, entrez dans la page
« Wireless » pour activer WPS et définissez « Encrypt Mode to
AES » puis enregistrez les modifications. Appuyez sur le bouton
WPS du CODA et de l'appareil que vous souhaitez connecter à
moins de 2 minutes l'un de l'autre pendant qu'ils sont dans la zone de couverture.
0440010285N0
P/N:0123456789AB
S/N:AB1234567890
CM MAC:AB9876543210
Model Name: XXXXXXXXX
Default Wi-Fi network:HitronXXXXX-EasyConnect
Default key:AB123456790
PMN: DOCSIS 3.1 wifi Gateway
H/W: XX
For initial setup, click “LET’S GO” to test your connection and enter your
preferred SSID and Passphrase. The Wi-Fi Passphrase will also act as your
password with the username “cusadmin” the next time you visit
192.168.0.1. Make sure to complete the Easy Connect walkthrough so it
does not come back. If the CODA receives a factory reset, the Easy
Connect interface will appear again.
Pour la configuration initiale, cliquez sur « LET'S GO » pour tester votre connexion et
entrer votre SSID et « Passphrase » préférés. Votre « Passphrase » Wi-Fi sera
également votre mot de passe avec
le nom d'utilisateur « cusadmin » la
prochaine fois que vous visiterez
192.168.0.1. Assurez vous de compléter
le processus pour qu'il ne revienne pas.
Si le CODA reçoit une réinitialisation
complète, l'interface Easy Connect
s'affichera de nouveau.
Pour compléter l'installation initiale, votre CODA affichera l'interface Easy Connect sur
le premier appareil connecté. Vous pouvez y accéder à l'aide d'un ordinateur branchez
par le cable Ethernet fourni à l'un des ports LAN (reseau local) ou utiliser un appreil
sans fil connecter au réseau Wi-Fi en utilisant le nom de réseau Wi-Fi (Default Wi-Fi
network) qui se trouvent sur l'étiquette derrère vote CODA.
To complete initial setup, your CODA will launch Easy Connect user
interface on the first connected device. You can access it using a laptop
connected by a Ethernet cable or any mobile device with the default
Wi-Fi network name found on the back label of your new CODA.
POWER ADAPTER
Items may not be
exactly as shown.
4
5
3
2
1
Connect to select devices.
(Feature not supported)
Pinhole button to reset your
modem.
(Should only be used with the guidance
of a Comwave Tech Support)
Connect provided Ethernet
cable to any one of the
Ethernet (LAN) ports.
Connect cable jack internet
line here.
(Cable not provided)
Connect provided Power
Adapter cable here.
1
USB
3
2
Ethernet
(1 to 4)
4
Reset
5
Cable
Power
Adapter


