Comtrend Corporation WAP-EN1750C Скачать руководство пользователя страница 5


For Other Ceilings (refer to diagram B): 
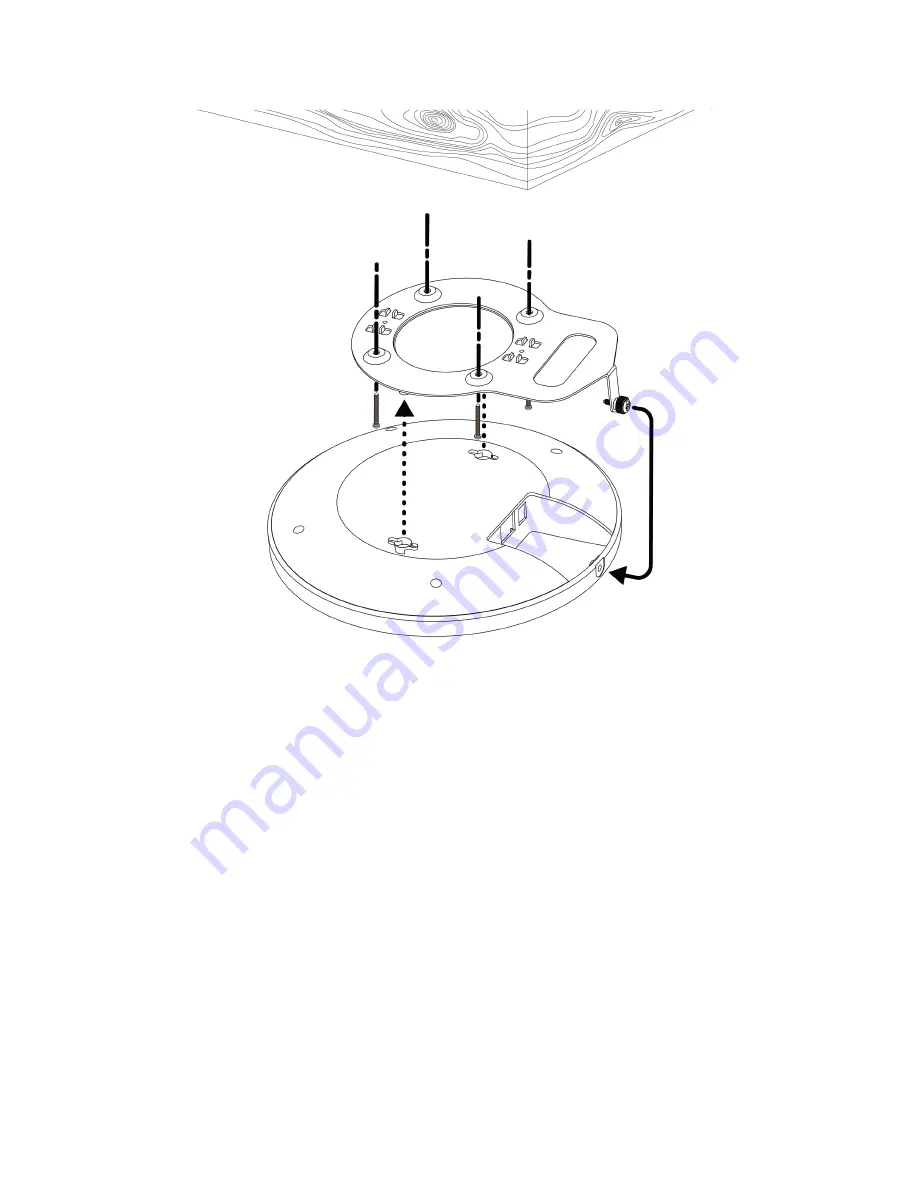
 

1.


Drill four holes in your ceiling using the ceiling mount bracket as 
a guide, and insert the four included wall plugs/screw anchors 
(

i

). 


2.


Align the ceiling mount bracket with your wall plugs/screw 
anchors and use the included screws x 4 to fix it into place (

ii

). 


Содержание WAP-EN1750C

Страница 1: ...iling Mount Access Point I Product Information I 1 Package Contents 1 Access Point 2 Ceiling Mount Bracket 3 T Rail Mounting Kit Screws 4 Ceiling Mounting Kit Screws 5 Quick Installation Guide 6 Ether...

Страница 2: ...4 LED Status LED Color LED Status Description Blue On The access point is on Long Flashing The access point s firmware is upgrading Short Flashing The access point is resetting to factory defaults Am...

Страница 3: ...s will reset all settings back to default 1 Press and hold the reset button on the access point for at least 10 seconds Then release the button You may need to use a paperclip or pencil to push the re...

Страница 4: ...s refer to diagram A 1 Place the ceiling mount bracket to a ceiling in your desired location and use the included screws x 4 to fix it into place i 2 Attach the access point to the ceiling mount brack...

Страница 5: ...ur holes in your ceiling using the ceiling mount bracket as a guide and insert the four included wall plugs screw anchors i 2 Align the ceiling mount bracket with your wall plugs screw anchors and use...

Страница 6: ...point to the ceiling mount as shown in iii 4 Secure the access point firmly in place using the included screw as shown in iv I 7 Drop Ceiling Suspeded Ceiling Mount To mount the access point to a dro...

Страница 7: ...use the included bracket and longer screws If you need more space between the access point and the T Rail 3 Attach the access point to the ceiling mount bracket by aligning the grooves in the access...

Страница 8: ...8 C D E i i ii ii iii iii...

Страница 9: ...setup and is ready for use right out of the box The following instructions will help you install your access point and customize your settings II 1 Initial Setup 1 Connect a router or PoE switch to th...

Страница 10: ...r adapter to the access point s 12V DC port and plug the power adapter into a power supply 3 If you are using a PoE Power over Ethernet switch then it is not necessary to use the included power adapte...

Страница 11: ...bled on the access point by default If no DHCP Service is found the access point will default to IP address 192 168 2 2 6 Enter the access point s default IP address 192 168 2 2 into the URL bar of a...

Страница 12: ...c Settings to configure basic settings II 2 Basic Settings The instructions below will help you configure the following basic settings of the access point LAN IP Address 2 4GHz 5GHz SSID Security Admi...

Страница 13: ...reload Default setting is DHCP Enabled When you change your access point s IP address you need to use the new IP address to access the browser based configuration interface instead of the default IP 1...

Страница 14: ...ur access point s 2 4GHz wireless network s go to Wireless Setting 2 4GHz 11bgn Security Select an Authentication Method and enter a Pre shared Key or Encryption Key depending on your choice then clic...

Страница 15: ...eps 3 4 for the access point s 5GHz wireless network s 6 To change the administrator name and password for the browser based configuration interface go to Management Admin 7 Complete the Administrator...

Страница 16: ...Protocol so alternatively you can enter the host name or IP address of a time server Click Apply when you are finished You can use the Acquire Current Time from your PC button if you wish to set the a...

Страница 17: ...computer to your access point using an Ethernet cable 2 Enter your access point s IP address in the URL bar of a web browser The access point s default IP address is 192 168 2 2 Default IP address app...

Страница 18: ...18 4 You will arrive at the System Information screen shown below 5 Use the menu across the top and down the left side to navigate...

Страница 19: ...ly changes FOR MORE HELP For instructions on advanced features FAQ etc please visit our online Product Webpage Your Device is Now Connected For more information YouTube https www youtube com user Comt...

Отзывы: