Comtrend Corporation WAP-5903 Скачать руководство пользователя страница 3


Page 3 


Deploy the WiFi Mesh Extender


5.


After the WAP-5903 is paired, move it to the nearest outlet where additional WiFi coverage is needed. Once 
it is plugged in, wait for the LED to light up solid 

blue

, which means it is ready. 


The WiFi Mesh Network is Ready to Use!


6.


The WiFi mesh network is automatically using the original WiFi configuration on the Comtrend Gateway. If 
you would like to further change the network settings, then please refer to the Comtrend Gateway’s User 
Manual to make changes directly to the Gateway. 


Scenario 

II

: Setting up the WiFi Mesh Extender with a Non-Comtrend 

Gateway/Comtrend Gateway that does not Support WifiXtend2.0™.


Note: This scenario requires at least two WAP-5903 units to create a connection. 


1.


Optional:

 Disable the WiFi on the non-Comtrend 

modem/router. This will help improve the performance 
of the WiFi Mesh Extender and avoid confusing the 
Internet-enabled devices. 
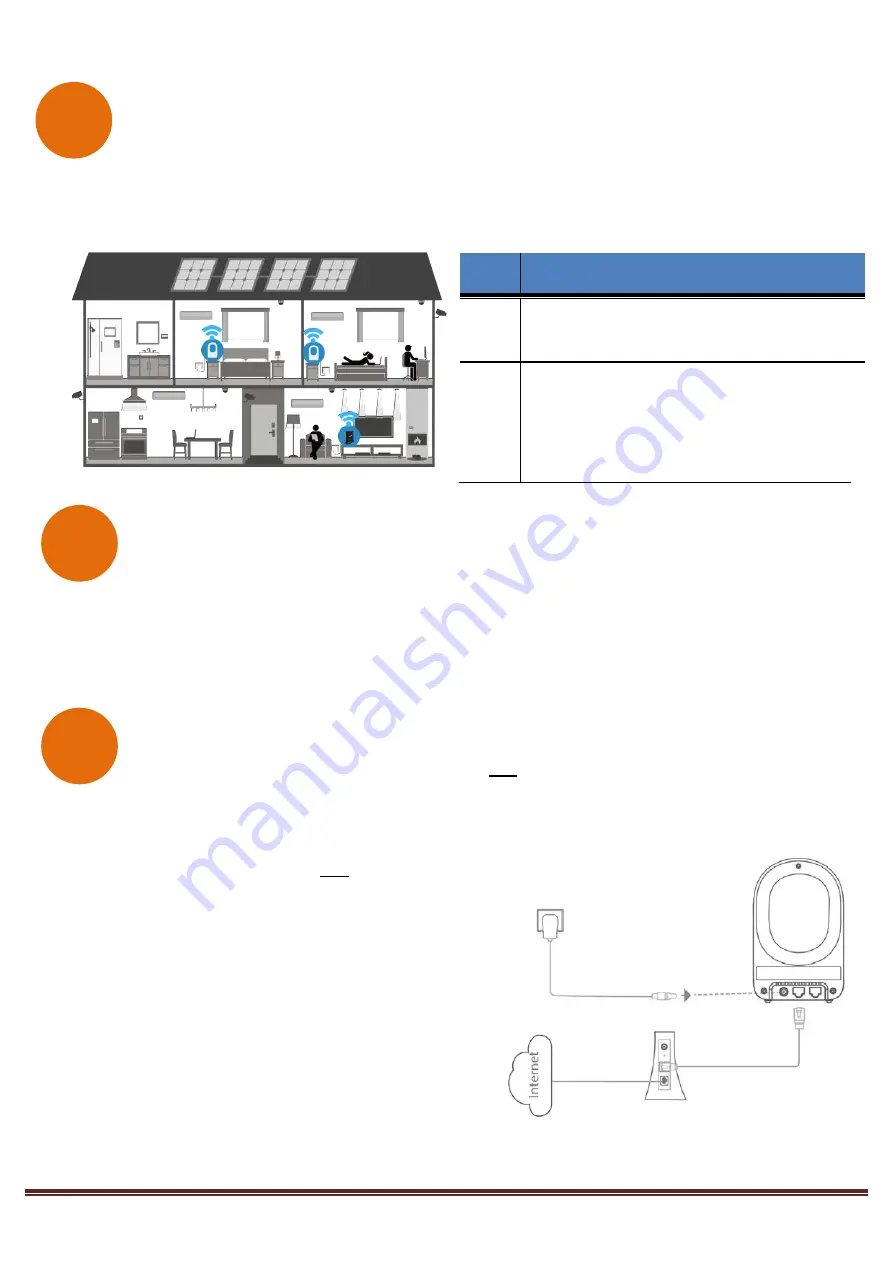
 

2.


Use the included Ethernet cable to connect one end 
into the LAN port of the existing home modem/router 
and the other end into the UPLINK port of the first WAP-
5903. 
 

3.


Power on this WAP-5903 by connecting one end of the 
Power Adapter into the Power Port of the WAP-5903 
and the other end into an outlet.  

LED 

Description 

Solid 
Blue


The WAP-5903 is placed in an ideal location 
and is receiving a good WiFi signal. 

Solid 
Red


The WAP-5903 is placed too far away from 
the Comtrend Gateway, and is receiving a 
weak WiFi signal. 

Action Required:

 Move 

the WAP-5903 closer to the Comtrend 
Gateway. 

WAP-5903


Power Plug


Ethernet Cab

le 

Existing Modem/Router


Содержание WAP-5903

Страница 1: ...linking The mesh system is processing Green Blue Blinking 1 The device is booting up and on stand by 2 The device has lost the uplink connection Green Blue Red Blinking 1 The device is upgrading the f...

Страница 2: ...rend Gateway that Supports WifiXtend2 0 1 Use the included Ethernet cable to connect one end into the LAN port of the Comtrend Gateway that supports WifiXtend2 0 and the other end into the UPLINK port...

Страница 3: ...at least two WAP 5903 units to create a connection 1 Optional Disable the WiFi on the non Comtrend modem router This will help improve the performance of the WiFi Mesh Extender and avoid confusing th...

Страница 4: ...nder2368 or Extender2368 5G The default SSID of this extender device is Extender2368 and 2368 is for reference It is the last 4 digits of the device s MAC number 5 When you are prompted to input the s...

Страница 5: ...word is 12345 Click the OK button to continue 9 After logging into the Web page input the new SSID for both the 2 4GHz and 5GHz fields The user can setup a new password by inputting it in both the Key...

Страница 6: ...wait for the LED to light up solid blue which means it is ready 14 Repeat steps 11 13 to add more WAP 5903 extenders to the mesh network The WiFi Mesh Network is Ready to Use FOR MORE HELP For instruc...

Страница 7: ...distance of 20 cm between the radiator and your body Safety Power Specifications Alimentation Input 12Vdc 1 5A Certification FCC IC standard Part 15B ICES 003 Part 15C RSS 247 2 4GHz Part 15E RSS 247...

Страница 8: ...und to comply with the limits for a Class B digital device pursuant to part 15 of the FCC Rules These limits are designed to provide reasonable protection against harmful interference in a residential...

Отзывы: