background image


55 

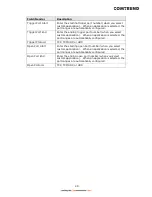
IPv6 LAN Applications 

 
Heading 

Description 

Stateless 

Use stateless configuration


Refresh Time (sec): 

The information refresh time option specifies how long a 
client should wait before refreshing information retrieved 
from DHCPv6


Stateful 

Use stateful configuration


 Start interface ID: 

Start of interface ID to be assigned to dhcpv6 client


 End interface ID: 

End of interface ID to be assigned to dhcpv6 client


 Leased Time (hour): 

Lease time for dhcpv6 client to use the assigned IP address


Heading 

Description 

Enable RADVD 

Enable use of router advertisement daemon


RA interval Min(sec): 

Minimum time to send router advertisement


RA interval Max(sec):


Maximum time to send router advertisement


Reachable Time(ms): 

The time, in milliseconds that a neighbor is 
reachable after receiving reachability 
confirmation


Default Preference: 

Preference level associated with the default 
router


MTU (bytes): 

MTU value used in router advertisement 
messages to insure that all nodes on a link use 
the same MTU value


Enable Prefix Length Relay   

Use prefix length receive from WAN interface


Enable ULA Prefix Advertisement  Allow RADVD to advertise Unique Local Address 

Prefix 

Randomly Generate 

Use a Randomly Generated Prefix 

Statically Configure    

Specify the prefix to be used 

Prefix 

The prefix to be used 

Preferred Life Time (hour) 

The preferred life time for this prefix 

Valid Life Time (hour) 

The valid life time for this prefix 

Enable MLD Snooping 

Enable/disable IPv6 multicast forward to LAN 
ports 

Standard Mode 
Blocking Mode 

In standard mode, IPv6 multicast traffic will 
flood to all bridge ports when no client 
subscribes to a multicast group even if MLD 
snooping is enabled 
 

In blocking mode, IPv6 multicast data traffic will 
be blocked and not flood to all bridge ports when 
there are no client subscriptions to any 
multicast group 

Enable MLD LAN 
To LAN Multicast 

Enable/disable IPv6 multicast between LAN 
ports 

Содержание VR-3063

Страница 1: ...261099 048 Version A1 0 July 31 2018 VR 3063 Home Gateway User Manual ...

Страница 2: ...ow it to lie freely There should be no obstructions in its path and no heavy items should be placed on the cord In addition do not walk on step on or mistreat the cord Use only the power cord and adapter that are shipped with this device To safeguard the equipment against overheating make sure that all openings in the unit that offer exposure to air are not blocked Avoid using a telephone other th...

Страница 3: ...sn t practical the telephone company will notify the customer as soon as possible Also you will be advised of your right to file a complaint with the FCC if you believe it is necessary To prevent interference with cordless phones ensure that gateway is at least 5 feet 1 5m from the cordless phone base station If you experience trouble with this equipment you disconnect it from the network until th...

Страница 4: ...ipment and receiver Connect the equipment into an outlet on a circuit different from that to which the receiver is connected Consult the dealer or an experienced radio TV technician for help This Class B digital apparatus complies with Canadian ICES 003 To reduce potential radio interference to other users the antenna type and its gain should be so chosen that the equivalent isotropically radiated...

Страница 5: ...e de rayonnements et votre corps ISED This device complies with the ISED portable RF exposure limit set forth for an uncontrolled environment and are safe for intended operation as described in this manual The further RF exposure reduction can be achieved if the product can be kept as far as possible from the user body or set the device to lower output power if such function is available Déclarati...

Страница 6: ...r Environment This symbol indicates that when the equipment has reached the end of its useful life it must be taken to a recycling centre and processed separate from domestic waste The cardboard box the plastic contained in the packaging and the parts that make up this router can be recycled in accordance with regionally established regulations Never dispose of this electronic equipment along with...

Страница 7: ...36 4 7 3 IPv6 Route 37 4 8 CPU MEMORY 38 4 9 NETWORK MAP 39 4 10 WIRELESS 39 4 10 1 Station Info 39 4 10 2 Site Survey 41 CHAPTER 5 BASIC SETUP 43 5 1 WAN SETUP 44 5 1 1 WAN Service Setup 45 5 2 NAT 46 5 2 1 Virtual Servers 46 5 2 2 Port Triggering 48 5 2 3 DMZ Host 50 5 3 LAN 51 5 3 1 Lan VLAN Setting 53 5 3 2 LAN IPv6 Autoconfig 54 5 3 3 Static IP Neighbor 56 5 3 4 UPnP 57 5 4 WIRELESS 58 5 4 1 ...

Страница 8: ...ER MANAGEMENT 103 6 12 MULTICAST 104 6 13 WIRELESS 107 6 13 1 Basic 2 4GHz 107 6 13 2 Security 2 4GHz 109 6 13 3 WPS 2 4GHz 111 6 13 4 Advanced 2 4GHz 113 6 13 5 Basic 5GHz 115 6 13 6 Security 5GHz 117 6 13 7 WPS 5GHz 119 6 13 8 Advanced 5GHz 121 CHAPTER 7 DIAGNOSTICS 123 7 1 DIAGNOSTICS INDIVIDUAL TESTS 123 7 2 ETHERNET OAM 124 7 3 PING 127 7 4 TRACE ROUTE 128 CHAPTER 8 MANAGEMENT 129 8 1 SETTING...

Страница 9: ...8 APPENDIX B PIN ASSIGNMENTS 147 APPENDIX C SPECIFICATIONS 148 APPENDIX D SSH CLIENT 150 APPENDIX E PRINTER SERVER 151 APPENDIX F CONNECTION SETUP 158 ...

Страница 10: ...h performance Internet access In addition VR 3063 supports high power 400mw 26 dBm dual bands 802 11n 2 4GHz 802 11ac 5GHz to create a large Wi Fi footprint for the most seamless video experience as well as blazing fast data speed and a toll quality voice experience ...

Страница 11: ...10 Chapter 2 Installation 2 1 Hardware Setup Follow the instructions below to complete the hardware setup BACK PANEL The figure below shows the back panel of the device ...

Страница 12: ...L Port Connect to an ADSL2 2 or VDSL with this RJ11 Port This device contains a micro filter which removes the analog phone signal If you wish you can connect a regular telephone to the same line by using a POTS splitter SFP Port SFP Small form factor pluggable transceiver port provides an additional interface for modular fiber giga g fast transceivers ETH WAN PORT This port has the same features ...

Страница 13: ...tton Press and release the WiFi WPS button to activate WPS for the 5GHz WiFi interface make sure the WPS is enabled in Wireless 5GHz Security page Press and hold WiFi WPS button more than 10 seconds to enable disable 5GHz WiFi ...

Страница 14: ...e device and its connections LED Color Mode Function POWER GREEN On The device is powered up Off The device is powered down Blink Software upgrade is in progress RED On POST Power On Self Test failure or other malfunction A malfunction is any error of internal sequence or state that will prevent the device from connecting to the DSLAM or passing customer data ...

Страница 15: ...LAN WiFi 5G GREEN On The wireless module is ready i e installed and enabled Off The wireless module is not ready i e either not installed or disabled Blink Data transmitting or receiving over WLAN ETH WAN GREEN On WAN is connected at 1000 Mbps SFP module is connected Off Ethernet WAN is not connected SFP module is connected Blink In TX RX over 1000 Mbps ORANGE On Ethernet is connected at 10 100 Mb...

Страница 16: ...PoE fails Off Modem power off modem in bridged mode or WAN connection not present Blink IP connected and IP Traffic is passing thru the device either direction RED On Device attempted to become IP connected and failed no DHCP response no PPPoE response PPPoE authentication failed no IP address from IPCP etc ...

Страница 17: ...access enabled Technical Note During power on the device initializes all settings to default values It will then read the configuration profile from the permanent storage section of flash memory The default attributes are overwritten when identical attributes with different values are configured The configuration profile in permanent storage can be created via the web user interface or telnet user...

Страница 18: ...involved are similar for most operating systems OS Check your OS support documentation for further details STEP 1 From the Network Connections window open Local Area Connection You may also access this screen by double clicking the Local Area Connection icon on your taskbar Click the Properties button STEP 2 Select Internet Protocol TCP IP and click the Properties button STEP 3 Select Obtain an IP...

Страница 19: ... your OS support documentation for further details STEP 1 From the Network Connections window open Local Area Connection You may also access this screen by double clicking the Local Area Connection icon on your taskbar Click the Properties button STEP 2 Select Internet Protocol TCP IP and click the Properties button STEP 3 Change the IP address to the 192 168 1 x 1 x 255 subnet with subnet mask of...

Страница 20: ...type http 192 168 1 1 NOTE For local administration i e LAN access the PC running the browser must be attached to the Ethernet and not necessarily to the device For remote access i e WAN use the IP address shown on the Device Information screen and login with remote username and password STEP 2 A dialog box will appear such as the one below Enter the default username and password as defined in sec...

Страница 21: ...20 STEP 3 After successfully logging in for the first time you will reach this screen You can also reach this page by clicking on the following icon located at the top of the screen ...

Страница 22: ...e options opens a submenu with more selections NOTE The menu items shown are based upon the configured connection s and user account privileges For example user account has limited access to configuration modification Device Info is the first selection on the main menu so it will be discussed first Subsequent chapters will introduce the other main menu options in sequence The Device Info Summary s...

Страница 23: ... status Igmp Pxy Shows Internet Group Management Protocol IGMP proxy status Igmp Src Enbl Shows the status of WAN interface used as IGMP source MLD Pxy Shows Multicast Listener Discovery MLD proxy status MLD Src Enbl Shows the status of WAN interface used as MLD source NAT Shows Network Address Translation NAT status Firewall Shows the status of Firewall Status Lists the status of DSL link IPv4 Ad...

Страница 24: ... 15 seconds Click Reset Statistics to perform a manual update 4 2 1 LAN Statistics This screen shows data traffic statistics for each LAN interface Heading Description Interface LAN interface s Received Transmitted Bytes Pkts Errs Drops Number of Bytes Number of Packets Number of packets with errors Number of dropped packets ...

Страница 25: ...affic statistics for each WAN interface Heading Description Interface WAN interfaces Description WAN service label Received Transmitted Bytes Pkts Errs Drops Number of Bytes Number of Packets Number of packets with errors Number of dropped packets ...

Страница 26: ...itted over the interface In Packets Number of packets received over the interface Out Packets Number of packets transmitted over the interface In OAM Cells Number of OAM Cells received over the interface Out OAM Cells Number of OAM Cells transmitted over the interface In ASM Cells Number of ASM Cells received over the interface Out ASM Cells Number of ASM Cells transmitted over the interface In Pa...

Страница 27: ...26 4 2 4 xDSL Statistics The xDSL Statistics screen displays information corresponding to the xDSL type The two examples below VDSL ADSL show this variation VDSL2 ...

Страница 28: ...27 ADSL2 Click the Reset Statistics button to refresh this screen Field Description Mode VDSL VDSL2 Traffic Type ATM PTM Status Lists the status of the DSL link Link Power State Link output power state ...

Страница 29: ...ts transmitted in each data symbol D The interleaver depth I The interleaver block size in bytes N RS codeword size Delay The delay in milliseconds msec INP DMT symbol Super Frames Total number of super frames Super Frame Errors Number of super frames received with errors RS Words Total number of Reed Solomon code errors RS Correctable Errors Total Number of RS with correctable errors RS Uncorrect...

Страница 30: ...ed Seconds Total UAS Total Number of Unavailable Seconds xDSL BER TEST Click xDSL BER Test on the xDSL Statistics screen to test the Bit Error Rate BER A small pop up window will open after the button is pressed as shown below Click Start to start the test or click Close to cancel the test After the BER testing is complete the pop up window will display as follows ...

Страница 31: ...xDSL TONE GRAPH Click Draw Graph on the xDSL Statistics screen and a pop up window will display the xDSL statistics graph including SNR Bits per tone QLN and Hlog of the xDSL line connection as shown below ...

Страница 32: ...tination Flag U route is up reject route G use gateway H target is a host R reinstate route for dynamic routing D dynamically installed by daemon or redirect M modified from routing daemon or redirect Metric The distance to the target usually counted in hops It is not used by recent kernels but may be needed by routing daemons Service Shows the WAN connection label Interface Shows connection inter...

Страница 33: ...Address Shows the MAC address of host PC Device Shows the connection interface 4 5 DHCP Click DHCP to display all DHCP Leases Field Description Hostname Shows the device host PC network name MAC Address Shows the Ethernet MAC address of the device host PC IP Address Shows IP address of device host PC Expires In Shows how much time is left for each DHCP Lease ...

Страница 34: ...ription IPv6 Address Shows IP address of device host PC MAC Address Shows the Ethernet MAC address of the device host PC Duration Shows leased time in hours Expires In Shows how much time is left for each DHCP Lease ...

Страница 35: ...ection Field Description Interface The Source interface from which the IGMP report was received WAN The WAN interface from which the multicast traffic is received Groups The destination IGMP group address Member The Source IP from which the IGMP report was received Timeout The time remaining before the IGMP report expires ...

Страница 36: ...enabled Status Connection status of the WAN interface Address IPv6 Address of the WAN interface Prefix Prefix received configured on the WAN interface Device Link local Address The CPE s LAN Address Default IPv6 Gateway The default WAN IPv6 gateway IPv6 DNS Server The IPv6 DNS servers received from the WAN interface configured manually ...

Страница 37: ... to display the list of IPv6 nodes discovered Field Description IPv6 Address Ipv6 address of the device s found Flags Status of the neighbor device HW Address MAC address of the neighbor device Device Interface from which the device is located ...

Страница 38: ...ck IPv6 Route to display the IPv6 route info Field Description Destination Destination IP Address Gateway Gateway address used for destination IP Metric Metric specified for gateway Interface Interface used for destination IP ...

Страница 39: ...38 4 8 CPU Memory Displays the system performance graphs Shows the current loading of the CPU and memory usage with dynamic updates ...

Страница 40: ...ilable for Internet Explorer users 4 10 Wireless 4 10 1 Station Info This page shows authenticated wireless stations and their status Click the Refresh button to update the list of stations in the WLAN Consult the table below for descriptions of each column heading Field Description MAC Lists the MAC address of all the stations ...

Страница 41: ... of time since packets were transferred to and from each station If a station is idle for too long it is removed from this list Authorized Lists those devices with authorized access SSID Lists which SSID of the modem that the stations connect to Interface Lists which interface of the modem that the stations connect to ...

Страница 42: ...41 4 10 2 Site Survey The graph displays wireless APs found in your neighborhood by channel 2 4GHz ...

Страница 43: ...42 5GHz ...

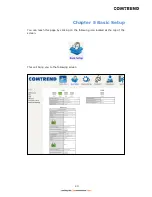
Страница 44: ...43 Chapter 5 Basic Setup You can reach this page by clicking on the following icon located at the top of the screen This will bring you to the following screen ...

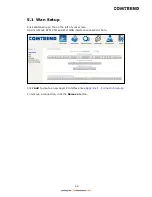
Страница 45: ...AN Setup on the on the left of your screen Add or remove ATM PTM and ETH WAN interface connections here Click Add to create a new Layer 2 Interface see Appendix F Connection Setup To remove a connection click the Remove button ...

Страница 46: ...xId Shows 802 1Q VLAN ID VlanTpid VLAN Tag Protocol Identifier IGMP Proxy Shows Internet Group Management Protocol IGMP Proxy status IGMP Source Shows the status of WAN interface used as IGMP source NAT Shows Network Address Translation NAT status Firewall Shows the Security status IPv6 Shows the WAN IPv6 address MLD Proxy Shows Multicast Listener Discovery MLD Proxy status Mld Source Shows the st...

Страница 47: ...y if the external port needs to be converted to a different port number used by the server on the LAN side A maximum of 32 entries can be configured To add a Virtual Server click Add The following will be displayed Click Apply Save to apply and save the settings Consult the table below for field and header descriptions Field Header Description Use Interface Select a WAN interface from the drop dow...

Страница 48: ...ding external port number when you select Custom Server When a service is selected the port ranges are automatically configured Protocol TCP TCP UDP or UDP Internal Port Start Enter the internal port starting number when you select Custom Server When a service is selected the port ranges are automatically configured Internal Port End Enter the internal port ending number when you select Custom Ser...

Страница 49: ...he WAN side to establish new connections back to the application on the LAN side using the Open Ports A maximum 32 entries can be configured To add a Trigger Port click Add The following will be displayed Click Save Apply to save and apply the settings Consult the table below for field and header descriptions Field Header Description Use Interface Select a WAN interface from the drop down menu Sel...

Страница 50: ...plication When an application is selected the port ranges are automatically configured Trigger Protocol TCP TCP UDP or UDP Open Port Start Enter the starting open port number when you select custom application When an application is selected the port ranges are automatically configured Open Port End Enter the ending open port number when you select custom application When an application is selecte...

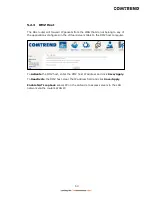
Страница 51: ...nfigured in the Virtual Servers table to the DMZ host computer To Activate the DMZ host enter the DMZ host IP address and click Save Apply To Deactivate the DMZ host clear the IP address field and click Save Apply Enable NAT Loopback allows PC on the LAN side to access servers in the LAN network via the router s WAN IP ...

Страница 52: ...AN port Enable IGMP Snooping Standard Mode In standard mode multicast traffic will flood to all bridge ports when no client subscribes to a multicast group even if IGMP snooping is enabled Blocking Mode In blocking mode the multicast data traffic will be blocked and not flood to all bridge ports when there are no client subscriptions to any multicast group Enable IGMP LAN to LAN Multicast Select E...

Страница 53: ...then click the Remove button as shown below Select Enable DHCP Server Relay not available if NAT enabled and enter the DHCP Server IP Address This allows the Router to relay the DHCP packets to the remote DHCP server The remote DHCP server will provide the IP address 2ND LAN INTERFACE To configure a secondary IP address tick the checkbox outlined in RED below IP Address Enter the secondary IP addr...

Страница 54: ...hen this feature is used Click the Add button to display the following Heading Description Vlan ID The VLAN ID to be supported on the LAN port pbits The VLAN priority bit to be supported on the LAN port Remove Tick the checkbox and click the Remove button to delete entries ...

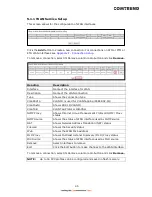
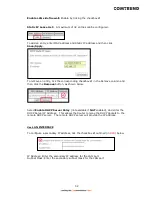
Страница 55: ...ocal Address Configuration Heading Description EUI 64 Use EUI 64 algorithm to calculate link local address from MAC address User Setting Use the Interface Identifier field to define a link local address Static LAN IPv6 Address Configuration Heading Description Interface Address prefix length is required Configure static LAN IPv6 address and subnet prefix length ...

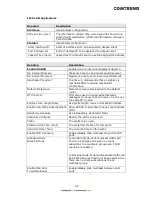
Страница 56: ...ated with the default router MTU bytes MTU value used in router advertisement messages to insure that all nodes on a link use the same MTU value Enable Prefix Length Relay Use prefix length receive from WAN interface Enable ULA Prefix Advertisement Allow RADVD to advertise Unique Local Address Prefix Randomly Generate Use a Randomly Generated Prefix Statically Configure Specify the prefix to be us...

Страница 57: ...vices Click the Add button to display the following Click Apply Save to apply and save the settings Heading Description IP Version The IP version used for the neighbor device IP Address Define the IP Address for the neighbor device MAC Address The MAC Address of the neighbor device Associated Interface The interface where the neighbor device is located ...

Страница 58: ...57 5 3 4 UPnP Select the checkbox provided and click Save Apply to enable UPnP protocol ...

Страница 59: ...elow for descriptions of these options Option Description Enable Wireless A checkbox that enables or disables the wireless LAN interface When selected a set of basic wireless options will appear Hide Access Point Select Hide Access Point to protect the access point from detection by wireless active scans To view and connect to available wireless networks in Windows open Connect to a Network by cli...

Страница 60: ... band Max Clients The maximum number of clients that can access the router Wireless Guest Virtual Access Points This router supports multiple SSIDs called Guest SSIDs or Virtual Access Points To enable one or more Guest SSIDs select the checkboxes in the Enabled column To hide a Guest SSID select its checkbox in the Hidden column Do the same for Isolate Clients and Disable WMM Advertise For a desc...

Страница 61: ...ether a network key is used for authentication to the wireless network If network authentication is set to Open then no authentication is provided Despite this the identity of the client is still verified Each authentication type has its own settings For example selecting 802 1X authentication will reveal the RADIUS Server IP address Port and Key fields WEP Encryption will also be enabled as shown...

Страница 62: ...d secret shared encryption keys are generated and used by the source station and the destination station to alter frame bits thus avoiding disclosure to eavesdroppers Under shared key authentication each wireless station is assumed to have received a secret shared key over a secure channel that is independent from the 802 11 wireless network communications channel Click Save Apply to implement new...

Страница 63: ...cess point from detection by wireless active scans To view and connect to available wireless networks in Windows open Connect to a Network by clicking the network icon or in the notification area If the access point is hidden it will not be listed there To connect a client to a hidden access point the station must add the access point manually to its wireless configuration SSID 1 32 characters Set...

Страница 64: ...in the Enabled column To hide a Guest SSID select its checkbox in the Hidden column Do the same for Isolate Clients and Disable WMM Advertise For a description of these two functions see the previous entries for Clients Isolation and Disable WMM Advertise Similarly for Enable WMF Max Clients and BSSID consult the matching entries in this table NOTE Remote wireless hosts cannot scan Guest SSIDs ...

Страница 65: ... be configured with the correct SSID to access the WLAN If the SSID does not match that client will not be granted access Network Authentication This option specifies whether a network key is used for authentication to the wireless network If network authentication is set to Open then no authentication is provided Despite this the identity of the client is still verified Each authentication type h...

Страница 66: ...P algorithm WEP is a set of security services used to protect 802 11 networks from unauthorized access such as eavesdropping in this case the capture of wireless network traffic When data encryption is enabled secret shared encryption keys are generated and used by the source station and the destination station to alter frame bits thus avoiding disclosure to eavesdroppers Under shared key authenti...

Страница 67: ...ch your local time Clicking on the checkbox in the Enable field allows the user to select all none entries for Enabling Disabling Click Add to display the following screen See below for field descriptions Click Save Apply to add a time restriction User Name A user defined label for this restriction Browser s MAC Address MAC address of the PC running the browser Other MAC Address MAC address of ano...

Страница 68: ... Exclude radio button to deny access to the websites listed Tick the Include radio button to restrict access to only those listed websites Then click Add to display the following screen Enter the URL address and port number then click Save Apply to add the entry to the URL filter URL Addresses begin with www as shown in this example A maximum of 100 entries can be added to the URL Filter list ...

Страница 69: ...igital media like pictures music and video to other LAN devices from the digital media server Insert the USB drive into the USB host port on the back of the router Click Enable on board digital media server a dropdown list of directories found on the USB driver will be available for selection Select media path from the drop down list or manually modify the media library path and click Save Apply t...

Страница 70: ...69 5 6 3 1 Storage Device Info This page also displays storage devices attached to the USB host Display after storage device attached for your reference ...

Отзывы: