background image

Sep 01


Compuprint PageMaster 450 User Guide

5-3

Replacing the EP cartridge (for standard configuration)

When there is no more toner or the drum must be replaced, an error message appears and the printer stops. 
Follow the steps described in the following sections to replace the EP cartridge with a new one. Be sure to 
use only the designated EP cartridge. Consult your dealer for more information. 

Replacing the EP cartridge (for standard configuration)

1.

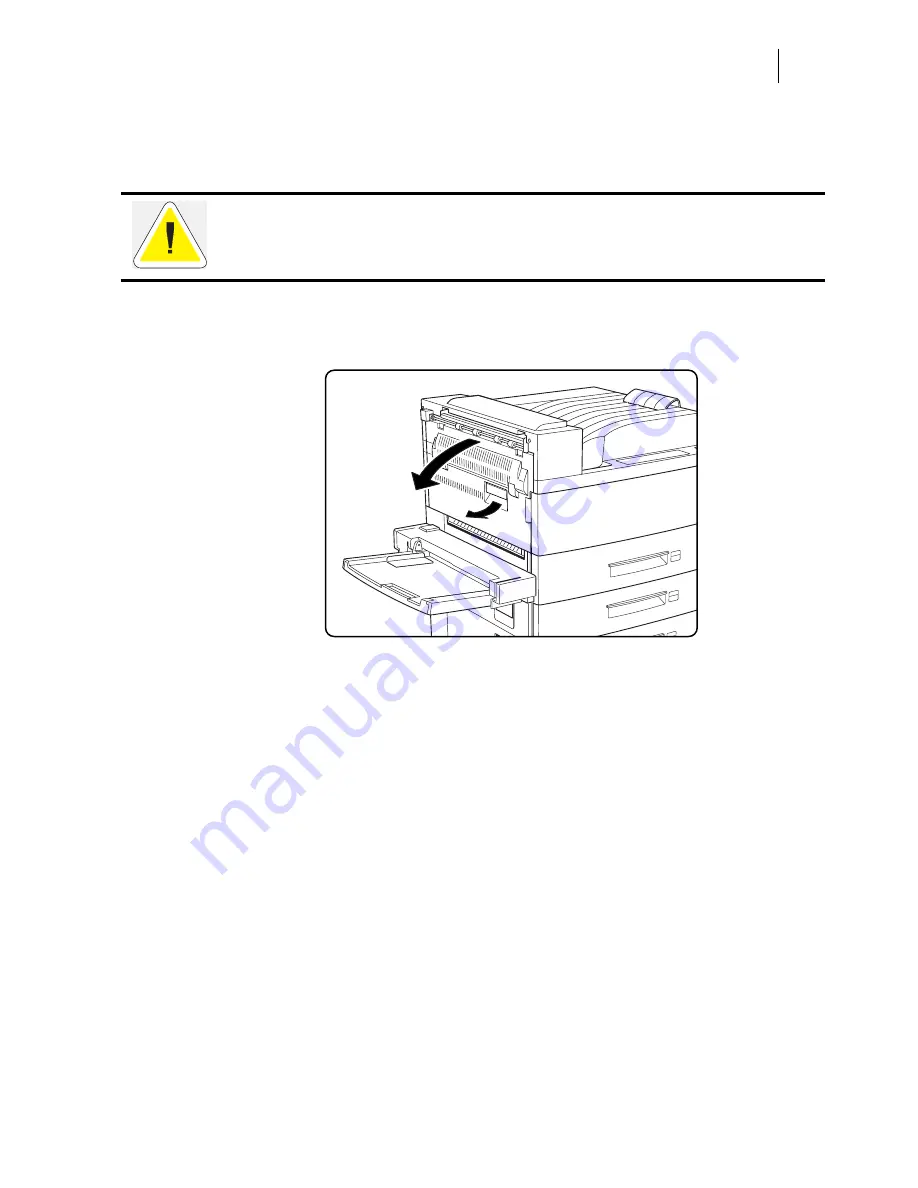
Hold the latch and open the upper left cover.

Do not shake the EP cartridge in order to check for toner level. A tiny amount of toner left 
may spill out.

Содержание PageMaster 450

Страница 1: ...Sep 01 Compuprint PageMaster 450 User Guide...

Страница 2: ...pple Computer Inc Banyan VINES Banyan DEC DECnet LN03 VMS Digital Equipment Corporation Hewlett Packard HP PCL HP GL HP UX LaserJet Hewlett Packard Co IBM PC Token Ring International Business Machines...

Страница 3: ...rinter settings Chapter 5 Printer Consumables Cleaning and Maintenance Describes how to handle and replace the EP cartridge replacement of transfer and feed rollers and perfor mance of other steps as...

Страница 4: ...D Frequently Used Ethernet Commands This appendix lists some of the most frequently used commands of the Print Server command set More information about the command set including additional options ca...

Страница 5: ...Conventions 5 Chapter 1 Unpacking and Installing Your Printer About this Chapter 1 2 Installation Precautions 1 2 Environment 1 2 Space requirements 1 2 Top View of Printer standard configuration 1 3...

Страница 6: ...ivers for MacOS 1 19 Printing a Configuration Summary 1 19 Printing a Test Page 1 21 Printing PCL and PostScript Font Lists 1 23 Turning the Printer Off 1 23 Chapter 2 Printer and Options Parts and Fu...

Страница 7: ...Duplex Bind in Landscape Orientation 3 10 Paper Paths 3 11 Paper path for standard configuration 3 11 Paper path when options are installed 3 12 Paper Delivery 3 13 Paper output tray 3 14 Face up tra...

Страница 8: ...the EP cartridge 5 2 Cautions on storing the EP cartridge 5 2 When to replace the EP cartridge 5 2 Replacing the EP cartridge for standard configuration 5 3 Replacing the EP cartridge when options ar...

Страница 9: ...er MBF 6 16 Clearing Paper Jams from the Envelope Feeder 6 16 Control Panel LCD Messages 6 17 Code Class 1 6 18 Code Class 2 6 19 Code Class 3 6 19 Code Class 4 6 20 Code Class 5 6 23 Code Class 6 6 2...

Страница 10: ...ocation and Environment Precautions B 3 Fire Smoke and Shock Precautions B 3 Paper Jam Precautions B 4 Regulatory Compliances B 4 Class B Equipment B 4 Class 1 Laser Device and CDRH Compliance B 5 Rad...

Страница 11: ...Sep 01 Preface Preface In this Chapter Welcome on page 2 Features on page 2 Standard Configurations on page 3 Manual Conventions on page 5...

Страница 12: ...rce and Delivery The printer comes standard with two 500 sheet universal paper cassettes and the Multi Bypass Feeder An optional 2500 sheet High Capacity Feeder HCF Envelope Feeder and Duplexer can be...

Страница 13: ...s and one 50 sheet Multi Purpose Bypass Feeder for paper transparencies envelopes and other non standard paper sizes Paper Output One 500 sheet face down tray Interfaces Bidirectional 1284 Parallel Po...

Страница 14: ...inter Languages Adobe PostScript 3 and PCL6 Paper Handling Options Duplexer High Capacity Feeder includes one 500 sheet tray and two 1 000 sheet trays Finisher Stapler Unit supports 3 000 sheets offer...

Страница 15: ...w to avoid equipment damage process failure or extreme annoyance Pay special attention to these sections and read them fully before operating the printer Compuprint will not be responsible for any pro...

Страница 16: ...Sep 01 6 Compuprint PageMaster 450 User Guide Manual Conventions...

Страница 17: ...versal paper cassette on page 1 10 Connecting the Parallel Cable on page 1 14 Connecting the Ethernet Cable on page 1 15 Connecting the Power Cord on page 1 15 Turning the Printer On on page 1 17 Sele...

Страница 18: ...e printer rest for some time to adjust to the new temperature Do not subject the printer to direct sunlight or a malfunction may result Do not place the printer in a location with high temperature and...

Страница 19: ...requirements Top View of Printer standard configuration Measurements in inches mm Top View of Printer when options are installed Measurements in inches mm 14 3 364 42 7 1084 7 9 200 7 9 200 41 7 1060...

Страница 20: ...off the exterior carton 2 Remove the four plastic inserts at the base of the shipping container by pulling on the tabs of each insert Plastic inserts should be completely removed 3 Lift the shipping...

Страница 21: ...NG 1 This printer is very heavy The weight of the main unit without paper cassette consum ables and paper is about 106 lbs 48kg Never attempt to lift the printer by yourself The printer should always...

Страница 22: ...t the procedure in a brightly lit location and complete the installation procedure as quickly as possible within about 5 minutes When the EP cartridge is removed from the printer immediately put it ba...

Страница 23: ...tive drum from external light Do not open the drum shutter by hand Never touch the surface of the photosensitive drum For standard configuration 1 Hold the latch and open the upper left cover 2 Remove...

Страница 24: ...Cartridge ing the cartridge a noise may be heard when turning on the printer and the EP cartridge may be dam aged 4 Open the front cover as indicated WARNING Never touch the fuser area where a label i...

Страница 25: ...ange handle with one hand gently push the cartridge all the way into the printer I 1 Gently pull out the sealing tape in the direction of the arrow NOTE If the tape is pulled out at an angle it may br...

Страница 26: ...lose the front cover and the upper left cover NOTE When closing the upper left cover do not use the latch on the cover Instead follow the instruction label on the cover and push the recommended locati...

Страница 27: ...onfiguration 2 Prepare a stack of paper Make sure the tops of the sheets are properly aligned NOTE Do not use paper with creases or wrinkles When using special paper fan it before insertion 3 Gently l...

Страница 28: ...e all the way until it stops 5 Align the four corners of the paper and place the paper in the cassette The paper should enter easily between the guides Make sure the paper does not get bent upwards by...

Страница 29: ...e 1 13 For standard configuration 6 Adjust the side guide to the paper width NOTE Adjust the guide to the paper size correctly otherwise paper may not be transported correctly and may result in a pape...

Страница 30: ...correctly otherwise paper may not be transported correctly and may result in a paper jam 9 Insert a correct paper size label into the paper size slot on the cassette then push the cassette all the way...

Страница 31: ...t less than 124V 15A Never use extension cords with low capacity or extreme heat or flame may result Consult your dealer on the correct type of extension cord to use Do not damage or modify the extens...

Страница 32: ...rint PageMaster 450 Connecting the Power Cord 2 Verify that the power switch of the printer is set to the O off position then insert the plug of the power cord into the AC outlet 3 Connect the power c...

Страница 33: ...NOTE While turned on the printer will go into the standby state if it remains idle for a period of time If an error message appears see Control Panel LCD Messages on page 6 17 Selecting a Display Lan...

Страница 34: ...lder contains the following subfolders Drivers Folder The Drivers folder contains all of the printer drivers necessary to print from Windows 3 1and 95 98 and Windows NT 3 5 1 and 4 0 and Windows 2000...

Страница 35: ...e for the printer These items are available in English German French Italian and Spanish Printing a Configuration Summary Your printer can print a configuration summary that lists the currently select...

Страница 36: ...Sep 01 1 20 Compuprint PageMaster 450 Printing a Configuration Summary...

Страница 37: ...dy status press MENU the control panel display will read Menu Paper Menu 2 Press PREVIOUS or NEXT until the display reads Menu Functions 3 Press SELECT the display will read Functions Reset Printer 4...

Страница 38: ...Sep 01 1 22 Compuprint PageMaster 450 Printing a Test Page...

Страница 39: ...lay will read Functions Reset Printer 4 Press NEXT or PREVIOUS until the display reads Functions Print Fonts 5 Press SELECT the display will read Print Fonts PCL Fonts NOTE You may toggle between PCL...

Страница 40: ...Sep 01 1 24 Compuprint PageMaster 450 Turning the Printer Off Set the power switch to the 0 position to turn off the printer...

Страница 41: ...Sep 01 Chapter 2 Printer and Options Parts and Functions In this Chapter About this Chapter on page 2 2 Main Unit on page 2 2 Options on page 2 6...

Страница 42: ...that they are collected properly 3 Operation panel Contains all push buttons LEDs and LCD display controls required for operation of the printer 4 Power switch Serves to turn the printer on and off 5...

Страница 43: ...tanding and Navigating the Control Panel Menus for a detailed discussion about using the LCD display and push buttons of the control panel 1 DUPLEXER connector Connects to the optional duplexer 2 OUTP...

Страница 44: ...uide Main Unit Controller 1 Optional Network Interfaces 2 Parallel Port 3 Ethernet Reset Switch 4 LED ON 100BaseT Connection active OFF 10BaseT Connection active 5 LED ON Indicates Ethernet connection...

Страница 45: ...the toner and the photosensitive drum WARNING The fuser becomes very hot in operation If you have to access the fuser area turn the power off and wait at least 40 minutes before removing the drum car...

Страница 46: ...printer with the standard cassette feeders duplexer and face up tray installed 1 Duplexer For printing on both sides of a sheet 2 Duplexer latch Lift to replace the EP cartridge or remove jammed pape...

Страница 47: ...ith the envelope feeder installed The above illustration shows the printer with the Finisher Stapler unit installed 5 Envelope feeder The optional envelope feeder can be hold up to about 100 envelopes...

Страница 48: ...Sep 01 2 8 Compuprint PageMaster 450 User Guide Options NOTE Additional options such as network interfaces memory DIMMs consumables and user publications are available for your printer...

Страница 49: ...supported on page 3 5 Paper Orientation on page 3 6 Long and Short Edge Duplex Binding in Portrait and Landscape Orientations on page 3 9 Paper Paths on page 3 11 Paper Delivery on page 3 13 Adding p...

Страница 50: ...as already been printed Wrinkled torn or bent paper Moist or wet paper Curled paper Paper with an electrostatic charge Glued paper Paper with special coating Color paper with surface treatment Paper u...

Страница 51: ...0 5 LEF 184 267 Yes Yes B5 LEF 182 257 Yes Yes A3 SEF 420 297 Yes Yes 8 5 x 14 SEF 356 216 Yes Yes 11 x 17 SEF 432 279 Yes Yes Tray 1 Only A5 LEF 148 210 Yes Yes 5 5 x 8 5 LEF 140 216 Yes Yes Paper So...

Страница 52: ...rt Edge Feed whereas LEF refers to Long Edge Feed See Paper Orientation on page 3 6 Tray 4 Tray 5 A4 LEF 210 297 Yes Yes 8 5 x 11 LEF 216 280 Yes Yes 7 5 x 10 5 LEF 330 216 Yes Yes B5 LEF 182 257 Yes...

Страница 53: ...s SEF refers to Short Edge Feed whereas LEF refers to Long Edge Feed COM 10 ENVELOPE LETTER SEF MEDIA SIZE Tray 1 Tray 2 Tray 3 Tray 4 Tray 5 MBF Env Fdr MEDIA TYPE Tray 1 Tray 2 Tray 3 Tray 4 Tray 5...

Страница 54: ...Paper Orientation Paper Orientation in Trays 1 2 or 3 Paper Orientation in Tray 4 Top View of Long Edge Feeds 1 represents duplex printing Top View of Short Edge Feeds Top View of Long Edge Feeds 1 re...

Страница 55: ...print PageMaster 450 User Guide 3 7 Paper Orientation in Tray 5 2 represents simplex printing Paper Orientation in Tray 5 Top View of Long Edge Feeds 1 represents duplex printing 2 represents simplex...

Страница 56: ...nvelope Orientation in the Bypass Feeder Top View of Short Edge Feeds SEF Top View of Long Edge Feeds LEF 1 represents duplex printing 2 represents simplex printing Top View of Envelope Feeds 1 repres...

Страница 57: ...User Guide 3 9 Paper and Envelope Orientation in the Bypass Feeder Long and Short Edge Duplex Binding in Portrait and Landscape Orientations Long Edge Duplex Bind in Portrait Orientation Short Edge Du...

Страница 58: ...10 Compuprint PageMaster 450 User Guide Long and Short Edge Duplex Binding in Portrait and Landscape Orientations Long Edge Duplex Bind in Landscape Orientation Short Edge Duplex Bind in Landscape Ori...

Страница 59: ...ter in its standard configuration and also when options are installed Paper path for standard configuration 1 The paper is pulled out of a paper cassette or the multi bypass feeder 2 The image is tran...

Страница 60: ...Sep 01 3 12 Compuprint PageMaster 450 User Guide Paper Paths Paper path when options are installed Finisher Stapler...

Страница 61: ...rred by the photosensitive drum 3 The toner on the paper is fixed by the fuser 4 The paper is output as follows z For face up tray face up z For paper output tray face down z For Finisher Stapler unit...

Страница 62: ...Paper output tray The standard output tray enables printouts to emerge facing down It can store up to about 500 sheets of printed paper Face up tray option When installed and selected the face up tray...

Страница 63: ...PageMaster 450 User Guide 3 15 Face up tray with the Duplexer option Face up tray with the Duplexer option When installed and selected the face up tray can store up to about 200 sheets of printouts co...

Страница 64: ...nt PageMaster 450 User Guide Adding paper to the 500 sheet paper cassette Tray 1 or Tray 2 Finisher Stapler unit option Adding paper to the 500 sheet paper cassette Tray 1 or Tray 2 1 Pull out desired...

Страница 65: ...t PageMaster 450 User Guide 3 17 Finisher Stapler unit option 2 Prepare a stack of paper Make sure the tops of the sheets are properly aligned 3 Gently lift up the length guide and slide it all the wa...

Страница 66: ...down the gray handle slide the side guide all the way until stops 5 Align the four corners of the paper and place the paper in the cassette The paper should enter easily between the guides Make sure...

Страница 67: ...e 3 19 Finisher Stapler unit option 6 Adjust the side guide to the paper width NOTE Adjust the guide to the paper size correctly otherwise paper may not be transported correctly and may result in pape...

Страница 68: ...otherwise paper may not be transported correctly and may result in a paper jam 9 Insert a correct paper size label into the paper size slot on Tray 2 then push the cassette all the way back into the...

Страница 69: ...1 Finisher Stapler unit option 1 If necessary pull out the extension tray to a length desired for the paper to be loaded 2 Place paper along the right side of the multi bypass feeder 3 Push the paper...

Страница 70: ...go into the printer The paper is now ready for use 5 When the paper is no longer required remove it and push back the extension tray if necessary Adding paper to the HCF unit 2500 sheet The HCF unit a...

Страница 71: ...aster 450 User Guide 3 23 Tray 3 500 sheet universal paper cassette Tray 3 500 sheet universal paper cassette 1 Pull out Tray 3 until it stops 2 Prepare a stack of paper Make sure the tops of the shee...

Страница 72: ...per to the HCF unit 2500 sheet 3 Gently lift up the length guide and slide it all the way until it stops 4 While pressing down the gray handle slide the side guide all the way until it stops If you wi...

Страница 73: ...n the four corners of the paper and place the paper in the cassette The paper should enter easily between the guides Make sure the paper does not get bent upwards by the guides NOTE Make sure the pape...

Страница 74: ...aper size correctly otherwise paper may not be trans ported correctly and may result in a paper jam CAUTION Make sure the stack is under the retaining clips on both sides Also make sure that the guide...

Страница 75: ...er size slot on the cassette then push the cassette all the way back into the printer until it latches Trays 4 and 5 A4 Letter size paper compartment Trays 4 and 5 are designated for printing of A4 or...

Страница 76: ...r Guide Adding paper to the HCF unit 2500 sheet 2 Prepare a stack of paper Make sure the tops of the sheets are properly aligned 3 Insert paper into the compartment NOTE Make sure the paper s stack he...

Страница 77: ...uide 3 29 Trays 4 and 5 A4 Letter size paper compartment 4 Push Tray 4 back into the printer Loading envelopes into the envelope feeder 1 Prepare a stack of envelopes Make sure the envelopes are not s...

Страница 78: ...e envelope weight insert envelopes with the flap side up and the long edges leading first 3 Slide the side guide so that it slightly touches the edges of the envelope stack CAUTION Make sure the envel...

Страница 79: ...4 2 Control Panel Features on page 4 2 Navigating the Control Panel Menus on page 4 4 Menu Structure on page 4 6 Paper Menu on page 4 7 Interface Menu on page 4 10 PS Menu on page 4 12 PCL Menu on pa...

Страница 80: ...he LCD display shows status and error messages that inform you of the current status of the printer and also displays menus submenus and printer settings when you are in the menu system The display co...

Страница 81: ...stem MENU Push this button to enter the menu system NEXT Push this button to move to the next menu submenu or setting within the same level of the menu structure SELECT Push this button to select the...

Страница 82: ...ng that you are in the menu system The second line of the display lists the active menu which you can change by pressing the NEXT or PREVIOUS but ton If you press the NEXT button repeatedly the second...

Страница 83: ...tton on the control panel 2 Press the NEXT button until the text Paper Menu is shown on the second line of the display 3 Press the SELECT button to enter the paper menu 4 Press the NEXT button until t...

Страница 84: ...Banner DHCP Network Frame Delay Out Close PS Menu Print PS Errors Manual Feed TO PCL Menu Orientation Font Source Font Number Pitch Symbol Set Macro Filter Lines Per Page CR Mode LF Mode FF Mode Prin...

Страница 85: ...s submenu allows you to change the number of copies printed 1 Numbers 1 999 1 Press NEXT or PREVIOUS to increase or decrease the number of copies printed 2 Press SELECT to save this setting Default So...

Страница 86: ...MEDIA TYPE 4 Press SELECT to choose either 5 Press NEXT or PREVIOUS to scroll through the available sizes or types 6 Press SELECT to set a size or type Tray Linking This submenu allows you to turn the...

Страница 87: ...ole Punch feature on and off This submenu is only available if the Finisher Stapler is installed Off On Off 1 Press NEXT or PREVIOUS to toggle between ON and OFF 2 Press SELECT to save this setting MB...

Страница 88: ...ress the SELECT button to enter the interface menu 4 Press the NEXT button to move through the submenus Port Parallel Setup and Network Setup 5 Use the procedures in the following table to access and...

Страница 89: ...ctional Delay Out Close Off Interpreter Auto Switch PCL PostScript 3 Format Raw Normal Binary Mode Bidirectional Standard Delay Out Close Off On 1 Press NEXT or PREVIOUS to scroll through the INTERPRE...

Страница 90: ...k 1 Setup This submenu allows you to set up the Network interface Interpreter Auto Switch Format Raw Network Channel Netware Network Address IP Address user specified Subnet Mask user specified Defaul...

Страница 91: ...en ON print and OFF do not print 2 Press SELECT to save this setting Manual Feed TO This submenu allows you to set the manual feed timeout the number of seconds the printer should wait for a manual fe...

Страница 92: ...font source Internal Internal 1 Press NEXT or PREVIOUS to scroll through the available font sources 2 Press SELECT to choose and set a source Font Number This submenu allows you to set the font number...

Страница 93: ...rriage return alone or a carriage return and a line feed together CR CR CR CR CR CR LF 1 Press NEXT or PREVIOUS to choose from CR CR or CR CR LF 2 Press SELECT to save this setting LF Mode This submen...

Страница 94: ...ameter Values Paper Source MBF Paper Size Executive Paper Source MBF Tray 1 Tray 2 Tray 3 Tray 4 Tray 5 Auto select Paper Size Executive Letter Legal Statement Folio Ledger A6 A5 A4 B5 B4 MonarchEnvel...

Страница 95: ...lay messages English English Francais French Deutsch German Italiano Italian Espanol Spanish 1 Press NEXT or PREVIOUS to scroll through the available languages English French Francais German Deutsch I...

Страница 96: ...after changing the last digit to save this setting Jam Recovery This submenu allows you to turn jam recovery on or off On On Off 1 Press NEXT or PREVIOUS to toggle between ON and OFF 2 Press SELECT t...

Страница 97: ...is submenu allows you to set the resolution dpi 600 dpi 300 dpi 600 dpi 1 Press NEXT or PREVIOUS to scroll through the available resolutions 2 Press SELECT to choose and set the dpi Enhancement This s...

Страница 98: ...ess to the printer settings that are related to the optional FLASH DIMM Use the following procedure to enter the FLASH Menu 1 Press the MENU button on the control panel 2 Press the NEXT button until t...

Страница 99: ...5 Press the SELECT button to enter a submenu Submenus Procedure for Changing Setting Print This selection will read the selected file from FLASH and print it as if it were being received from one of...

Страница 100: ...elete the selected disk file or directory from the hard disk To delete an entire directory you must first delete all the files within that directory 1 Press NEXT or PREVIOUS to scroll through the file...

Страница 101: ...ype and Level for Tray 4 1 Press NEXT or PREVIOUS to scroll through the media size media type and level settings for Tray 4 2 Press SELECT to view a specific setting Tray 5 optional This submenu allow...

Страница 102: ...Sep 01 4 24 Compuprint PageMaster 450 User Guide Status Menu...

Страница 103: ...eplacing the EP Cartridge on page 5 2 Replacing the Fuser on page 5 13 Replacing the Transfer Roller on page 5 19 Replacing the Feed Rollers on page 5 20 Cleaning on page 5 26 Daily Maintenance on pag...

Страница 104: ...m water and soap If toner gets on your clothing you should immediately try to blow it off with compressed air The drum shutter protects the photosensitive drum from external light Do not open the drum...

Страница 105: ...stops Follow the steps described in the following sections to replace the EP cartridge with a new one Be sure to use only the designated EP cartridge Consult your dealer for more information Replacin...

Страница 106: ...idge to gently take it out Then hold the handle and completely remove the cartridge Be careful about the toner falling out then wrap the used EP cartridge in its original packing and dispose it proper...

Страница 107: ...protective paper sheet from the drum shutter 5 Hold the EP cartridge horizontally and gently shake it 5 to 6 times to evenly distribute the toner inside CAUTION Uneven toner distribution may degrade p...

Страница 108: ...acing the EP Cartridge 6 Open the front cover as indicated 7 While holding the orange handle with one hand gently push the cartridge all the way into the printer NOTE Do not touch any parts inside the...

Страница 109: ...reak possibly rendering the cartridge unusable 9 Close the front cover and the upper left cover The upper left cover can be closed only when the EP cartridge is inside the printer If you have not inst...

Страница 110: ...geMaster 450 User Guide Replacing the EP Cartridge Replacing the EP cartridge when options are installed 1 If the duplex printing unit is installed pull on its latch to open it 2 Hold the latch and op...

Страница 111: ...le lever on the cartridge to gently take it out Then hold the handle and completely remove the cartridge Be careful about the toner falling out then wrap the used EP cartridge in its original packing...

Страница 112: ...ve paper sheet from the drum shutter 6 Hold the EP cartridge horizontally and gently shake it 5 to 6 times to evenly distribute the toner inside CAUTION Uneven toner distribution may degrade print qua...

Страница 113: ...ted 8 While holding the orange handle with one hand gently push the cartridge all the way into the printer NOTE Do not touch any parts inside the printer Make sure the cartridge is seated properly WAR...

Страница 114: ...ndering the cartridge unusable 10 Close the front cover and the upper left cover NOTE The upper left cover can be closed only when the EP cartridge is inside the printer If you have not installed the...

Страница 115: ...e duplex printing unit Replacing the Fuser The fuser becomes very hot during operation Never touch the fuser area where a label indicating high temperature is located such as that shown below or else...

Страница 116: ...Sep 01 5 14 Compuprint PageMaster 450 User Guide Replacing the Fuser 1 Open the upper left cover 2 Open the front cover...

Страница 117: ...r 450 User Guide 5 15 Replacing the EP cartridge when options are installed 3 Loosen the two locking screws indicated You cannot remove them completely 4 Hold the two rings indicated and pull out the...

Страница 118: ...p 01 5 16 Compuprint PageMaster 450 User Guide Replacing the Fuser 5 Prepare a new fuser While holding the two rings of the new fuser push into the printer as indicated 6 Tighten the two locking screw...

Страница 119: ...screws 8 Using a coin or a flat head screwdriver with a wide blade turning in a counter clockwise direction loosen the two metal fuser shipping screws The two metal fuser shipping screws MUST be remov...

Страница 120: ...Sep 01 5 18 Compuprint PageMaster 450 User Guide Replacing the Fuser 9 Completely remove and discard the two metal fuser shipping screws 10 Close the front cover and then the upper left cover...

Страница 121: ...idge when options are installed Replacing the Transfer Roller 1 Open the upper left cover 2 Lift up the handles to unlock the transfer roller Never touch the fuser area where a label indicating high t...

Страница 122: ...eed Rollers 3 Remove the transfer roller 4 Insert a new transfer roller and press down to hold the roller in place 5 Push the handles to lock the transfer roller in place Replacing the Feed Rollers Af...

Страница 123: ...Guide 5 21 Replacing the EP cartridge when options are installed 1 Remove the top cassette from the printer unit 2 While pressing the white tab remove the lower feed roller NOTE Be sure not to remove...

Страница 124: ...er 450 User Guide Replacing the Feed Rollers 3 Flip down the cover and remove the upper two rollers with the same steps described earlier 4 While pressing the white tab remove the upper two rollers 5...

Страница 125: ...Sep 01 Compuprint PageMaster 450 User Guide 5 23 Tray 5 HCF Unit 6 Inset a new lower feed roller Tray 5 HCF Unit 1 Remove the Tray 3 2 Pull out the Tray 5...

Страница 126: ...the Feed Rollers 3 Pull the roller cover towards you 4 While pressing the white tab remove the three feed rollers NOTE Be sure not to remove the coupling behind the feed roller 5 Insert the three new...

Страница 127: ...5 25 Tray 4 HCF Unit Tray 4 HCF Unit 1 Pull out the left tray 2 Open the lower left cover Press down the roller cover 3 While pressing the white tab remove the three feed rollers NOTE Be sure not to...

Страница 128: ...ter as described below WARNING Before cleaning the printer or performing any other maintenance tasks be sure to turn off the printer and disconnect the power cord from the AC outlet Not doing so may c...

Страница 129: ...soft cloth slightly moistened with water For stubborn stains soak the cloth in a mild detergent solution before cleaning Finish by wiping the printer with a soft dry cloth Check the interior of the pr...

Страница 130: ...oting and turn off the printer properly Preparing the Printer for a Period of Extended Non Use If the printer will not be used for one week or more perform the following steps WARNING Never touch the...

Страница 131: ...eck the interior of the printer 1 Turn off the printer by setting the power switch to the 0 position If any error message or status code appears see Chapter 6 Troubleshooting and turn off the printer...

Страница 132: ...per cassette consumables and paper is about 106 lbs Never attempt to lift the printer by yourself The printer should always carried by two persons To carry the printer grasp the four bottom corners fr...

Страница 133: ...distance put the printer in its original shipping carton and other packing materials 1 Turn off the printer by setting the power switch to the 0 position If any error message or status code appears se...

Страница 134: ...3 Remove any paper from the multi bypass feeder as well as all the paper cassettes Store the paper in a location that is not humid and dusty For more information see Appendix B Safety Notes and Regu l...

Страница 135: ...er If the printer is moved with the cartridge inside toner may spill out and soil the printer NOTE Replace the EP cartridge in its original packing material or wrap it in a thick lint free cloth 6 If...

Страница 136: ...Sep 01 5 34 Compuprint PageMaster 450 User Guide Relocating the Printer...

Страница 137: ...About this Chapter on page 6 2 Solving Printer Power on Problems on page 6 2 Solving Print Quality Problems on page 6 3 Clearing Paper Jams on page 6 6 Control Panel LCD Messages on page 6 17 Etherne...

Страница 138: ...ng the printer or performing any other maintenance be sure to turn the printer off O and disconnect the power cord from the AC outlet to prevent the risk of electric shock DESCRIPTION POSSIBLE CAUSE R...

Страница 139: ...oad new dry media EP cartridge is old or damaged Replace EP cartridge See Chapter 5 Printer Consumables Cleaning and Maintenance Toner in EP cartridge is low Black dots Print media is outside recommen...

Страница 140: ...ack page EP cartridge is old or damaged Replace EP cartridge See Chapter 5 Printer Consumables Cleaning and Maintenance High voltage power supply may be defective Contact Compuprint to arrange for a t...

Страница 141: ...5 Printer Consumables Cleaning and Maintenance Print media is moist Remove moist media and load new dry media See Chapter 5 Printer Consumables Cleaning and Maintenance Plotted print Print media is o...

Страница 142: ...Print density setting is not appropriate Adjust print density See Chapter 5 Printer Consumables Cleaning and Maintenance EP cartridge is old or damaged Replace EP cartridge See Chapter 5 Printer Consu...

Страница 143: ...User Guide 6 7 Clearing Paper Jams from Area A 2 Pull on the latch to open the upper left cover If the optional face up tray is installed instead of the duplexer lift to unhook and remove the face up...

Страница 144: ...w If the paper is jammed at the fuser area pull it out carefully without touching the fuser If it becomes difficult to pull out the paper turn the knob continuously in the direction of the arrow until...

Страница 145: ...earing Paper Jams from Area A If the paper is jammed at the indicated location pull it out in the direction of the arrow 4 Open the cover inside the duplexer 5 Remove any paper jam found by pulling ou...

Страница 146: ...User Guide Clearing Paper Jams 6 Close the cover inside the duplexer 7 Close the duplexer NOTE When closing the duplexer do not use the latch on the cover Instead follow the instruction label on the c...

Страница 147: ...r 450 User Guide 6 11 Clearing Paper Jams from Area B 8 Close the duplexer or reinsert the face up tray as appropriate Clearing Paper Jams from Area B 1 Pull on the latch to open the cover to Area B 2...

Страница 148: ...splay of the control panel for information about a possible jam in a paper tray Clearing Paper Jams from Area C 1 Pull on the latch to open the cover to Area B 2 Remove any paper jam found 3 If the pa...

Страница 149: ...ms from Area E Clearing Paper Jams from Area E Lift the handle of the Stapler Stacker docking cover and remove any jammed paper found Clearing Paper Jams from Area F Open the cover of the Stacker Stap...

Страница 150: ...e paper feed area and carefully pull out any jammed paper found there Clearing Paper Jams from Tray 2 Pull out Tray 2 Check the paper feed area and carefully pull out any jammed paper found there Clea...

Страница 151: ...PageMaster 450 User Guide 6 15 Clearing Paper Jams from Trays 3 4 and 5 in the HCF unit 2 Pull out Trays 4 and 5 3 Check the paper feed area of Tray 5 and remove any jammed paper found 4 Carefully cl...

Страница 152: ...r Jams Clearing Paper Jams from the Multi Bypass Feeder MBF 1 Remove the jammed paper by pull it out in the direction of the arrow as shown 2 Remove all the paper and load the stack again Clearing Pap...

Страница 153: ...D Messages LCD messages involving troubleshooting are classified into nine numeric code classes 1 through 9 and an additional alphanumeric class These code classes have no significance to you as a use...

Страница 154: ...ay 2 trouble see note 1 Ensure that Tray 2 is loaded correctly and securely closed 1 3 FEED ERROR AREA A TRAY 1 Tray 1 paper misfeed Clear paper misfeed from Tray 1 Area A 1 3 LVPS FAN CALL SERVICE LV...

Страница 155: ...REQUIRED ACTION 3 1 NO CARTRIDGE RESET TONER CART Toner cartridge not set correctly Reset Toner Cartridge 3 1 FEED ERROR AREA B TRAY 3 Tray 3 paper misfeed Clear paper misfeed from Tray 3 or Area B 3...

Страница 156: ...Clear paper misfeed from Tray 4 Area C or Area B 4 2 FUSER ERROR CALL SERVICE Fuser overheat trouble detected Service Call required 4 2 IRREG PAPER CHECK TRAY 2 Irregular paper in Tray 2 see note 1 En...

Страница 157: ...er jam in Area E 4 12 FINISH JAM CLEAR AREA E Paper didn t reach TRANSPORT entry sensor in specified time after passing fuser exit sensor Clear paper jam in Area E 4 13 FINISH JAM CLEAR AREA E TRANSPO...

Страница 158: ...r Clear paper jam in Area G 4 42 FINISH JAM CLEAR AREA G Paper did not reach finisher path sensor Open finisher front cover Clear paper jam in Area G 4 46 FINISH JAM CLEAR AREA G Remaining paper detec...

Страница 159: ...rom Tray 5 Area C or Area B 5 3 FEED ERROR AREA A AREA B Tray 5 paper misfeed Clear paper misfeed from Tray 5 Area A or Area B 5 4 FEED ERROR AREA C TRAY 5 Tray 5 paper misfeed Clear paper misfeed fro...

Страница 160: ...ER OPEN CLOSE COVER C HCF cover C open Close HCF cover C 6 1 TONER EOL REPLACE TONER Toner Cartridge end of life Replace Toner Cartridge 6 1 FEED ERROR CLEAR DUPLEXER Paper misfeed from duplexer Clear...

Страница 161: ...CE Cannot Read Write HCF NVM Service Call required 7 4 HCF ERROR CALL SERVICE HCF NVM failure Service Call required 7 7 HCF ERROR CALL SERVICE Communications error between MCU and HCF see note 2 Check...

Страница 162: ...ed from or Area A Area B or Tray 2 8 2 PAPER JAM CLEAR DUPLEXER Paper jam in Duplexer Clear paper jam in Duplexer 8 3 TONER CART RESET TONER CART CRUM read write error Reset Toner Cartridge 8 3 FEED E...

Страница 163: ...2 CAUSE OF ERROR MESSAGE REQUIRED ACTION 9 1 FEED ERROR CHECK ENVELOPE ENV OUT sensor time out Clear paper misfeed from Envelope Feeder 9 2 FEED ERROR CHECK MBF MBF T A roll 1 sensor time out Clear pa...

Страница 164: ...EGAL OR LOAD A4 OR ETC No Paper in Tray 3 Add indicated paper size to Tray 3 PAPER OUT TRAY 4 LOAD LETTER OR LOAD LEGAL OR LOAD A4 OR ETC No Paper in Tray 4 Add indicated paper size to Tray 4 PAPER OU...

Страница 165: ...inisher Ethernet Network Interface Troubleshooting This section offers various troubleshooting procedures and technical support advice for the Ethernet net work interface Power Up Troubleshooting Ther...

Страница 166: ...b list If an entry does not appear refer to the appropriate host section in this Appendix Use the Monitor Port n Counters command to verify that the counter is incrementing with each job If it is not...

Страница 167: ...s name and hardware address must be in this file for the host to answer a RARP request The network interface s name and IP address in the etc hosts file The network interface s name and IP address mu...

Страница 168: ...hase or Technical Support as listed in Appendix A When you report a problem please provide the following information Your name and your company name address and phone number Printer model number Print...

Страница 169: ...ng DRAM DIMMs FLASH DIMMs and Power on Files In this Chapter About this Chapter on page 7 2 Installing DRAM Memory DIMMS on page 7 2 Installing a FLASH DIMM Module on page 7 5 Using the Power On Files...

Страница 170: ...scribes the procedures for installation of DRAM memory DIMMs and FLASH DIMM mod ules Downloading software to the FLASH DIMM module is also discussed in this chapter Installing DRAM Memory DIMMS 1 Ensu...

Страница 171: ...l loose and gently pull controller assembly towards you to remove from printer 4 Carefully insert a DRAM DIMM which is compatible with your printer into any available DRAM DIMM slot as shown below Whe...

Страница 172: ...Installing DRAM Memory DIMMS 5 Reinstall the controller assembly Once firmly in place push and hand tighten the thumbscrews in a clockwise direction 6 Connect the power cord to the wall outlet 7 Turn...

Страница 173: ...MM Module 1 Ensure that the printer power switch is set to the OFF O position 2 Disconnect the power cord from the wall outlet 3 Turn thumbscrews on controller assembly counterclockwise until loose an...

Страница 174: ...low When properly seated gently push down on the DIMM until the white braces close onto the ends of the DIMM NOTE To remove the FLASH DIMM pull the white braces away from the ends of the DIMM until th...

Страница 175: ...n page 4 20 and DISK Menu on page 4 21 Power on files can contain either PCL or PostScript language content Examples of power on files include soft fonts and macro overlay definitions The FLASH DIMM c...

Страница 176: ...8 Compuprint PageMaster 450 User Guide Using the Power On Files Feature NOTE Contact the technical support team at your point of purchase for additional information regarding loading and using power...

Страница 177: ...Sep 01 Appendix A General Information About this Appendix on page A 2 Specifications on page A 2 Printable Area on page A 3...

Страница 178: ...inting max 46 dB During standby max 36 dB Power requirements 100V type 100 V AC min 90 V max 110 V 50 60 Hz Power consumption During operation max 580 W 110 V type Temperature range for operation 50 t...

Страница 179: ...EP cartridge away from CRT disk drive floppy drive or any magnetic objects Keep the EP cartridge out of reach of children To order an EP cartridge contact your point of purchase Printable Area Normal...

Страница 180: ...Sep 01 A 4 Compuprint PageMaster 450 User Guide Printable Area...

Страница 181: ...Sep 01 Appendix B Safety Notes and Regulatory Compliances In this Chapter About this Appendix on page B 2 Safety Notes on page B 2 Regulatory Compliances on page B 4...

Страница 182: ...nce Access to a live machine s interior can cause a shock hazard When the machine is not used over an extended period of time switch it off and unplug it If an unused machine is left connected to a po...

Страница 183: ...se Place the machine on a level and sturdy surface that can withstand the machine weight If tilted the machine may fall over and cause injuries The machine weighs about 48kg When carrying the equipmen...

Страница 184: ...mes very hot in operation If a paper jam has occurred turn the power off and wait at least 40 minutes before removing the drum cartridge and touching the fuser section When clearing a jammed paper tha...

Страница 185: ...me the cause of radio interference Read the instructions for correct handling This regulation applies only to Japan This printer is certified as a Class 1 laser product under the U S Department of Hea...

Страница 186: ...t PageMaster 450 User Guide Regulatory Compliances Reorientate the TV and or radio antennas and cables until the interference stops For an outdoor antenna ask your local electrician for support Use co...

Страница 187: ...Sep 01 Appendix C Printing Font Summaries In this Chapter About this Appendix on page C 2 Printing a Font Summary on page C 2 PostScript Font Summary on page C 3 PCL Font Summary on page C 7...

Страница 188: ...hese steps 1 From the Ready status press MENU the control panel display will read Menu Paper Menu 2 Press PREVIOUS or NEXT until the display reads Menu Functions 3 Press SELECT the display will read F...

Страница 189: ...Sep 01 Compuprint Page Master 450 User Guide C 3 PostScript Font Summary...

Страница 190: ...Sep 01 C 4 Compuprint Page Master 450 User Guide PostScript Font Summary PostScript Font Summary cont d...

Страница 191: ...Sep 01 Compuprint Page Master 450 User Guide C 5 PostScript Font Summary cont d PostScript Font Summary cont d...

Страница 192: ...Sep 01 C 6 Compuprint Page Master 450 User Guide PostScript Font Summary PostScript Font Summary cont d...

Страница 193: ...Sep 01 Compuprint Page Master 450 User Guide C 7 PostScript Font Summary cont d PCL Font Summary...

Страница 194: ...Sep 01 C 8 Compuprint Page Master 450 User Guide PCL Font Summary PCL Font Summary cont d...

Страница 195: ...Sep 01 Appendix D Frequently Used Ethernet Commands In this Chapter About this Appendix on page D 2 Server Commands on page D 3 Protocol Commands on page D 6...

Страница 196: ...ppendix the NIC is referred to as the Server Commands are divided into Server general Port and Protocol sections Within each section com mands are listed alphabetically Commands may require privileged...

Страница 197: ...t prompting for a password DEFINE SERVER IPADDRESS ipaddress Sets the Server s network IP address DEFINE SERVER LOADHOST ipaddress Specifies the TCP IP host from which the Server requests its run time...

Страница 198: ...ether the named service can be used to service networks running the specified protocol RTEL applies to TCP IP networks LAT EN DIS NETWARE EN DIS RTEL EN DIS DEFINE SERVICE name option BANNER EN DIS Wh...

Страница 199: ...s flash ROM LOGOUT option nothing Logs out the current port the port that issued the command PORT num Logs out the specified port PURGE SERVICE option LOCAL Removes the definitions of all local servic...

Страница 200: ...nection attempts DEFINE PROTO LAT option EN DIS Enables or Disables the LAT protocol for the Server DEFINE PROTO NETWARE option EN DIS Enables or Disables the NetWare IPX protocol for the Server DSCON...

Страница 201: ...HOST server on page D 3 PURGE PROTO NETWARE ACCESS option ALL Removes all entries from the NetWare access list server Removes entries from the NetWare access list that are related to the specified fil...

Страница 202: ...Sep 01 D 8 Compuprint Page Master 450 User Guide Protocol Commands...

Отзывы: