background image


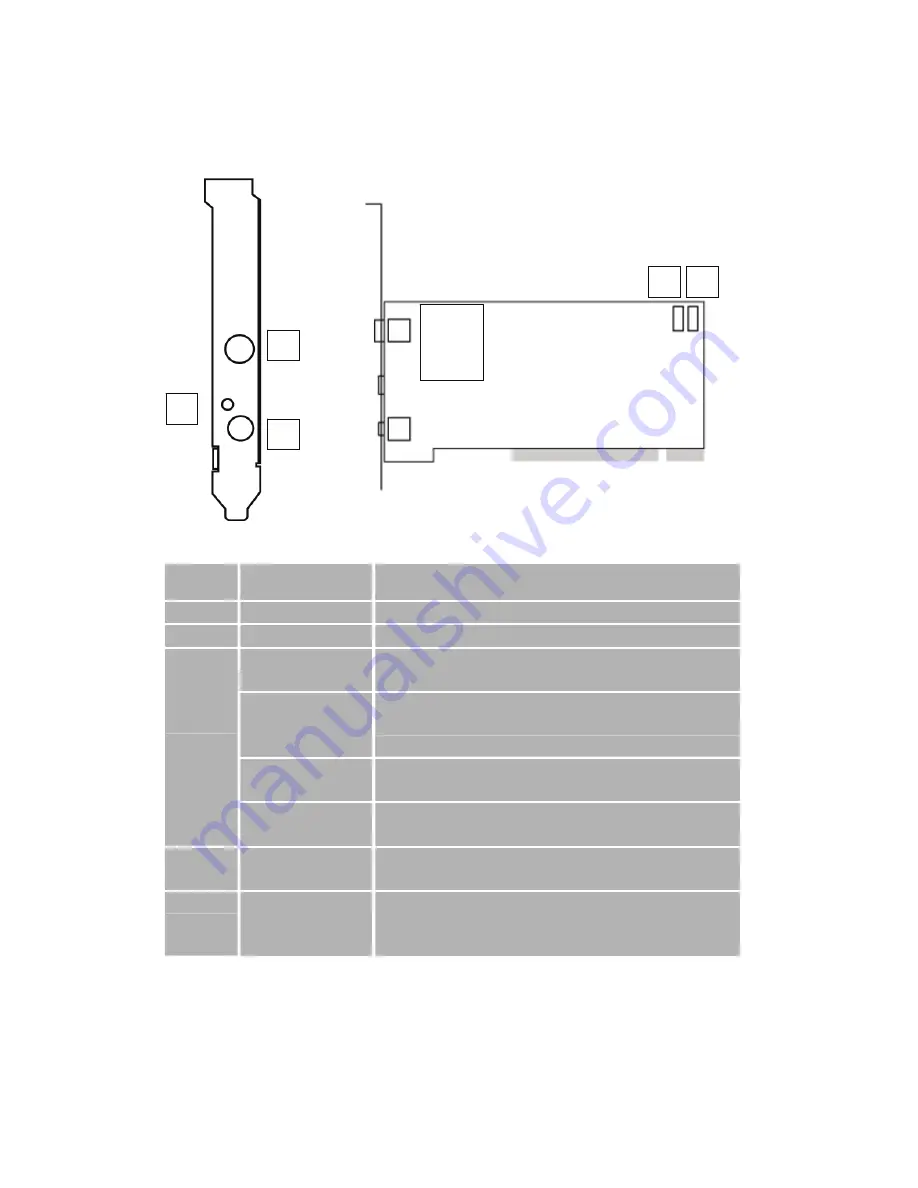
VideoMate Vista T220 Connectors 


Item   Function  

Description  

TV Tuner-In 

Connect to a TV antenna or TV cable feed.   

IR 

Connect the IR receiver here.   

Audio-In (Blue)  Use an audio patch cable to connect to an audio 

source, such as a VCR, DVD or VCD.   

External 
Audio-Out 
(Green) 

Use the supplied audio patch cable to connect to 
the Line-In port of your sound card.   

S-Video-In 
(Black) 

Use an S-Video patch cable to connect to a 
video source, such as a VCR, DVD or VCD.   

(1 to 4 

converter 

cable) 

Composite-In 
(Yellow) 

Use a Composite video patch cable to connect to 
a video source, such as a VCR, DVD or VCD.   

To Case Power 
Switch 

Connect the ATX Power Switch cable of your 
computer case here.   

To Mainboard 
Power Switch 
Connector 

Use the supplied power switch patch cable to 
connect to the ATX Power Switch pins on the 
mainboard.  

4  5 

3

1

Содержание VISTA T100 - START UP GUIDE

Страница 1: ...VideoMate Vista T220 T100 PCI DVB T Tuner Card Start Up Guide Compro Technology Inc www comprousa com ...

Страница 2: ... of this document may be copied or reproduced in any form or by any means without the prior written consent of Compro Technology Inc Compro VideoMate Poladyne Play with Power and the Compro logo are trademarks of Compro Technology Inc Other names and marks are trademarks of their respective owners Compro makes no warranties with respect to this documentation and disclaims any implied warranties of...

Страница 3: ...ideo cameras to your PC MINIMUM SYSTEM REQUIREMENTS Your PC must meet or exceed the following system requirements to watch TV on your PC z PIII 1 7 GHz or equivalent CPU for DVD Quality recording or timeshifting z 512 MB System Memory z Sound card z Open PCI 2 2 or above slot z CD ROM drive for software installation z Windows XP SP2 or Vista x86 x64 z 150 MB free disk space for basic software inst...

Страница 4: ...trial TV broadcast uses about the same wave UHF as analog TV It s recommended to have a fishbone like antenna on the roof for receiving More details can be found in the troubleshooting chapter of this manual Digital TV broadcast is different than normal analog TV You will see no picture instead of noisy or blurred picture when the signal is too weak Make sure you have a good antenna and strong dig...

Страница 5: ...00 Package Contents Vista T220 TV card IR cable Installation CD Start Up Guide Windows Media Center remote Power switch patch cable Batteries 4 in 1 Audio video patch cable Vista T100 TV card IR cable Installation CD Start Up Guide Windows Media Center remote ...

Страница 6: ...onnect to the Line In port of your sound card S Video In Black Use an S Video patch cable to connect to a video source such as a VCR DVD or VCD 3 1 to 4 converter cable Composite In Yellow Use a Composite video patch cable to connect to a video source such as a VCR DVD or VCD 4 To Case Power Switch Connect the ATX Power Switch cable of your computer case here 5 To Mainboard Power Switch Connector ...

Страница 7: ...Description 1 TV Tuner In Connect to a TV antenna or TV cable feed 2 IR Connect the IR receiver here 3 S Video In Black Use an S Video patch cable to connect to a video source such as a VCR DVD or VCD S video cable not included in this package 2 3 1 ...

Страница 8: ... setup 3 Locate the ATX power switch pins on your computer case and trace the wires to the power switch connector on your mainboard The ATX power switch cable is normally a twisted pair cable with a two pin connector as shown above Note On the mainboard the ATX power switch pins are usually labeled POWER SW or similar It is vital to remember the position of these pins for a later step in the insta...

Страница 9: ...patch cable to the TV tuner card and the black end to the mainboard Power Up Scheduling is not required for using VideoMate Vista T220 PCI card If you don t want to use Power Up Scheduling from the Windows Shut down state you can skip the power switch circuit connections in other words you can skip Power Up Connections in steps 3 through 6 You can still use scheduled recording from Standby mode or...

Страница 10: ...e computer before 3 54 in order to let Power Up start the computer Power Up from Windows Shutdown mode i e ACPI S5 state requires z An ATX power supply in your PC z Motherboard support for PCI Express x1 in order to have 3 3V standby power z ATX powers switch cable which is a pair of twisted wires with a two wire connector as shown to the right If you don t have the above items you can still use P...

Страница 11: ...vers and ComproDTV 4 or choose Custom to install selected item by item We also provide the DirectX 9 and Acrobat Reader 6 0 software on the installation CD you can explorer the CD folder and install them by your need Step 3 If you see the Windows Logo testing message below please press Continue Anyway to proceed Press Next to install ComproDTV 4 Windows Media Format 9 Series Runtime Step 4 After e...

Страница 12: ...o VideoMate Vista T220 bundles the easy to use Microsoft certified remote control to controls the Windows Media Center and also ComproDTV software Some keys are special designed for Windows Vista Premium Ultimate it may not be used in Windows XP system ...

Страница 13: ...ub MCE 20 Up arrow or select Mono Stereo SAP Up arrow 21 Replay or switch TV format Left arrow 22 Down arrow or snapshot Down arrow 23 Advance in Timeshifting Right arrow 24 OK OK 25 EPG US only Back 26 Media Center Media Center 27 Zoom In Out More 28 Volume up Volume up 29 Volume down Volume down 30 Mute Mute 31 Channel up Channel up 32 Channel down Channel down 33 Record Record 34 Stop Live Stop...

Страница 14: ... also ComproDTV software Some keys are special designed for Windows Vista Premium Ultimate it may not be used in Windows XP system 39 Timeshift Play Pause Play Pause 40 Change scale of screen Skip Forward 41 42 Channel surf 43 Sleep function Clear 44 Zoom 45 Playlist Enter 46 C C Language Red 47 ComproDVD Green 48 ComproDTV Yellow 49 ComproFM Blue 50 Setup Teletext on off ...

Страница 15: ...Back Guide Menu 10 OK OK 11 Up Up Mono SAP Stereo 12 Down Down snapshot 13 Right Right forward 14 Left Left backward 15 Play Pause Play Pause Timeshift 16 Play Pause Play Pause Timeshift 17 Stop Live Stop Live 18 Record Record 19 Fast Forward Fast Forward 20 Skip Forward Aspect Ratio 21 Skip Rewind Last Channel 22 Rewind Rewind 23 DVD Menu MCE No function 24 Live TV MCE Live TV MCE 25 Zoom MCE Com...

Страница 16: ... the instructions of the installation guide You will be able to use Remote Power On Off immediately Remote Power On Please put batteries in the remote control Pressing the power button which is on the top of remote control it will start your computer If the computer does not start up you may have to install the TV card s driver correctly and set a schedule first in order to use this feature Note Y...

Страница 17: ... mouse to press the cancel button Press OK to immediately shutdown the computer When watching TV i e ComproDTV 4 is running Just press the CLEAR button on the lower left corner on the remote keypad repeatedly you will see the text on the screen turns to SLEEP OFF SLEEP ON 30 MINUTES SLEEP ON 1 HOUR SLEEP ON 2 HOURS and SHUTDOWN When the text shows SHUTDOWN it will countdown 20 seconds to shutdown ...

Страница 18: ...lease right click the mouse button and select the video source you want UI Control DTV Gadget has three modes including Live TV mode display playlist and display scheduled list The buttons from left to right sides are Channel down in live TV mode Start Stop Live TV Play pause from playlist Channel Up in live TV mode Start stop record live TV Mute Playlist mode It just displays first eight files in...

Страница 19: ... has three modes the undocked gadget only support live TV playback video mode and its size is bigger than docked one You can direct drag the gadget window to the other place out the sidebar and shows the bigger undock window to watch TV or playback recorded video files Because undocked gadget lacks playlist if you wants to play a file in undocked mode you can drop a file into the window of gadget ...

Страница 20: ... to select capture devices when running gadget first time or having more than one device this item is needed z Quality setting to select recording quality Normal Better Best Quality z Record folder a directory to place recorded files z Snapshot folder a directory to place picture ...

Страница 21: ...u can choose the Option to enter the setup window Setup Step 1 Choose the type of your remote control There are many type of remote from Compro please select the remote picture as you have Step 2 Choose one IR function you want to change Image below shows the remote for Vista T220 Step3 Set the IR dialog you want and press OK button ...

Страница 22: ...ave any Windows Media Center system in your PC such as Windows MCE Vista Premium Vista Ultimate this function can replace the windows remote control HID can also combine the Compro software control in the MCE interface to make you more convenient Open and close the ComproDTV 4 display panel You can open and close the ComproDTV 4 display window by click the down arrow on the right of ComproDTV pane...

Страница 23: ...op S Record R and Record Option Channel Up Page Up with Quick Channel list I Play P Pause U Volume Mute M Num Pad W Close CTRL X Docking D Full Screen Z Help H Minimize G Timeshift bar Rewind Left Arrow Fast Forward Right Arrow Digital TV Signal Strength Volume Mute M Option Channel Surf F Timeshift T Snapshot Space Schedule B Video Source V Left Right Audio Switch Reduce Window F2 Close All Windo...

Страница 24: ...V Settings This option gives you the way to manually set the method of scanning TV programs Select your choice here or use default channel table to do the scanning Autoscan The first time you start ComproDTV 4 Autoscan will automatically scan for available TV channels for TV signals Please select your TV source from digital antenna You can rescan the channels at any time by pressing the Autoscan b...

Страница 25: ... can do more changes on the channel s property by right click the mouse on the Description field of the channel you wish to edit Custom Settings for each channel You can customize each channel properties by click the icon in Custom Settings filed and edit it In the channel property settings you can setup video color and noise reduction level de interlacing level for each channel noise reduction le...

Страница 26: ...ams on one frequency Therefore ComproDTV 4 in Vista T220 T100 TV card supports up to 1 main DVB T channel windows 3 sub channel windows and playback recorded video file at the same time if available You can press the Add Reduce Window button to open a slave window for that Please see the following picture Main window has all features while slave window has limited functions only Double click on th...

Страница 27: ...ideo screen for different type monitors the Aspect Ratio setting provides 4 3 16 9 1 85 1 2 35 1 and customize for different resolutions Also you can Zoom In Out the video display screen to standard or 1 2X 2X 4X size Zooming image If you would like to see more details on a certain part of a video image you can press the mouse right button to drag a zone of the screen You will see the zoomed image...

Страница 28: ... save it automatically and show the file name on the screen You can also use the schedule recording by press Schedule button on control panel of ComproDTV 4 Timeshifting Timeshifting temporarily saves the video to your hard disk for a specified period of time so that you can pause replay or skip commercials during live TV without interrupting an ongoing recording session Press the Timeshifting but...

Страница 29: ...ure and TV tuner drivers If you have problems watching recording or timeshifting live TV please check the status of the drivers with Device Manager You should see VideoMate TV SAA7130 Hybrid Capture Device drivers in the Sound video and game controllers section of Windows Device Manager If these drivers are not there uninstalling and reinstalling the VideoMate DVB T PCI card drivers can help Use t...

Страница 30: ...s TV set can receive a good TV signal If the picture is not clear the digital terrestrial TV broadcast signal is about the same The difference is when the program data is not sufficient you may see a blank screen or the video will be scrambled Note Digital TV broadcast is different than normal analog TV You will see no picture instead of noisy or blurred picture when the signal is too weak Make su...

Страница 31: ...e the VideoMate Vista T220 PCI card and troubleshoot PC start up Remember to correctly reconnect the power switch cables 3 Some external software may be interfering with ComproDTV 4 Shutting down unnecessary software can help 4 The ComproDTV 4 Scheduler shortcut is missing from the Programs Startup folder Reinstalling ComproDTV 4 can help Video OK No Audio If you can view the TV picture but get no...

Страница 32: ...receiver Contacting Compro Technical Support Before you submit an email for support please check support FAQs on our web site http www comprousa com en supports html You can download the latest update from our website Many issues should be solved on the newer version When contacting Compro for technical support please use the Compro support request form and provide as much of the requested informa...

Отзывы: