


Repair and Replacement
4–15
Disconnecting the Faulty Fiber-Optic Cable
NOTE:
To replace the ISL cable, it is not necessary to power down the switch elements before
disconnecting ISL cables.
1. Disconnect each end of the damaged ISL cable by firmly grasping the connector
housing and pulling the cable from the GBIC. Do not remove the GBIC.
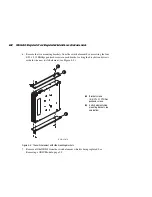
2. Remove the damaged ISL cable from the switch element.
3. Check the switches and the fabric to ensure correct operation.
Connecting the New ISL Cable to the Appropriate Ports
Use these steps to connect the new ISL cable.
1. Determine the switch element and port number for connecting each end of the new ISL
cable. You can find this information by:
a. Checking the labels from the removed cable.
b. Looking at the SAN Integrated Switch to physically locate the open ISL ports and
the associated switch elements.
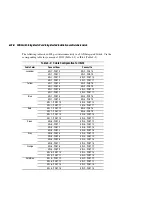
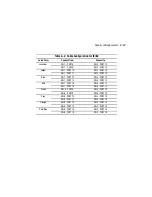
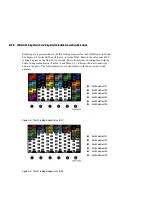
c. Checking the color-coded cable diagram inside your SAN Integrated Switch (see
Figure 4–5 and Table 4–2 for the IS/32; and Figure 4–6 and Table 4–3 for the
IS/64).
2. Make sure both ends of the new cable are labeled correctly.
3. Line up the keyed cable connector with the notch in the GBIC of the appropriate port
and switch element.
4. Insert the cable connector into the GBIC until the cable connector is firmly seated.
5. Repeat steps 3 and 4 for the other end of the cable.
6. Place the new ISL cable in the cable guide at the top of the SAN Integrated Switch, for
organized cable management.
Checking the Switch Element and Fabric for
Port or ISL Issues
To check that the proper connections have been made, and the switch elements and fabric
are operating correctly, follow the procedures documented in Chapter 3.
■
Checking Each Switch Element for Port or ISL Issues, page 3-10
■