background image

6

   R

EPLACING


THE

 H

ARD

 D

RIVE

III. Removing the Hard Drive

To remove the hard drive, complete the following procedure.

1. Turn the computer on its side (open side facing up).

2. Locate the hard drive inside the chassis wall at the front of the computer.

Note: 

Your hard drive has icons and markings inside the chassis to make identifying parts easy. Look at the replacement part carefully to 

help identify and locate the component to be replaced.

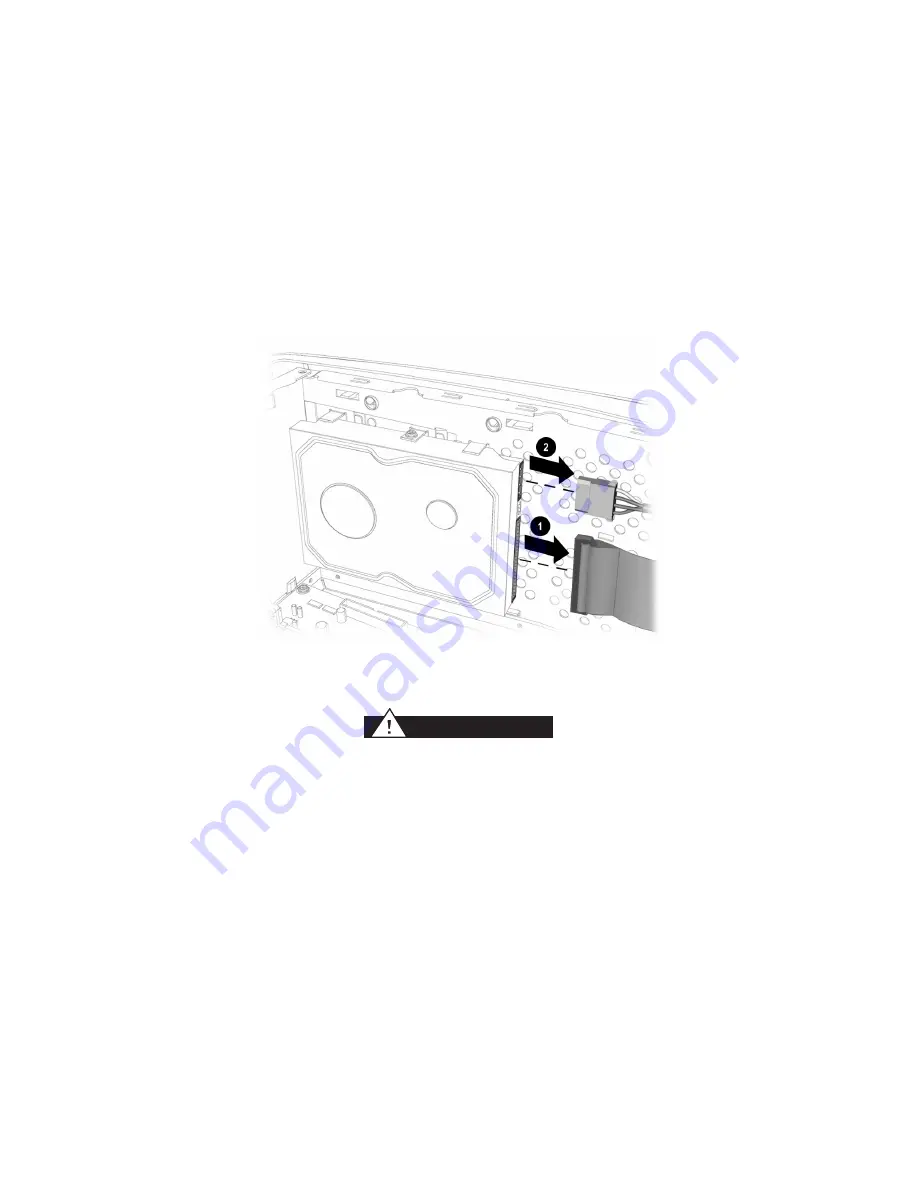
3. Disconnect the hard drive data cable 

1

 and power cable 

2

 using a gentle rocking motion (see Figure 3-1).

Note: 

The hard drive data cable has a blue pull tab to help you identify the cable.

Figure 3-1

If you leave the computer at any time during the removal and replacement procedure, remember to touch 
some part of the metal chassis before resuming the procedure.

Warning

Содержание Presario Series

Страница 1: ...End User Replaceable Parts Program Replacing the Hard Drive ...

Страница 2: ...IENT IN NO EVENT SHALL COMPAQ BE LIABLE FOR ANY DIRECT CONSEQUENTIAL INCIDENTAL SPECIAL PUNITIVE OR OTHER DAMAGES WHATSOEVER INCLUDING WITHOUT LIMITATION DAMAGES FOR LOSS OF BUSINESS PROFITS BUSINESS INTERRUPTION OR LOSS OF BUSINESS INFORMATION EVEN IF COMPAQ HAS BEEN ADVISED OF THE POSSIBILITY OF SUCH DAMAGES THE FOREGOING SHALL APPLY REGARDLESS OF THE NEGLIGENCE OR OTHER FAULT OF EITHER PARTY AN...

Страница 3: ...lation instructions is provided for configuring your computer after you install your replacement hard drive The QuickRestore CD ships separately from the replacement hard drive If you did not receive a QuickRestore CD after your initial call to service call 1 800 984 9350 Special Recommendations All upgrades and repairs should be performed on a hard scratch resistant surface Upgrading and repairin...

Страница 4: ...en click Shut Down The Shut Down Windows dialog box is displayed Select Shut Down from the drop down list and click OK to turn the computer off 3 Disconnect all peripheral device cables from the computer 4 Disconnect the power cord from the electrical outlet 1 and computer 2 see Figure 1 2 Figure 1 2 Failure to disconnect the power from the computer may result in personal injury Warning ...

Страница 5: ... panel Grab the handle on the side panel and slide the side panel from the chassis 2 see Figure 2 1 Figure 2 1 m Caution Before doing any work inside your computer ground yourself by touching a metal part of the chassis Note Should the latch fail to move when pressed downward check to see if there is a shipping screw above the latch If so remove the screw ...

Страница 6: ...hassis to make identifying parts easy Look at the replacement part carefully to help identify and locate the component to be replaced 3 Disconnect the hard drive data cable 1 and power cable 2 using a gentle rocking motion see Figure 3 1 Note The hard drive data cable has a blue pull tab to help you identify the cable Figure 3 1 If you leave the computer at any time during the removal and replacem...

Страница 7: ... for your replacement drive see Figure 3 2 Figure 3 2 Important Keep the screw that secured the defective hard drive to the chassis You will need it for your replacement drive 5 Tilt out the side of the drive that was screwed to the chassis then lift out the entire drive see Figure 3 3 Figure 3 3 ...

Страница 8: ... hard drive may cause damage to the hard drive and or loss of data 1 Slide the three holes on the bottom of the replacement hard drive over the three tabs 1 on the chassis Ensure that the center screw hole on the top side of the hard drive is aligned with the center bracket on the chassis 2 and push the drive into place flat against the chassis 3 see Figure 4 1 Figure 4 1 2 Replace the screw secur...

Страница 9: ... Figure 4 3 V Replacing the Side Access Panel and Connecting the Power 1 Align the tabs on the top and bottom of the side access panel with the slots on the top and bottom edge of the chassis and slide the side access panel 1 into place Connect the power cord to the computer 2 and the electrical outlet 3 see Figure 5 1 Figure 5 1 ...

Страница 10: ...ctions provided with the CD Note You do not need to return the QuickRestore CD when returning your defective hard drive 4 If the problem persists repeat the Removing and Replacing procedures 5 If you are still experiencing problems contact Compaq Support 1 800 984 9350 VII Returning the Defective Part Please refer to the Compaq Part Return Instructions that came with your replacement part for inst...

Страница 11: ......

Страница 12: ...compaq com 238173 001 ...

Отзывы: