background image

8

    Upgrading and Servicing Guide 

If you are not replacing the old add-in card with a 
new add-in card, close the open slot by inserting 
the metal slot cover into the opened slot. 


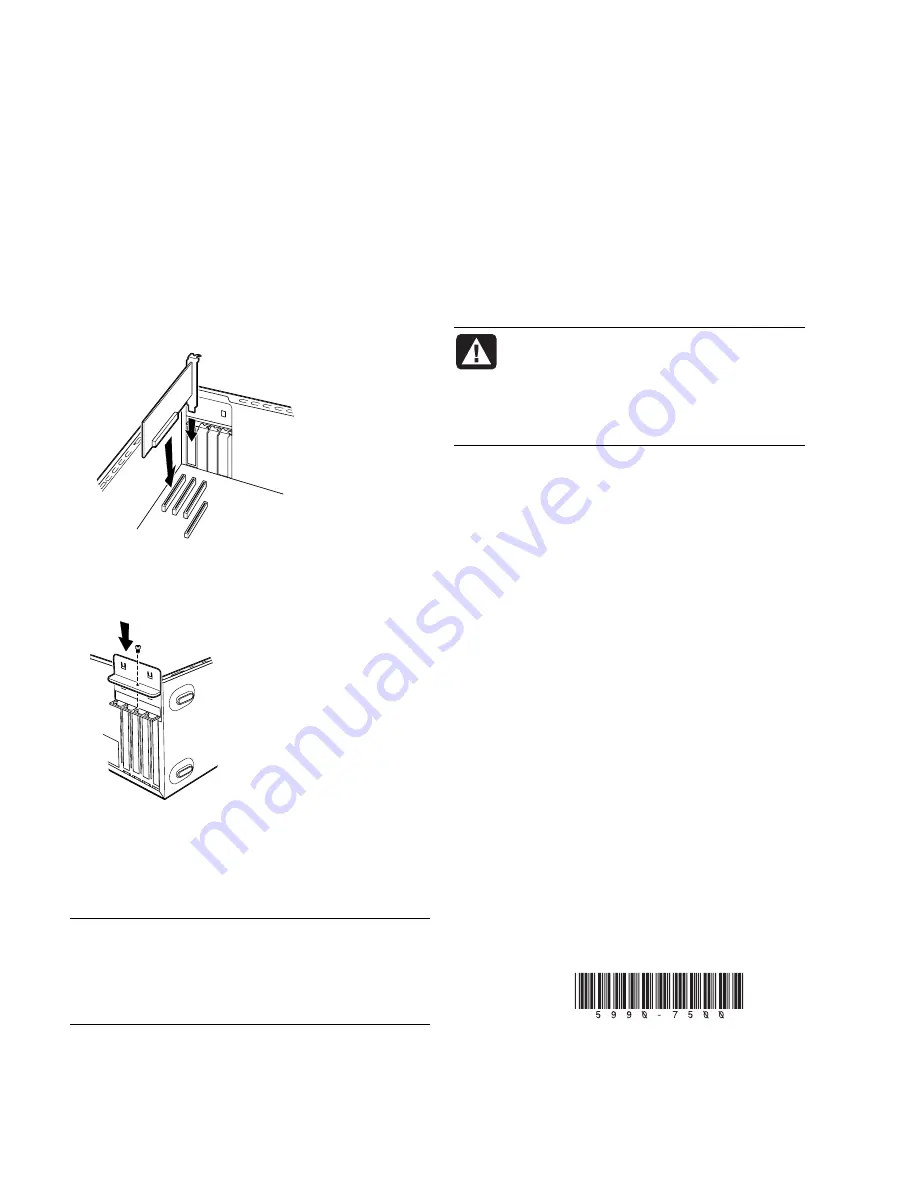
installing an add-in card 

Align the edge of the add-in card with the slot on 
the chassis and gently but firmly press the card 
straight down into the add-in card slot. The 
whole connector should be seated properly in 
the card slot. 


On the back of the PC, replace the bracket cover 
for the add-in card slots, and then install the screw. 


Set the chassis upright. 

Complete the procedures to replace the side panel, 
and close the PC. See “opening and closing the 
pc“ on page 1. 


NOTE:

 If the new card or device isn’t working, read 

through the card manufacturer’s installation 
instructions, and recheck all connections, including 
those to the card, power supply, keyboard, and 
monitor. 

replacing the battery 

A lithium battery on the motherboard provides backup 
power for the PC’s timekeeping capability. The battery 
has an estimated life expectancy of seven years. 

When the battery starts to weaken, the date and time 
may be incorrect. If the battery fails, replace it with a 
CR2032 lithium battery (3 volt, 220mAH rating) or an 
equivalent battery. 


WARNING: There is danger of explosion 
if the battery is incorrectly replaced. 
Replace only with the same, or 
equivalent, type of battery. Discard used 
batteries according to the manufacturer’s 
instructions. 


Complete the procedures to prepare the PC and to 
remove the side panel. See “opening and closing 
the pc“ on page 1. 

Gently lay the PC on its side. 

Remove any cabling, if necessary, to reach the 
battery. 

Remove any memory modules, if necessary, to 
reach the battery. See “adding memory“ on 
page 6. 

To remove the battery, push the latch away from the 
battery and lift the battery from the socket. 

Install the new CR2032 battery in the socket, with 
the positive (+) side facing the latch.  

Replace memory modules or cables you removed. 

Set the chassis upright. 

Complete the procedures to replace the side panel, 
and to close the PC. See “opening and closing the 
pc“ on page 1. 


Printed in 


Содержание Presario SA4000 - Desktop PC

Страница 1: ...Compaq Presario Desktop Products Upgrading and Servicing Guide...

Страница 2: ...5 4010 USA 2003 Hewlett Packard Development Company L P All rights reserved Hewlett Packard is a registered trademark of Hewlett Packard Company in the United States of America and other countries reg...

Страница 3: ...ide panel 2 removing the front panel 2 replacing the front panel 3 locating components inside the PC 3 removing and replacing drives 3 removing a drive 3 replacing or adding a drive 4 adding memory 6...

Страница 4: ...iv Upgrading and Servicing Guide...

Страница 5: ...xamine the PC Compaq recommends that you use an antistatic wrist strap and a conductive foam pad when working on the system WARNING Always disconnect the modem cord from the telephone system and then...

Страница 6: ...anufacturer removing the side panel 1 Remove the side panel by loosening the screw D that secures the panel to the PC chassis 2 Slide the panel back about 1 inch 2 5 cm and then lift it off the unit W...

Страница 7: ...ting components inside the PC for drive type and location CAUTION Back up your personal files on the hard disk drive to an external storage device such as a CD before removing the hard disk drive Fail...

Страница 8: ...rive cables disconnecting the memory card reader drive cable disconnecting the diskette floppy drive cables disconnecting the hard disk drive cables 5 Pull the drive out of the drive bay 6 If you are...

Страница 9: ...align the guide screws with the guide slots 6 Reconnect the power and data cables to your drive as indicated in the following illustrations connecting the optical drive cables NOTE An optical drive m...

Страница 10: ...y the PC on its side 3 Locate the memory sockets on the motherboard CAUTION When handling a memory module be careful not to touch any of the contacts Doing so may damage the module 4 Move any cabling...

Страница 11: ...alling add in cards that draw excessive current The system is designed to provide 2 amps average of 5 V power for each board card in the computer The total 5 V current draw in a fully loaded system on...

Страница 12: ...s timekeeping capability The battery has an estimated life expectancy of seven years When the battery starts to weaken the date and time may be incorrect If the battery fails replace it with a CR2032...

Отзывы: