Comodita RAINBOW AIR 3IN1 S Скачать руководство пользователя страница 6

6

16. Vendoseni pajisjen larg çdo burimi të ngrohjes, siç është furra, 

dhe shmangni  dritën direkte të diellit.

17. Shmangni spërkatjen e drejtpërdrejtë të avullit mbi mobiliet dhe 

pajisjet elektrike.

18. Vendosni pajisjen në temperaturë normale të dhomës. Shmangni 

përdorimin e pajisjes në mjedise të ftohta për të shmangur 

dëmtimin e njësisë. Nëse ka ngrirje brenda, mos e ndizni 


pajisjen derisa akulli të jetë pastruar ose shkrirë.

 MASAT PARAPRAKE TË VEPRIMIT 

1.  Mos e mbushni pajisjen me ujë të nxehtë mbi 45°C, në mënyrë 

që të parandaloni njollosjen dhe shtrembërimin.

2.  Kur temperatura e dhomës të jetë më poshtë se 0°C, largojeni 

ujin nga pajisja. Ngrirja e ujit mund të dëmtojë komponentët.

3.  Mos vendosni metale, kemikale dhe detergjentë brenda 


rezervuarit të ujit.

4.  Mos vendosni vajërat aromatizues brenda në rezervuarin 


e ujit.

5.  Kur ka ujë të tepërt në enën e ujit, mos e lëvizni për të 

shmangur derdhjen e ujit.

6.  Mbajeni pajisjen larg nga mobiljet qe janë të ndjeshme ndaj 

lagështisë dhe pajisjeve elektrike.

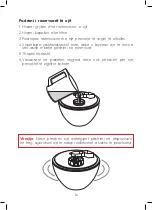
7.  Mos shtoni ujë drejtpërdrejt në enën e ujit. Ujin shtojeni vetëm 

në rezervuarin e ujit.

8.  Kur pajisja nuk do të përdoret për një kohë të gjatë, hiqeni 

nga priza elektrike.

9.  Mos e hiqni ujin nga pajisja, në momentin kur pajisja është në 

funksion ose në rrymë.

10. Kur është e mbushur me ujë plot, pajisja mund të punojë deri 

ne 6 orë pa ndërprerë në shkallën maksimale të rrjedhjes.

Содержание RAINBOW AIR 3IN1 S

Страница 1: ......

Страница 2: ......

Страница 3: ...htatsh m p r vendosjen e pajisjes Udh zimet e mbushjes Udh zimet e p rdorimit Kontrollimi i drit s LED t nat s P rdorimi i shp rndar sit t arom s Kujdesi p r lag shtuesin tuaj t ajrit Specifikacionet...

Страница 4: ...jet r p rve asaj t p rshkruar n k t udh zues mund t anuloj garancin e pajisjes tuaj KARAKTERISTIKAT 1 Lag shtuesi i ajrit sht projektuar posa risht p r t lag shtuar ajrin me avull t ftoht duke p rdoru...

Страница 5: ...esore p r riparim ose rregullim 7 Mos e z vend soni vet kordonin e priz s 8 Mbani l ngjet e d mshme si sht agjenti pastrues larg nga f mij t p r t mos e futur n pajisje gabimisht 9 do modifikim ose ri...

Страница 6: ...om s t jet m posht se 0 C largojeni ujin nga pajisja Ngrirja e ujit mund t d mtoj komponent t 3 Mos vendosni metale kemikale dhe detergjent brenda rezervuarit t ujit 4 Mos vendosni vaj rat aromatizues...

Страница 7: ...7 NJIHUNI ME LAG SHTUESIN TUAJ T AJRIT...

Страница 8: ...osing a suitable location More than 150cm from the ceiling More than 50cm from the wall More than 50cm from the wall More than 50cm from the floor Caution 8 Do not direct the Humidifier vapour flow at...

Страница 9: ...cap and the attached filter It is highly recommended that the filter be replaced after approximately 500 hours of operation 9 1 Hiqeni gryk n e avullit nga rezervuari i ujit 2 Kthejeni rezervuarin e...

Страница 10: ...d the water tank 5 Put the water tank back on the base Secure the nozzle on the water tank 10 4 Mbusheni rezervuarin me uj t past r n temperatur t dhom s 5 Shtr ngojeni kapakun dhe filtrin fshijini pi...

Страница 11: ...until a click is heard the switch is now off The LED light also turns off 11 UDH ZIMET E P RDORIMIT 1 Kthejeni el sin e kontrollit n drejtim t akrepave t or s Treguesi i energjis ndri ohet me ngjyr t...

Страница 12: ...ON OFF 1 Zhvendosni shport n e shp rndarjes s arom s anash Thjesht mbani shport n ngrijeni dhe t rhiqeni 2 Vendoseni mbi sfungjer vajin aromatik t preferuar ose vet m l reni me arom n baz t ujit 3 Z v...

Страница 13: ...inse well with fresh water 5 Dry Thouroughly Oscillator Caring for your Multi Color Cool Mist Humidifier 13 KUJDESI P R RAINBOW AIR Ultrasonic Air Humidifier 3in1 S V rejtje Para se t pastroni pajisje...

Страница 14: ...water tank 2 Remove the filter cap 3 Clean the tank with a diluted vinegar solution 4 Rinse extremely well taking care not to leave any cleaning residue in the tank 5 Dry thouroughly 6 Store in origin...

Страница 15: ...t mjaftuesh m n rezervuar Rimbusheni me uj Sigurohuni q lag shtuesi sht ven dosur n nj sip rfaqe horizontale dhe rezervuari sht instaluar sakt Sigurohuni q el si i ndryshorit t kontrollit t jet i vend...

Страница 16: ...16...

Страница 17: ...Suitable Location Filling Instructions Operating Instructions Controlling the LED Night Light Using the Aroma Diffuser Caring for your Humidifier Technical Specifications Troubleshooting INDEX faqe 1...

Страница 18: ...way other than depicted in this manual may void the warranty of your unit FEATURES 1 The Ultrasonic Humidifier is specifically designed to humidify the air with cold vapour using ultrasonic high frequ...

Страница 19: ...ourself 7 Do not replace the power cord by yourself 8 Keep any harmful liquids such as cleaning agent away from reach of children to avoid entering the unit by mistake 9 Any modification or refitting...

Страница 20: ...isture sensitive furniture and electric appliances 7 Do not add water into the water bowl directly 8 When the unit is not to be used for a long time please unplug from the power point 9 Never pour out...

Страница 21: ...ur flow adjustment knob Power cord Power plug Aroma diffusion sponge Aroma diffusion tray Power indication light Water filter Colour LED lamp Water valve Vapour outlet Water bowl Know your Multi Color...

Страница 22: ...level and to suit the size of the room Choosing a suitable location More than 150cm from the ceiling More than 50cm from the wall More than 50cm from the wall More than 50cm from the floor Caution 8...

Страница 23: ...p and the attached filter It is highly recommended that the filter be replaced after approximately 500 hours of operation 9 1 Remove the vapour nozzle from the water tank 2 Invert the water tank and t...

Страница 24: ...ops around the water tank 5 Put the water tank back on the base Secure the nozzle on the water tank 10 1 Fill the tank with clean water at room temperature 2 Screw the cap and filter wipe off excess w...

Страница 25: ...rol knob counter clockwise until a click is heard the switch is now off The LED light also turns off 11 OPERATING INSTRUCTIONS 1 Turn the main control knob clockwise The power indicator lights up gree...

Страница 26: ...OFF button The LED lights will change as per cycle shown below 1 Remove the Aroma diffusion tray in the rear Simply hold the tray lift and pull out 2 Soak the Aroma diffusion sponge with your favouri...

Страница 27: ...ell with fresh water 5 Dry Thouroughly Oscillator Caring for your Multi Color Cool Mist Humidifier 13 CARING FOR YOUR RAINBOW AIR Ultrasonic Air Humidifier 3in1 S Caution Before caring or cleaning you...

Страница 28: ...tank 1 Remove the nozzle and water tank 2 Remove the filter cap 3 Clean the tank with a diluted vinegar solution 4 Rinse extremely well taking care not to leave any cleaning residue in the tank 5 Dry...

Страница 29: ...tank Refill the water tank Ensure the humidifier is placed on a level horizontal surface and the tank is installed correctly Ensure the variable control knob is on the correct setting Ensure there is...

Страница 30: ......

Страница 31: ......

Страница 32: ...BlueChip Kosovo L L C N n Tereza st n a 50000 Gjakova Republic of Kosovo www comoditahome com...

Отзывы: