background image

INS_NWK1M_NWK2M_QS_REV–   07/7/15   PAGE 3

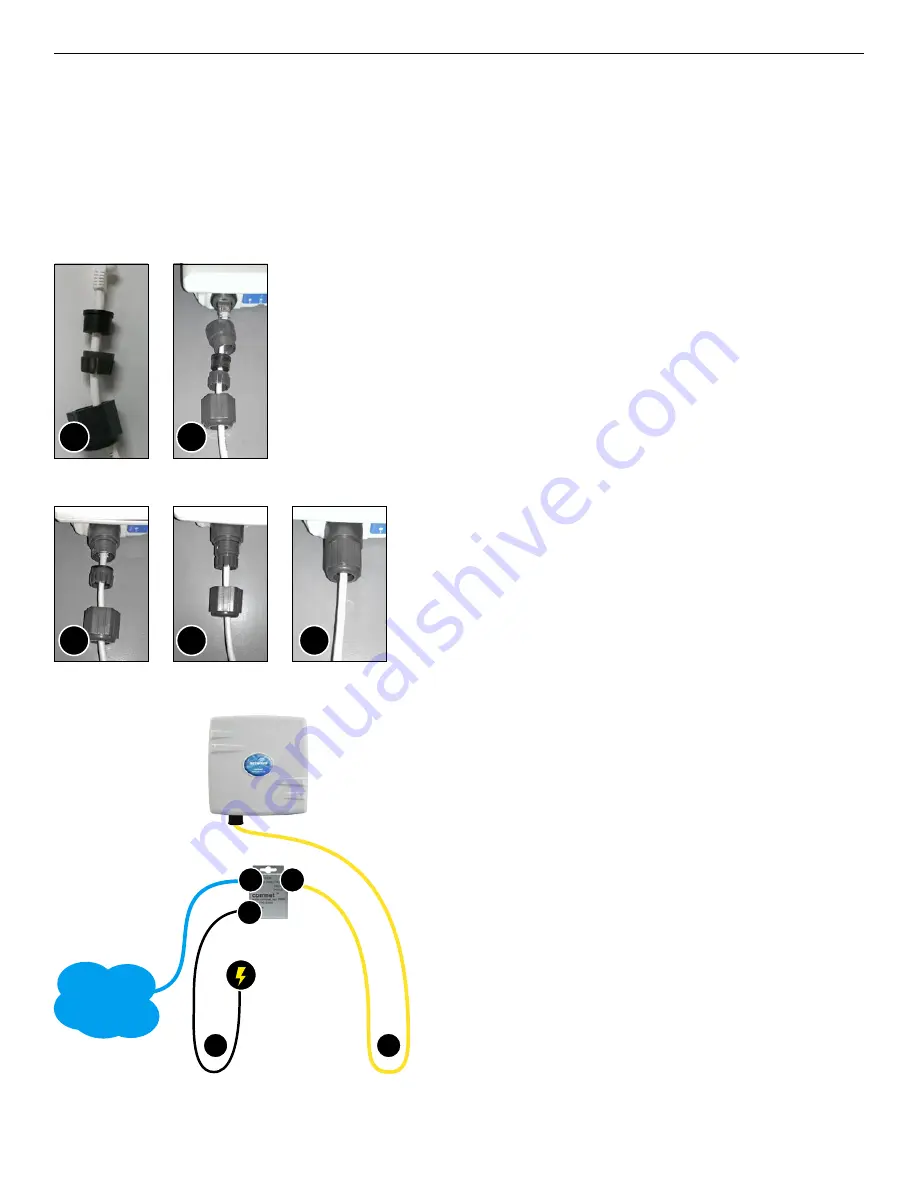
FIGURE 3 – INSTALLATION INSTRUCTIONS

QUICK START USER GUIDE 

NWK(1,2)/M

TECH SUPPORT: 1.888.678.9427

Step 1.

Unpack the mounting hardware from the box. Determine if this will be a pole or wall mount application.

The included Mounting kit is designed to support poles up to 2 in (5.8 cm) in diameter.

Step 3.

Slide the weather proof assembly over the cable so it can be 

screwed into the enclosure gland. Make sure the rubber sealing 

ring is in place as shown in step 3A.

Tighten the weather proof assembly into the enclosure and also 

tighten the cap that squeezes the rubber washer over the Ethernet 

cable as shown.

Step 2.

A.  Route the RJ45 connectorized Ethernet cable through the 

weather tight gland connection as shown at left.  

Note:  The slit rubber washer allows a pre-terminated 

Ethernet cable to be used. 


Once the cable has been routed through the weather 

connection as shown above, push the split rubber gasket 

into place and loosely screw the cap that goes over the 

rubber washer.

B.  Snap the RJ-45 connector in place as shown

A

A

B

B

C

Step 4.

A.   Connect one end of an RJ-45 Ethernet cable to the OUT 

port of the Power Injection Module (PIM) and the other end 

to LAN of the access point. 


Maximum length of the RJ-45 CAT5 cable is 100 meters.* 

B.   Connect the RJ-45 Ethernet cable attached to the PIM to a 

network device, such as to a switch or to the PC you will use 

to configure the access point.

C.   Connect the power adaptor to the main electrical supply 

and the power plug into the socket of the PIM. 


PoE power input: Passive PoE (range 36 to 48 VDC). 

The NWK(1,2)/M can also be powered by a suitable IEEE 

802.3af/at PSE device such as a PoE switch or injector.

D.   A Drip Loop is recommended as additional precaution 

against moisture entering the Access Point housing.

*  Up to 200mW radio. For higher power radio upgrade to higher rating 

power adapter.

A

D

D

B


Ethernet 
Network

C

Содержание NetWave NWK1/M

Страница 1: ...Industrial Multipoint FCC Version Includes NWK1 M_AP and NWK1 M_CL NWK2 M Industrial Multipoint ETSI Version Includes NWK2 M_AP and NWK2 M_CL An easy to read LED array displays unit operational statu...

Страница 2: ...VISUAL CUE INDICATION POWER SOLID GREEN Power is supplied to the unit OFF No power is supplied to the unit or the unit is in reset LAN SOLID GREEN LAN Connected OFF No Connectivity RSSI1 SOLID RED We...

Страница 3: ...le has been routed through the weather connection as shown above push the split rubber gasket into place and loosely screw the cap that goes over the rubber washer B Snap the RJ 45 connector in place...

Страница 4: ...WK1M_NWK2M_QS_REV 07 7 15 PAGE 4 QUICK START USER GUIDE NWK 1 2 M TECH SUPPORT 1 888 678 9427 Included Hardware Vertical Mount in 45 Position Vertical Mount in 45 Position FIGURE 4 POLE MOUNT INSTRUCT...

Страница 5: ...10 x 24 subnet 5 Point the Browser to 192 168 10 100 for the Access Point or 192 168 10 101 for the Client These are the default addresses 6 A login prompt will pop up Enter ID admin Password admin 7...

Страница 6: ...l Strength Signal Strength is based on a number of factors including the output power of the radios antenna gain and the attenuation of the signal as it travels from the transmitter to the receiver Si...

Страница 7: ...admin Web Server Password admin SSID NetWave 1 WPA Pre shared Key 12345678 Channel Frequency AP Auto Channel Spectrum Width 20 40M Long Range Parameters Enabled and defaulted to 1000m NOTE A Reset to...

Страница 8: ...qui est n cessaire pour une communication r ussie Cet appareil est conforme la norme RSS Industrie Canada exempts de licence norme s Son fonctionnement est soumis aux deux conditions suivantes 17 Com...

Страница 9: ...F 44 0 113 253 7462 INFO EUROPE COMNET NET Need Additional Assistance Visit our website http www comnet net or contact Comnet tech support Tel 203 796 5300 Toll free 888 678 9427 Email techsupport co...

Отзывы: