2 - NUMBERING
6 - TROUBLESHOOTING
PROBLEM
SOLUTION
The operating range is reduced
Check to verify the
transmitter is programmed
into your system
Replace the transmitter
batteries
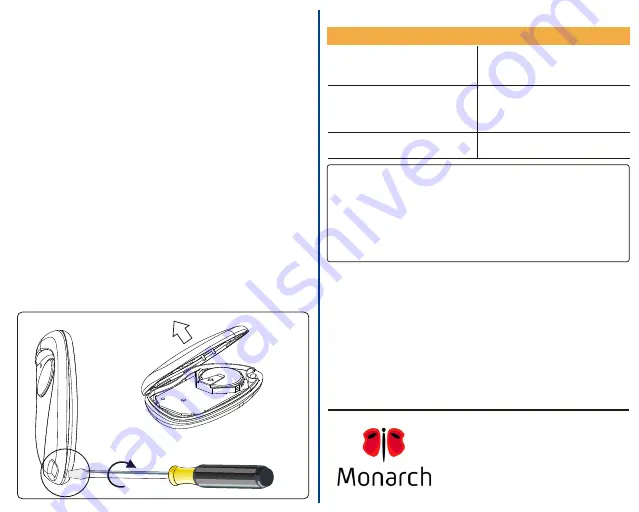
To access the battery open the case with a screwdriver acting on the slot between
the cover and the bottom and remove the bottom, as shown in fig. 3a and 3b.
Slide out the old batteries and replace them with the new ones
[CR2016]
respecting the polarity, with the positive (+) side upward.
NOTE: Please dispose of the batteries properly according to local laws and
regulations.
Test proper battery installation by verifying that the red LED illuminates when
the button is pushed.
5 - BATTERY ACCESS
3 - PROGRAMMING
Each transmitter is manufactured and sold with a different factory-set serial
number .
The transmitter must be programmed into your system memory.
Your own installer or reseller will provide you the necessary instructions for your
system.
Replace the transmitter
batteries
The warranty period of Community Controls 295 transmitters is 60 months,
beginning from the manufacturing date of the transmitter. During this period, if the
product does not operate correctly, due to a defective component, the product
will be repaired or replaced at the sole discretion of Community Controls.
The warranty does not extend to the transmitter case which can be damaged by
conditions outside the control of Community Controls or to battery life.
WARRANTY
Community Controls - Type : 295SEPC1K
FCC ID : SU7295SEPC1K
This device complies with
FCC Rules
Operation is subject to the following two conditions:
(1) This device may not cause harmful interference, and
(2) this device must accept interference received, including
interference that may cause undesired operation.
Part. 15 of the
Notice
Any changes or modification to
equipment not expressly
approved by
could void the manufacturer’s warranty.
Community Controls
Community Controls
The system does not receiver the
transmitter signal.
The transmitter LED is ON
The system does not receiver the
transmitter signal.
The transmitter LED will not light
4 - OPERATION
A - Firmly depress the button until the small red LED illuminates.
B - After the LED has illuminated, release the button.
If the device you are attempting to activate does not respond, repeat steps A and B
or consult section 6 ( Troubleshooting ) of this manual.
Fig. 3a
Fig. 3b
COMMUNITY CONTROLS
2500 South 3850 West, Suite A
Salt Lake City, UT 84120
(800) 284-2837 - (866) 867-3637 Fax
www.communitycontrols.com


