Step 7: Attaching the H350 to the Mounting
Bracket
1. Make sure that the mounting bracket is securely fastened as
described in
Step 6: Attaching the Mounting Bracket to a Wall Outlet
Box
on page 2.
2. If you have bypass cables (usually one or two, if any), make sure that
they are draped across one or both of the two upper hooks on the
mounting bracket.
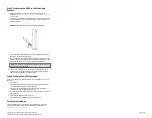
FIGURE 5
Attaching the H350 to the Mounting Bracket
3. Pull the uplink Ethernet cable from your LAN through the outlet box,
and plug it into the back of the H350.
4. The mounting bracket has two lower hooks that fit into slots on the
bottom of the H350. Rest the bottom of the H350 on the lower hooks,
and tilt the H350 until it is up against the mounting bracket.
NOTE:
Any optional bypass cables should slide smoothly into the
slots on the sides of the H350.
5. Use a T10 Torx driver to screw the factory-supplied Torx flat head
machine screws through the H350 screw holes into the threaded
inserts on the sides of the mounting bracket.
Step 8: Testing the H350 Operation
After a short pause to re-establish the Internet connection, you can test
the H350.
1. For using any:
•
Wireless-enabled PC or mobile device, search for and select the
wireless network you previously configured.
•
Wired PC or other device and an Ethernet cable, plug into an
Ethernet port on the bottom of the H350.
2. For connecting the PC or devices, open a browser and navigate to any
public website.
3. Verify that the H350 is working correctly.
Congratulations! Your H350 is active and ready for use.
For More Information
For information on how to configure and manage the AP, refer to the
Ruckus Wireless Indoor Access Point User Guide
, available from
http://
docs.commscope.com/?docs-box
.
Copyright
©
2021 CommScope, Inc. All rights reserved.
Page 3 of 3
Published September 2021, Part Number 800-72899-001 Rev A


