background image

860532050 
Instruction Sheet 


www.commscope.com 


Page 8 of 13 


Step 5 

– Align Ribbonized Fibers and Splice the Connector 

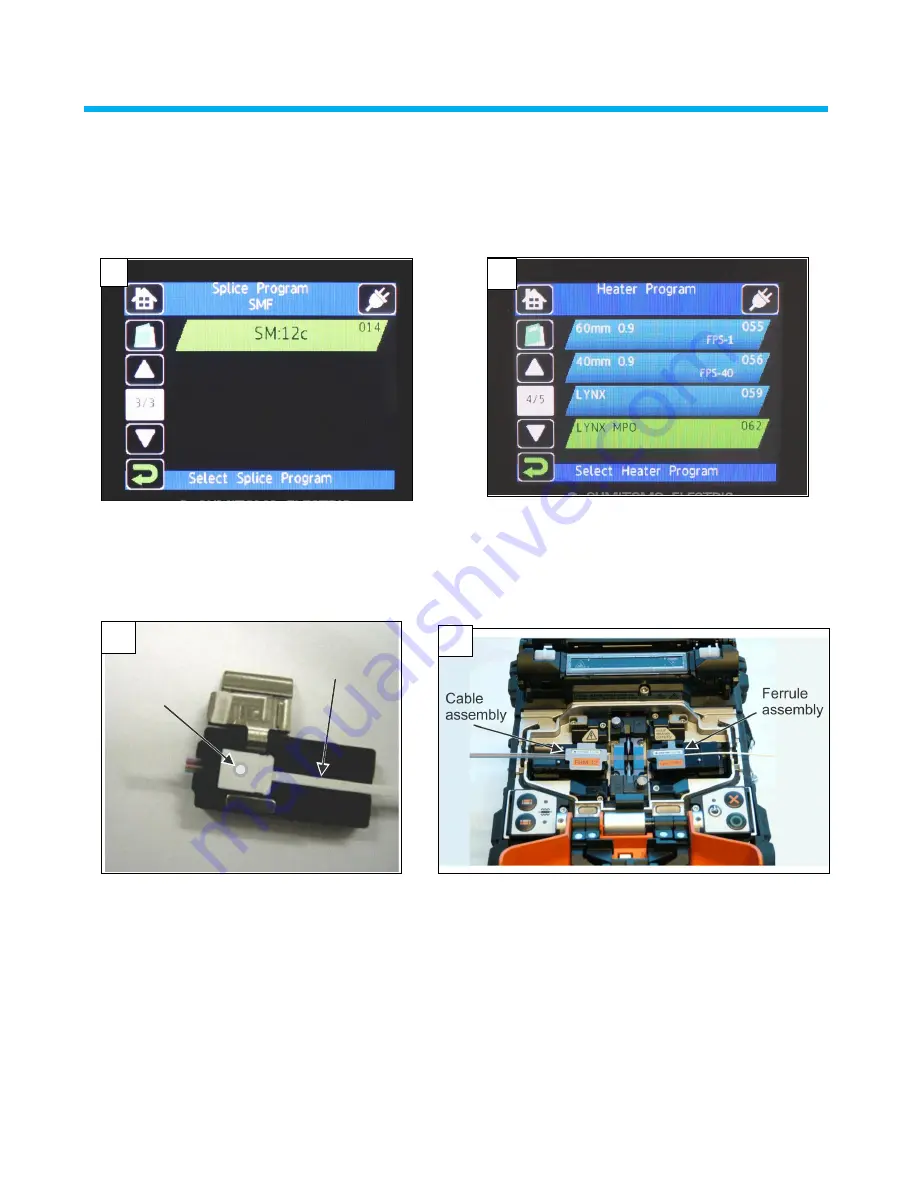
1.  Turn on the mass fusion splicer. Splicer display shows several fiber type options. 

Select the correct fiber type and arc test using proper fibers. 

  Select splice condition of SM12 or MM12, depending on fiber type to be spliced. 

2.  Select the 

“Lynx MPO” Heater Program for heating the protective sleeve.   


3.  Open top door of the splicer. 

Get the ferrule sub-assembly from connector kit and place it into the fiberclip holder with the 

“UP” circle 

showing on top as shown. Close the door on the clip. 

4.  Important:  

Place the fiberclip holder with ferrule assembly in the splicer on the

 right side

.  

Fiberclip holder with ribbonized cable assembly is always placed on the 

left side. 


5.  Confirm correct splice condition (item 1) is selected. Confirm correct heater program (item 2) is selected.   

6.  Close door and splicer automatically aligns the fibers and displays X/Y alignment offset, and machine 

pauses. 

7.  The display tracks splice progress and the alignment result, as shown on the next page. 

Note:

  Estimated loss screen of .00 

shows “near no loss”, a preferred outcome. 

Red estimated loss screen indicates out of tolerance splice and the need to resplice. 

8.  If alignment is acceptable, press the green button on top of mass fusion splicer to begin fusion splice.  

The fiber ends will glow during splicing. 


“UP” circle
must be
visible

Ferrule assembly
with blue fiber
facing down


1. 

3. 

4. 

2. 

Содержание 460143027

Страница 1: ...63949 SFC 12MP 8SP 30 GR SMAPC female green 3mm round 760163956 MFC 12MX 5SP 30 AQ MM OM3 male aqua 3mm round 760163964 MFC 12MP 5SP 30 AQ MM OM3 female aqua 3mm round 760163972 MFC 12MX 6SP 30 BG MM OM1 male beige 3mm round 760163980 MFC 12MP 6SP 30 BG MM OM1 female beige 3mm round Parts List Connector Kit includes Quantity Description 1 Boot furcation tube 1 Spring 1 Ferrule subassembly with cap...

Страница 2: ...nce Within the United States contact your local account representative or technical support at 1 800 344 0223 Outside the United States contact your local account representative or PartnerPRO Network Partner Within the United States report any missing damaged parts or any other issues to CommScope Customer Claims at 1 866 539 2795 or email to claims commscope com Outside the United States contact ...

Страница 3: ...e tested only with the specific provided ribbon fiber strip Perform a new ARC test whenever preparing to splice a different connector type 5 Confirm fiber order orientation of both ends on cable assembly A B prior to starting repairs to facilitate and maintain proper polarity configuration of cable assembly 6 Review and familiarize yourself with the splicer instruction for the safe and proper use ...

Страница 4: ...er and follow the standard color code BOGBSWRBYVRA as shown Standard Color Code Use the platform scale to place jacket mark at scale edge 0 Insert fibers into ribbonizer one at a time using the color guide Maintain fiber color order Clean fibers with lab strength alcohol wipe Note Before proceeding verify the color order and ensure that no fibers are crossed or out of order Inspect fiber order wit...

Страница 5: ...B fiber polarity 1 For Commscope cable assemblies with the connector keys facing up channel 1 on End A of the cable assembly always goes to channel 12 on End B of cable assembly Likewise channel 12 on End A goes to channel 1 on End B of cable assembly 2 This represents method B polarity per TIA 568C3 standards 3 When repairing end A of a female trunk cable assembly the blue fiber should always be ...

Страница 6: ...t orientation of the protection sleeve with steel bar on the bottom 2 Place the fiber cable into the fiberclip holder with 78 1 18 in 20 30mm of the ribbonized fiber protruding as shown Cable Type Gender Blue Fiber Position when placed in splicer Standard Trunks Equipment Cords End A B End A End B Ch Ch Bottom Bottom Bottom Male Male 12 1 Top Top Female Male 12 1 Top Top Female Female 12 1 Bottom ...

Страница 7: ...s closed and firmly pull sliding section of tool away from tool Open doors to remove the stripped cable and fiberclip holder 5 After stripping verify that all the coating has been removed from the fibers If not repeat items 3 and 4 6 Always clean the fibers with lab grade alcohol wipes after stripping and before cleaving Verify that all 12 fibers are present and not broken Stripped coating should ...

Страница 8: ...p holder with ferrule assembly in the splicer on the right side Fiberclip holder with ribbonized cable assembly is always placed on the left side 5 Confirm correct splice condition item 1 is selected Confirm correct heater program item 2 is selected 6 Close door and splicer automatically aligns the fibers and displays X Y alignment offset and machine pauses 7 The display tracks splice progress and...

Страница 9: ...ext item when splice has passed Repeat Steps 1 5 if splice has failed 10 Pick up the sleeve side and allow the sleeve to slide down towards the ferrule making sure that the splice protector is flush against the ferrule 11 Place the assembly into the oven with the metal side of the splice protector facing down 12 When the clamps are closed on the oven the machine will automatically heat The oven wi...

Страница 10: ...tion for male male trunks and opposite for female female trunks Note Refer to polarity method B shown in Table 2 below for orientation configuration options 5 Slide the outer housing over the ferrule and spring and snap onto the end of the rear housing Cable Type Gender End A End B Standard Trunks Equipment Cords End A B Male Male Female Male Female Female EQ Female EQ Male EQ EQ Housing Key Posit...

Страница 11: ...ector to reduce fiber stiffness Place spiral wrap on all 12 fibers as shown midway between the connector and beginning of jacket split 8 a Trim the jacket up to the slotted edge dotted line Do not trim too short The jacket should rest in the slotted area of the rear housing b While holding the strengthening yarn and jacket tightly together evenly distribute the yarn place the jacket into its slot ...

Страница 12: ...ale Trunk Cables Ferrule Ribbon Orientation when placed in Splicer Ribbon Fiber Color Ribbonized fiber Ferrule Stub End A 1 Blue 2 Orange 3 Green 4 Brown 5 Slate 6 White 7 Red 8 Black 9 Yellow 10 Violet 11 Pink 12 Aqua Ribbonized fiber Ferrule Stub End B 1 Aqua 2 Pink 3 Violet 4 Yellow 5 Black 6 Red 7 White 8 Slate 9 Brown 10 Green 11 Orange 12 Blue ...

Страница 13: ...nd Channel Ribbonized fiber Ferrule stub Ferrule window down End A Housing key up 1 Blue 2 Orange 3 Green 4 Brown 5 Slate 6 White 7 Red 8 Black 9 Yellow 10 Violet 11 Pink 12 Aqua Ribbonized fiber Ferrule stub Ferrule window down End B Housing key up 1 Aqua 2 Pink 3 Violet 4 Yellow 5 Black 6 Red 7 White 8 Slate 9 Brown 10 Green 11 Orange 12 Blue When assembled into connector housing channel 1 is al...

Отзывы: