


4
4
www.comfortzoneproducts.com
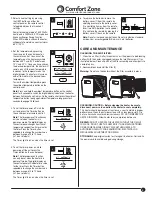
2. Select a heat setting by pressing
the HEAT button on either the
control panel or the remote control
to toggle between the three heat
settings.
Power for heat‑up mode is 1,500 Watts;
heat‑down is 750 Watts. ECO mode is an
Economic Energy Saving Function.
When ECO mode is chosen, the heater
will operate to maintain a constant warm
68°F / 20°C.
3. Set the temperature by pressing
the arrows on the control panel or
the remote control. You can set the
temperature on the heater anywhere
between 50°F and 90°F or between
10°C and 32°C. Once you have chosen
the desired temperature, the heater will
remain on until the room temperature
increases to the temperature on the
digital display. The heater will cycle on
and off to maintain the desired room
temperature.
To view the ambient temperature press
the ambient temperature button on the
control panel.
Note:
Press and hold the ambient temperature button on the control
panel for 5 seconds to switch the digital display indicator on the heater
between Fahrenheit and Celsius. On the remote, short press the ambient
temperature button to engage Ambient Temperature, long press for 3
seconds to engage Child Lock.
4. To set the timer power off, start the
unit and press the Timer button on
the control panel or remote control.
Note:
The timer‑power‑off function can
only be set when the heater is in
power‑on mode. The digital display on
the control panel changes from the set
temperature readout to a time value for
the timer. Press the Timer button
repeatedly to change the number value
between a range of 0 to 12 hours
(in 1‑hour intervals).
The Timer light turns on when the timer is set.
5. To set the timer power on, while
powering off the unit press the
Timer button on the control panel.
Note:
The timer‑power‑on function
can only be set when the heater is in
power‑off mode. The digital display on
the control panel will indicate time value
for the timer. Press the Timer button
repeatedly to change the number value
between a range of 0 to 12 hours
(in 1‑hour intervals).
The Timer light turns on when the timer is set.
2
HIGH
LOW
ECO
OR
3
4
TIMER
5
TIMER
6. To replace the batteries, remove the
battery cover (1) from the remote by
applying pressure to the battery cover
(1) and sliding it away from the remote.
Insert two AAA batteries (not included)
(2) and close the remote by placing the
battery cover (1) back on the remote.
Note:
Do not mix old and new batteries. Do not mix alkaline, standard
(carbon‑zinc), or rechargeable (NiCad, ni‑mh, etc) batteries.
CARE AND MAINTENANCE
CLEANING THE AIR FILITER:
1. Clean the air filter (2) after three months or if it appears to be blocking
airflow. With the heater unplugged, remove the two filter screws (1) as
illustrated below. Clean all parts of the filter assembly and allow parts to
completely dry.
2. Reassemble and reinstall the filter (2).
Warning:
Do not use the heater without the filter assembly in place.
CLEANING: CAUTION –
Before cleaning the heater be sure to
disconnect power cord and allow the heater to cool completely.
This heater should be cleaned at least once a year to maintain proper
performance. Clean the outside surface with a clean damp cloth. Do
not use harsh chemical or abrasive cleaners. DO NOT IMMERSE THE
HEATER IN WATER. Allow heater to dry completely before use.
REPAIR:
DO NOT OPERATE THE HEATER WITHOUT THE GRILLE
IN PLACE. DO NOT USE THE HEATER IF IT HAS MALFUNCTIONED
OR BECOME DAMAGED IN ANY WAY. RETURN HEATER TO
AUTHORIZED FACILITY FOR EXAMINATION, ELECTRICAL OR
MECHANICAL ADJUSTMENT OR REPAIR.
STORAGE:
Keep original carton for storage of the heater. Coil and tie
the power cord to avoid damage during storage.
6
1
2
1
2


