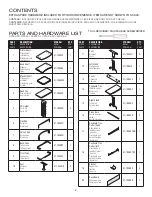
Comfort Products 50-1006 Скачать руководство пользователя страница 3

B

15

12

20

B

H

12

15

H

B x4

REPLACEMENT PARTS

IF YOU ARE MISSING ANY OF THE PARTS ABOVE, OR IF YOU HAVE A DAMAGED PART, PLEASE VISIT WWW.COMFORTPRODUCTS.NET/SUPPORT 
AND REFERENCE THE SUPPLIER # ON THE FRONT OF THIS MANUAL. SIMPLY COMPLETE THE INFORMATION, AND THE PART YOU NEED. THE 
PART WILL NORMALLY SHIP WITHIN 48 HOURS.

3

PARTS AND HARDWARE LIST

/,67('(63,Ë&(6‡3$57(6</,67$'($&&(625,26

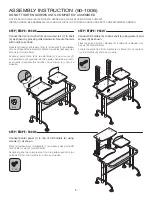
ASSEMBLY INSTRUCTION (50-1006)

DO NOT TIGHTEN SCREWS UNTIL COMPLETELY ASSEMBLED

NOTICE DE MONTAGE (50-1006) NE PAS SERRER LES VIS AVANT LE MONTAGE COMPLET
INSTRUCCIONES DE ENSAMBLAJE (50-1006) NO AJUSTE LOS TORNILLOS HASTA QUE ESTÉ COMPLETAMENTE ARMADO

STEP / ÉTAPE / PASO 1

Screw leg caps (H) into left stand (12) and right stand (15) 
as shown. 

Vissez les embouts de pied (H) dans le pied gauche (12) et le 
pied droit (15) (voir schéma).
Enrosque las tapas de la patas (H) en la pata izquierda (12) y 
pata derecha (15) como se muestra.

STEP / ÉTAPE / PASO 2

Connect the back board (20) to left stand (12) and right 
stand (15) using four screws (B) as shown. 

Fixez le panneau arrière (20) au pied gauche (12) et au pied 
droit (15) à l’aide de quatre vis (B) (voir schéma).
Acople la placa posterior (20) a la pata izquierda (12) y pata 
derecha (15) con cuatro tornillos (B) como se muestra.  

PART

PIÈCE
PARTE

DESCRIPTION

DESCRIPTION
DESCRIPCIÓN

STOCK#

RÉF#
CÓDIGO #

QTY.

QTÉ. 
CANT.

A

Black M6 x 45mm

M6 noire x 45mm
Negro M6 x 45mm

M6X45MMB

8

B

White M6 x 45mm

M6 blanche x 45mm
Blanco M6 x 45mm

M6X45MMW

9

C

M6 x 12mm

M6X12MM

18

D

M6 x 25mm

M6X25MM

4

E

M6

M6NUT

4

PART

PIÈCE
PARTE

DESCRIPTION

DESCRIPTION
DESCRIPCIÓN

STOCK#

RÉF#
CÓDIGO #

QTY.

QTÉ. 
CANT.

F

M4 x 12mm

M4X12MM

4

G

M4 x 20mm

M4X20MM

4

H

Leg Cap

Embout de pied
Tapa de la pata

51-1006LC

4

I

Plate

Plaque
Placa

51-1006PL

2

J

Hex Wrench

Clé hexagonale
Llave hexagonal

HW4

1

Содержание 50-1006

Страница 1: ...TION MANUAL MODEL 50 1006 For fastest service please visit our website at www comfortproducts net support e mail customerservice comfortproducts net Keep your sales receipt as documentation of your ownership CUSTOMER SERVICE SUPPLIER CH 50 1001 ...

Страница 2: ... Rail Rail plat Riel plano 51 1006FR 1 7 Curved Rail Rail incurvé Riel curvo 51 1006CR 1 8 Back Tube Tube arrière Tubo posterior 51 1006BT 1 9 Front Tube Tube avant Tubo frontal 51 1006FT 1 10 Post Montant Poste 51 1006P10 2 PART PIÈCE PARTE DESCRIPTION DESCRIPTION DESCRIPCIÓN STOCK RÉF CÓDIGO QTY QTÉ CANT 11 Post Montant Poste 51 1006P11 3 12 Left Stand Pied gauche Pata izquierda 51 1006LS 1 13 C...

Страница 3: ... droit 15 voir schéma Enrosque las tapas de la patas H en la pata izquierda 12 y pata derecha 15 como se muestra STEP ÉTAPE PASO 2 Connect the back board 20 to left stand 12 and right stand 15 using four screws B as shown Fixez le panneau arrière 20 au pied gauche 12 et au pied droit 15 à l aide de quatre vis B voir schéma Acople la placa posterior 20 a la pata izquierda 12 y pata derecha 15 con c...

Страница 4: ...ro tornillos a como se muestra STEP ÉTAPE PASO 4 Connect the posts 10 to frame using screws B and brackets 19 as shown Then connect the posts 11 to frame using screws B and brackets 19 as shown Fixez les montants 10 au châssis à l aide de vis B et de supports de fixation 19 voir schéma puis fixez les montants 11 au châssis à l aide de vis B et de supports de fixation 19 voir schéma Acople los post...

Страница 5: ...des écrous e voir schéma Acople el carril plano 6 a la estantería 2 y carril curvo 7 a la estantería 3 presionando los carriles hacia abajo como se muestra Asegurar los carriles con la tuerca e como se muestra STEP ÉTAPE PASO 7 Connect CD holders 5 to book shelf 2 using plate I and screws D as shown Fixez les porte CD 5 à l étagère 2 à l aide de la plaque i et des vis D voir schéma Acople los port...

Страница 6: ...tra STEP ÉTAPE PASO 10 Turn desk top 4 upside down Attach keyboard tray rollers 17 and 18 using four C screws as shown Renversez le plan de travail 4 Fixez les glissières de la tablette clavier 17 et 18 à l aide de quatre vis C voir schéma Voltee el escritorio 4 patas arriba acople los carriles para la bandeja de teclado 17 y 18 con cuatro C tornillos como se muestra STEP ÉTAPE PASO 11 Attach desk...

Страница 7: ...serrer les vis Vérifiez les vis tous les 6 mois pour être sûr qu elles sont toujours bien serrées Asegúrese de que todos los tornillos estén bien ajustados PRECAUCIÓN Noajustedemasiadolostornillos reviselostornillos cada 6 meses para asegurarse que continúan ajustados F 14 F F x4 7 DO NOT stand on the desk Do not use the desk as a stepladder NE PAS se mettre debout sur le bureau ne pas utiliser le...

Страница 8: ......

Отзывы: