


IOM - DOUBLE ECCENTRIC BUTTERFLY VALVES
UNIWAT® VF791
©COMEV
AL
V
AL
VE SYSTEMS
Technical Dept. Ref. IOM - DOUBLE ECCENTRIC BUTTERFL
Y V
AL
VES, UNIW
AT® VF791 - Ed.20/07
Comeval V
alve Systems reserves the right to alter any technical data contained in this Manual without prior notice. Regularly updated data on www
.comeval.es
- When being replaced, the disc sealing (18) and the o-rings should always be slightly greased.
- Replacement of the disc sealing:
Due to the double-eccentric bearing the disc sealing can be replaced without disassembly of the disc. Valves up to
DN1000 must either be completely dismantled from the pipeline or at least disconnected from the pipeline on one side to
replace the disc sealing.
• Open the disc (14) until the disc sealing (18) emerges from the body (28).
• Unfasten the retainer screws (30).
• Remove retainer (17) and disc sealing.
• Clean the disc in the sealing zone.
• Check the seat ring in the body (19) for damage or deposits.
• Insert the new disc sealing into the groove of the disc and slightly grease it.
• Insert the hexagonal screws and fasten them crosswise, moderately and uniformly, checking that the disc sealing
is not protuding excessively.
- Replacement of the O-rings in the bearings:
Please consult us.
After any maintenance work please refer to chapters 5 and 6 for installation / commissioning.
Recommended Spare parts:
Use only original spare parts.
It is advisable to keep disc sealings and o-rings as spare parts. Other spare parts available are stem and disc. Type and
number of each spare part to be stored according to many factors: service level, valves quantity, etc. In many cases a
good choice is to keep complete valves as spare part.
8. TROUBLESHOOTING
In the event of malfunction or faulty operating performance, check that the installation and adjustment work has been
carried out and completed in accordance with this Manual.
9. TROUBLESHOOTING TABLE
Technical support always available through our website www.comeval.es or your local distributor.
Page 6
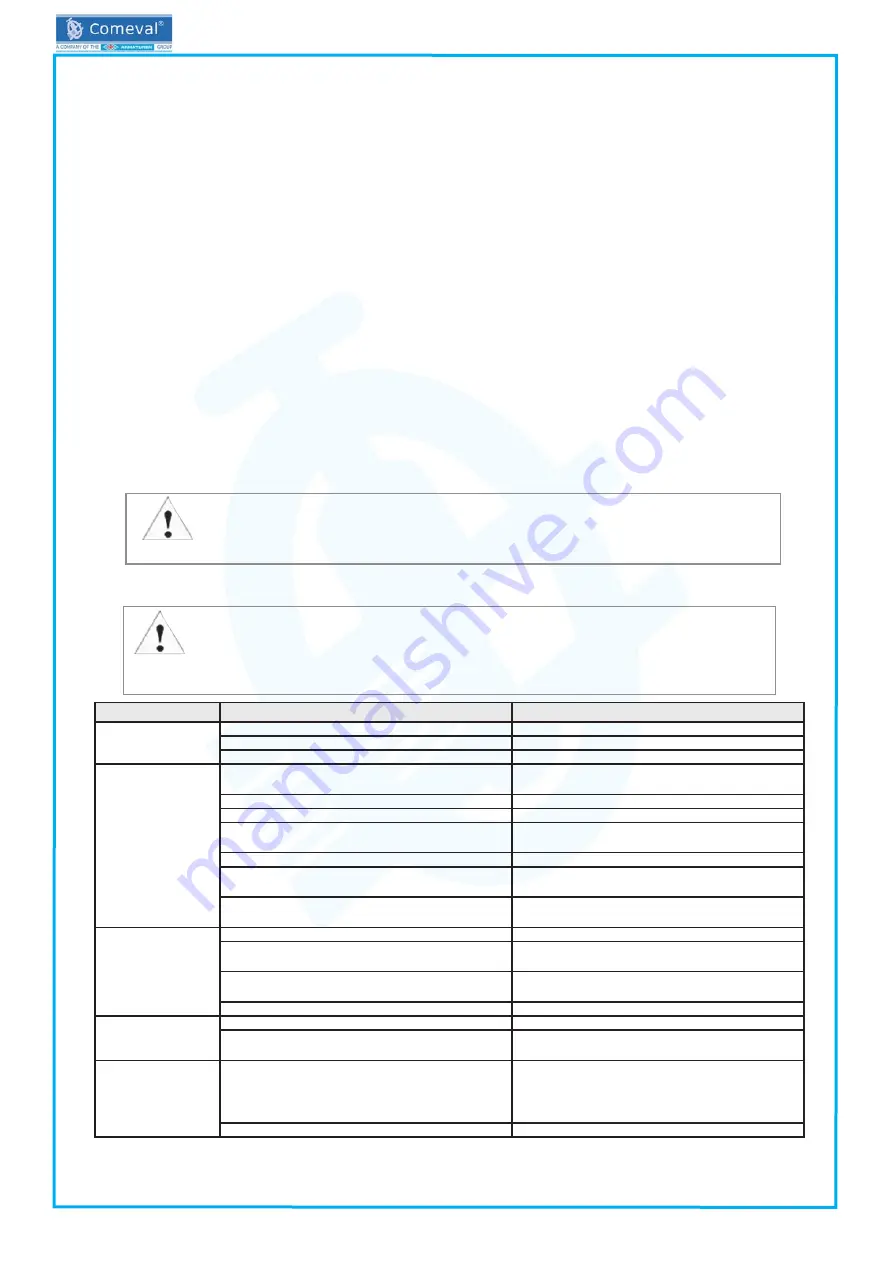
ATTENTION!
- Read the complete Manual before carrying out installation and repair work.
- Read chapter 6 before recommissioning.
FAULT
POSSIBLE CAUSE
CORRECTING MEASURES
No flow
Not enough flow
Flange covers or protection not removed
Clear valve entrances
Valve closed or almost closed
Check valve position
Piping clogged
Check piping system
Valve is impossible
or difficult to open
or close
Service conditions (e.g. medium, temperature)
may be outside the specified limits
Replace the valve
Consult the supplier or manufacturer
Power failure
Check the power supply
Actuator fault
Overhaul the actuator or replace it
Wrong direction of rotation
Turn in the correct direction
(anticlockwise for opening)
Solid matter is blocking the valve disc
Rinse or clean the valve
The parallel key on the stem has sheered off
Determine the cause and
replace the parallel key
Liquid has solidified between the bearings
If possible, flush the bearings and the stem via
the flushing connections
Valve is leaking
at closing
The disc is not completely closed
Put the disc into the closed position
Dirt trapped at closing
Move the disc and flush the valve in the open
position
Mechanical stop of the worm gear at closing
not well adjusted.
Adjust it according to chapter 6
The disc sealing or seat is damaged
Replace the disc sealing or repair the seat
Stem leakage
Stem seals or stem damaged or worn down
Revise and replace if needed
Excessive pressure or temperature,
fluid not compatible
Revise working conditions
Body or flanges
break
Assembly bolts with counterflanges has been
wrongly tightened or counterflanges are
misaligned or with too much gap.
Weight not properly supported
Revise installation and tightening
according to this Manual
Working parameters beyond allowable limits
Replace by suitable valve
ATTENTION!
- It is essential that the safety regulations are observed when identifying faults.


